Our KPN Things platform is your environment to start working on IoT Solutions and manage in a single environment. This guide will help you get started. Before we dive in, make sure you have a subscription and you're able to sign in.
Account types
There are two types of accounts. For both types the authentication is managed in our GRIP platform developed by KPN. This provides you with a secure and easy access to your KPN applications. With the GRIP portal you can manage your subscriptions and perform user management.
KPN Things Freemium
Once you have registered you have a developer account. With this account you get a Freemium project. Here you can test LoRa and M2Mconnectivity for a limited number of devices for free.
Let's get started
Create your Freemium KPN Things Portal account
Follow our step-by-step guide to further set up the environment.
Of course we offer solutions for both small and large applications within the account types below. We do recommend to start testing our Freemium subscription first to get a good idea of the possibilities.
KPN Things Explorer
You can easily upgrade this registration to a paid subscription later. This is our low threshold Explorer solution and suitable for even a couple of devices.
KPN Things Modular
An account will be created for you and you will receive an email to create a password. This is out dynamic solutions based on standard building blocks suitable for high-volumes.
KPN Things or Tailored
Accounts will be created for you and you will receive an email to create a password. This is our customized connectivity focussed solutions suitable for high-volumes.
Want to learn more about our propositions
KPN Things is available in four distinct propositions.
Please check the box when you would like to stay informed. This is not mandatory
Click on Register to create your account
If you intend to upgrade your account later, it is advised to enter the company name correctly and use your business email address. This way you have an account that can be upgraded later with the same data.
3
Create a password
After registration you receive an activation E-mail. This may take some time. Click the Set your password now link in the email and create a password.
You will recieve a confirmation that the password change is succesful.
4
Log in to KPN Things
As soon as you created your password you will be forwarded to the KPN Things portal.
In some cases you land in the KPN Developer Portal or in the MijnKPN Zakelijk portal. In this case you can go to the KPN Things Portal by clicking on the KPN Things icon.
5
Ready to start
You are now ready to set up your solution and go to the next step.
We would like to advice you to start testing using our free Device Simulator app. This way you know for sure that you have configured the portal correctly.
You know how to start and want to use an actual device? Perhaps one of the explanation pages about some of the most used test devices will be useful to you.
We are happy to help you on your way as best as possible. Nothing is more fun than seeing a visible result in your account quick. Follow our tutorials to get of to a good start.
Technical overview
The KPN Things Platform is the bridge between IoT Devices and IoT Applications. It offers a unified way of connecting Devices at the one side, and applications at the other side, making Devices and applications completely interchangeable in every IoT solution that uses KPN Things.
Solid line = IoT data. Dashed line = configuration/metadata
Device integration
Devices can communicate with the platform using one of our networks, LoRa or M2M (2G/3G/4G/LTE-M), or a Device using another network can get its data to and from KPN Things over the Internet.
Communication from your Device is called uplink communication. When data or instructions are sent to your Device, it is called downlink communication. The communication within KPN Things Platform uses the SenML data protocol. Devices using other languages can be translated from and to SenML using decoders and encoders.
Application integration
KPN Things will connect to your application through a dedicated connection layer. To connect your application to KPN Things you can use one of the available Destination types. We support connecting plain HTTPS endpoints to KPN Things, but if you are developing in Microsoft Azure, you can connect directly to the Azure Event Hub.
The Destination types that support 'management' connect on a platform level and can also manage objects in the application. The Cumulocity destination for instance will create Device objects in the Cumulocity tenant for each Device that KPN Things sends data of.
KPN Things Portal
The KPN Things Portal is the web application through which you can manage and monitor almost all parts of the KPN Things solutions. You can manage each part of the KPN Things solution, from Device to Destination, to bring your IoT data from the real world to the digital world. You are also able to use KPN Things API's directly to manage your IoT solutions.
The KPN Things Portal is the visual interface with which you configure your solutions on the KPN Things Data Management platform.
*) Customer management is only available when the add-on is purchased.
IoT solution in KPN Things Portal
To manage your IoT solution you use Flows and in a Flow you link Devices, configure Data Processing and set up Destinations together. See how these components relate to each other in the Management Data model. Since network configuration, or Connectivity, is part of the Device in KPN Things, a Flow expresses the complete way how IoT data should be received, processed and forwarded, from the Device to the Destination and vice versa.
Management data model
Explaining the data model of the platform.
Green bordered blocks are objects provided to you.
Green filled blocks are objects you can create and manage.
Grey bordered blocks are objects globally managed by the system.
Customer
If you have an account on KPN Things Data Management, it belongs to a Customer account. All main objects in the KPN Things Data Management belong to a Customer: Projects, Devices, Destination and Network subscriptions.
Each Project defines a solution you buy or build in KPN Things. Learn more about Projects.
Flow
With a Flow you link one or more devices to one or more plugs. So, if data is received from a device in a device group, its data will be forwarded to the plugs that are in the same device group.
A project has one or multiple activated decoders and encoders. These decoders prescribe which decoders should be used when data is received by a device that is in a device group that belongs to this project. Learn more about Flows.
Device
A Device represents a single physical device that can send data to the platform. When creating a device you tell the system the device specification it belongs to.
A Device specification has one or multiple supported network types. For all our supported device types, go to Devices.
For a device, you can create a Network info for each supported network type of the given device specification.
Destination
A Destination allows you to forward the data from your devices to an external system. For detailed information go to Destinations.
Uplink communication
When data is sent from device to KPN Things
KPN Things Data Management is a data processing platform that enables you to connect all your KPN Things devices to all supported destinations through one standard way of data processing. This principle is visualized in the diagram below:
KPN Things Data Management supports multiple forms of connectivity to receive data from devices. When you have a KPN Things device it is already configured to work with KPN Things Data Management.
During the optional decoding phase the device specific data protocol is transformed to the universal language of SenML. This is called decoding. Decoding for KPN Things devices and custom devices that use the KPN Things client libraries is taken care of automatically. Therefor there is automatic compatibility with the enrichment phase.
All downlink communication is requested on and managed by the Actuator API. Optionally a Destination can request and manage downlink communication as well. See Destination types to learn which destinations can support downlink communication.
After a downlink is requested on the Actuator API it is encoded. Meaning the downlink is translated to a message the device will understand. After encoding the downlink is send over the selected network to your device.
The network (and the device) will report feedback about the delivery of the downlink to the Actuator API. This information can be retrieved by the application, or the Things Connector fetches this information into your system.
Actuator API
Using the KPN Things Portal, you can request downlinks, and check their progress.
Since December 2020 it is also possible to directly call the Actuator API. Head on over to the API access documentation for more information!
Encoder
Using our encoders the downlink request is translated to a device specific message. All available encoders are listed on the Supported devices page.
Network support
Currently the following networks are supported for downlink communication:
LoRa downlink
HTTP response downlink for M2M devices
HTTP response downlink for Internet-connected devices
One of the main use cases in the Internet of Things is tracking of assets. Therefore KPN Things has location data at the core of its design, especially if you take into account the wide variety of tracking hardware we sell.
We consider two different types of determining the location of your Device:
Localization: really determining the absolute location of your Device on the world.
Detection: detecting the presence of your Device with an anchor in the world which has a known location. With this you can safely say your Device is close to the anchor.
Localization
Using multiple measurements in a single domain to try to approximate the location of the device.
The following measurement values are outputted by KPN Things:
latitude
longitude
radius (if available)
source
GPS
The device determines location using GPS. An implementation works for a given device and decoder.
Device: Should have a GPS module and send GPS location.
Decoder: A decoder for each device type that sends GPS data (unless a Things protocol is used)
LoRa Geolocation
The LoRa network determines the approximate location of the device using three or more fine timestamps calculated by the gateways. An implementation works for all LoRa devices.
Network: Should be KPN LoRa with a geo-enabled connectivity plan
Decoder: LoRa Geolocation decoder should be enabled.
Wifi localization
There should be WiFi infrastructure, dense enough for a device to pick up multiple access points. A device should scan for available WiFi access points and send their MAC-address and received signal strength to Things DM. Things DM should then decode the payload whereafter an external service can be called to resolve the measurements to a latitude and longitude.
Device: Device should be able to scan for WiFi access points
Decoder: A decoder for each device type that scans for WiFi access points (unless a Things protocol is used)
Processing: A WiFi Localization processor should translate incoming WiFi MAC+RSSI measurements to a latitude, longitude and radius using an external service.
Detection
Trying to detect another identifiable object with a known location and using the location of that object as approximate location of the device.
detectedBeacon
source
LoRa On Premises Gateway detection
The LoRa network forwards the identifier of the best receiving gateway. Using the user-administrated location of this gateway the general location of the device is determined.
Network: Should be KPN LoRa.
Decoder: Metadata embedded in the DevEUI_uplink message from Thingpark should be accepted as information to be processed in Things DM.
Processing: One LoRa Metadata decoder for location detection using LoRa Gateway ID
Bluetooth beaconing
There should be managed infrastructure of Bluetooth beacons that transmit their identifier in a known manner. The locations of these beacons should be administrated in an (out-of-scope) application. There should be devices being able to detect the beacon and send the beacon identifier to Things.
Device: There should be a beacon device transmitting a Bluetooth beacon.
There should be another device picking up the beacon and sending its identifier to Things.
Decoder: A decoder for each device type that sends a bluetooth beacon ID (unless a Things protocol is used)
Processing: trancelate beacon to coordinates.
Accounts and projects
Each company has a Customer Account. You can create multiple users within this Customer Account.
Projects describe your commercial plan and available features. One Customer Account can have multiple projects.
Each Customer Account has at least one User and at least one Project
Manage your customers
Upon request we can create a 'Reseller account' account for you, so that you can manage IoT solutions for your customers. Learn more about Customer management
Costs overview and contract
Users with an Explorer or Modular contract can view their contract and costs per billing cycle in the KPN Things Portal. To view the costs and contract, enable access by assigning the Finance Read-only role to your users in GRIP. See Roles and Access Levels on the Customer accounts & users page.
To see an overview of the costs per billing cycle, click on your Customer name in the menu on the left. The Account card shows an item called Costs overview, if at least one of your projects has an Explorer or Modular contract.
Costs overview
Click on the item Costs overview to navigate to the Costs Overview page. This page shows the costs that will appear on your invoices, presented in both a table and a chart. The costs are categorized by type; recurring costs, usage-based costs and one time costs (such as hardware). Any applicable discounts are already subtracted from the displayed amounts.
Costs details
Click on a row in the Costs table or on one of the bars in the chart to navigate to the Cost Details page for that billing cycle.
Under Base details information about the billing cycle, the rating period and the contract is shown. The items and discounts are shown under Items. The costs for the current month are a forecast of the upcoming invoice and are updated periodically throughout the billing cycle. Please not that the actual invoice may include additional costs and/or discounts that are not visible on this page. You can find all your previous invoices in MijnKPN Zakelijk.
The Previous and Next buttons above the card on the right allow you to navigate to the previous or next billing cycle.
Contract
To view your contract, go to the Project Overview page. To do this, click on the company name in the menu and then on the desired (Explorer of Modular) project. There you will see an item with the name of the contract.
Contract details
Click on the contract line to navigate to the Contract Details. Under Base details information about the contract, contract type and the activation date is shown.
Under Implementation, the project to which the contract is linked is shown. Items and discounts are shown per charge type, which can be recurring, one time or usage. These items are then grouped per product family. The regular price of each item is shown in the Unit price column of each row with a bold item name. If applicable, optional tiered discounts are shown below the corresponding row. The actual discount depends on the quantity, with the applicable range shown in the From and To columns . These columns are only visible if the contract includes at least one item with tiered discounts.
Two Factor Authentication
Enhance the security of your KPN Services account
All KPN services use the GRIP authentication solution. As of 16 April two-factorauthentication (2FA) is enabled for all Freemium and Explorer users. For other customers, this will be enabled as the default at a later stage; however, they can already activate it themselves. On this page, you can read how to manage the settings for two-factor authentication. Changes made to authentication settings will apply to all users.
How to manage 2FA
These settings can be adjusted by an admin user in the GRIP portal. Go to the GRIP portal or go in the Things Portal to the Organization tab, the Users page and click 'Edit roles':
Go to Directories in the menu
Select the GRIP directory
Open the Authentication tab
You are now in the Authentication settings of your GRIP environment.
Standard setting (for Freemium and Explorer)
Scroll down in the Authentication menu to find the Authentication Level settings.
The Required Authentication Level score determines the points you need to reach before you can log in successfully. The standard setting is 30 points.
Credentials (username/password) provide 20 points. Additionally, 10 (extra) points can be obtained with verification via SMS or Email.
The verification method Passkey provides the user with 30 points,once the Passkey has been created.
Activate two-factor authentication (for other customers)
After you logged in to the GRIP portal and followed the steps as mentioned at How to manage 2FA, scroll down in the Authentication menu to find the Authentication Level settings.
Adjust the settings for the Required Authentication Level and set the Authentication points for SMS and Email.
The settings as shown above are the best practice for two-factor authentication: combining SMS or Email with Credentials creates the required score for a successful login.
Two Factor login
The login interface for all users has been updated. After filling in your credentials (username and password) you can choose your preferred option to log in successfully.
If you choose verification via SMS, it is important that a mobile phone number is set in the user account. Please check (and update, if necessary) this in the account of the relevant user via Users in the GRIP portal.
From the Things Portal, the user can check (and update) this themselves via: Profile (top right) → My KPN user details → Personal information.
APIs
This API allows you to programmatically manage your IoT solutions on the KPN Things platform, including projects, devices, flows and downlinks.
Important Update
The fully supported API is under development and will be extended in the coming weeks and months.
The previous beta API is now deprecated. While it remains operational for the time being, we recommend transitioning to the new API as soon as possible to take advantage of new features, improved performance, and long-term support.
Getting Started
To start using the API, you will need to:
Obtain an access token to authenticate requests.
Learn how to navigate error handling, pagination, filtering and sorting to efficiently retrieve data.
The SSL server certificates of KPN Things and GRIP are signed by Sectigo and Certsign respectively.
Both certificate providers are trusted by default by most operating systems. If required for your security implementation, all certificate files of the chain can be downloaded here:
Manage your IoT devices and the connectivity of your IoT solutions in the Things Manager
The Things Manager includes the following menu items
Projects
Select the project you want to work to show only the information relevant to that project
IoT Devices
Add and configure new devices, monitor device status, manage device settings, process and interpret data from devices
Connectivity
Manage and control your connectivity for your IoT solutions across all connectivity options
Processing
Select the data processing options for your data flow and organize your decoders and encoders
Destinations
Connect your IoT data to the location where you want to use it using our destinations options
Activity
Track the status and progress of your activities and verify that everything has been processed correctly
Projects
Manage your projects
When you open Things Manager, you’ll start with an overview of your projects.
The first step is to select the project you want to work with.
We’ll show you how this works
Project overview
Once you select the desired project, the Project Picker field will automatically display the project name (see image below).
You are now on the Project Overview page. Here you can view everything included in this project, including the contract linked to it.
Contract
To view the contract, first enable access by assigning the Finance Read-only role to your users in GRIP.
Need help managing your users in GRIP? Go to User Management.
For now, this option is only available for Explorer and Modular contracts. This feature is currently not available for customers with a Tailored contract.
Contract details
You are now on the Contract Details page.
This page is divided into several sections. First, you’ll see Base Details. This section shows key information about the contract, including the contract type and activation date.
Under Implementation, you’ll see the project linked to the contract.
Next, you’ll find the different items included in the contract. Items and discounts are shown by charge type: recurring, one-time, or usage. These items are grouped by product family. The regular price for each item appears in the Unit Price column next to the bold item name.
If applicable, optional tiered discounts are listed below the corresponding row. The actual discount depends on the quantity, with the applicable range shown in the From and To columns. These columns only appear if the contract includes at least one item with tiered discounts.
Device Data
Can't find a tab called "Device graph"?
It shows up automatically if keeping Device data history has been turned on in your Customer settings. You can also contact support or create a ticket via 'mijnkpnzakelijk' if you have any questions.
How to read the graph
If data history is enabled for your account and device type, you can find a graph of the configured metrics on the Data graph tab of your devices details page. If available, two metrics can be selected to show 2 graphs simultaneously.
The "Zoom" button can be used to focus more on the range of the metric values. The "Table View" button gives access to the underlying data of the graph:
The displayed data can be filtered, sorted, and exported according to your needs, just like all other data tables in KPN Things.
The data-graph is configured for most device types to show battery related characteristics, like batteryVoltage and batteryLevel.
Typical Battery Voltage levels behavior
In the current portfolio KPN uses 2 types non rechargeable batteries, 3.0 Volt and 3.6Volt.
There is 1 type rechargeable battery, the 3.7 Volt.
Non rechargeable batteries 3.0V and 3.6V
Both the 3.0 and 3.6 type battery will be around the voltage of 3.0V or 3.6 Volt for a long time during their lifespan.
The course has a stable behaviour during the discharge process.
Slight fluctuations in voltage are caused by changes in the internal impedance of the battery which arise when the battery is in rest and becomes active when transmitting data and the power consumption by sensor readings. The ambient temperature is also a factor of importance in these fluctuations.
In the final phase of the battery life, the fluctuations to lower values will be more severe because the battery has more difficulty recovering from the passive to active state when the internal impedance of the battery is increasing.
In the final phase also the stable character will disappear and once the decline has started, it will proceed relatively faster.
How long a device will be able to work on a battery at the end of its lifespan depends on the number and current use of messages and sensor readings initiated by the device per day.
And here too, the ambient temperature is an important factor.
Rechargeable LiPo
The rechargeable battery has a voltage range from 3.7 Volts to fully charged around 4.2 Volts.
During consumption, the voltage will decrease and with this rechargeable type the degree of discharge is also influenced by the load and the ambient temperature.
A rechargeable battery has a slightly greater drop in voltage in the first phase of the discharge process and more as the battery reaches the end of its lifespan. Between those two phases the drop will be gradual.
If the battery reaches a voltage below 3.6 Volts, it is advisable to charge the battery to ensure proper functioning of the device.
Flows tab
The Flows tab provides a visual and interactive overview of the complete data flow of your device. This view is designed to give you immediate insight into how data from your IoT device is processed and routed. You find this tab on the Device & Connectivity detail page.
What you see in the Flows tab
The schematic overview shows the following components of the flow:
Device: your IoT device sending data
Decoders: Convert the raw payload from the device into readable data
Encoders: Translate the data into a specific format for the Destination
Destinations: The endpoints where the data is sent, such as a webhook, MQTT broker, or cloud platform
The components are visually connected, allowing you to see at a glance how the flow is structured and if/how each element is linked.
Interactive editing
The Flows tab is not just a visual representation, it is also an editable interface. You can:
Enable or disable components using toggle switches
Edit components by clicking on the link, which takes you directly to the configuration page
Remove a link, for example the Destination, by clicking the 'X' in the link
Error detection and warnings
If something goes wrong in the flow the affected component will be highlighted in orange. The visual cue helps you quickly identify where the issue lies. Clicking in the highlighted component (i) provides more details about the problem and suggestions how to fix it. The links in the highlighted component brings you to the configuration page, so you can fix it right away.
Examples of possible issues are:
A required decoder is disabled or missing
A destination is missing or misconfigured
There's an incompatability between components
Connectivity
Manage and control your connectivity for your IoT solutions
The Connectivity page gives you a clear overview of all your connections. Here, you gain insight into their status and settings. We distinguish between LoRa and M2M connectivity.
Connectivity menu
Show all or narrow down
At the top left you see the project picker. Leave the project picker empty and the side menu allows you to work accross all your projects
Pick a project and both the menu and the data will narrow down to just that specific project, just like the filters you can use in your tables
To open all connectivity items click one of the seperate tables for M2M and LoRa connectivity without selecting a project first.
Select connectivity overview
Open the connectivity view
Once you’ve selected a project, you can choose the connectivity overview in the project’s detail view
You can also use the side menu to open the same view
Select connectivity view
View options and filters
Below the table we show.
number of ICCIDs shown per page
total number of ICCID's
current page and total number of pages
View details
Use the filter options in the top-right corner to refine your overview.
Save your filter after making changes, you can store up to 10 different layouts
Expand the table to full screen, then click the ie to return to the standard view
Open the view options menu
Open the columns and filters editor for advanced options to customize your view
You can always return to the default setting by clicking Back to main view
Export your current overview as a CSV file based on the selected layout
Export your current overview as an Excel file based on the selected layout
Filter menu
In the view options menu under the icon, you’ll find tools to tailor the view to your needs.
Open the columns selector
Click an item and hold the left mouse button to drag it to your preferred position
Click a header and hold the left mouse button to drag it to your preferred position
Click on the check boxes to show or hide an item
Columns selector
It is possible to filter on multiple variables to create a cross-section of the data. The filters applied to the overview are shown at the top in light blue boxes.
Open the filter selector
Click an item and select the desired check boxes, or enter part of the value to search
Click the icon at the top of the overview or by using Reset in the filter selector
Click the icon to clear filters to clear all filters
Click Apply to activate a filter or refresh it after making changes
Filter selector
Don’t forget to save your created overviews and filters using the icon, so you can easily reuse them later.
Want to learn everything about using tables in the Things Portal? Watch the instruction video under tables for more details.
Manage connectivity
When you choose the connectivity variant, you’ll see an overview of connections, based on whether you selected a specific project or all connectivity.
Things Manager includes the following menu items
M2M and eSIM connectivity configuration
Learn more about managing your M2M and eSIM connectivity configuration
LoRa connectivity configuration
Learn more about managing your LoRaconnectivity configuration
LoRa connectivity configuration
Change your connectivity profile
The LoRa Connectivity configuration page gives you the opportunity to choose the connectivity profile that best suits your application.
The Devices overview provide you with a list of all devices als the connectivity used.
Click on Devices to show the device overview on the Things Manager tab
Search for a device Name of DevEUI to find the device and click the icon to open the Device and Connectivity details
Or click on the icon to open the Device and Connectivity directly in your device overview list
Devices overview
Click on the Connectivy Plan name to go to the LoRa Connectivity configuration section
Or open the LoRa tab and scroll down to the LoRa Connectivity configuration section
Configuration section
Click Edit LoRa Connectivity configuration
The page show an overview of the current connecivity settings for this device
Want to learn more about the different settings how they work then click the link to go to the documentationabout LoRa connectivity configuration
LoRa Connectivity configuration
Edit configuration
The connectivity plan can be updated here, by selecting the Connectivity plan selection box a new dialog opens In this dialog all available connectivity plans are shown, it shows per connectivity plan if it includes geolocation.
1
Configure Connectivity plan
Click on the Connectivity plan selector
2
Select Connectivity plan
Select the preferred connectivity plan
3
Change the profile and motion indicator
The device profile and motion indicator of a LoRa device can also be updated
If the device profile is changed the motion indicator is automatically updated, but it can be changed if required afterwards.
4
Save the settings
Select Save to apply the change. The connectivity plan of the LoRa device is now updated.
Of course you can also click Cancel to keep your current setting.
Device Types & Decoders
Learn how to create custom device types, write payload decoders, and activate them within your data flows.
If your IoT devices are not supported by KPN Things out of the box, you can easily integrate them by defining a custom Device Type and creating a Decoder to parse their incoming payloads.
Step 1: Manage Custom Device Types
Create a New Device Type
From the Things Creator menu, click All Device Types.
Click Add new Device Type.
Fill in the required details, such as Name, Description, and any specific properties.
Click Add Device Type to save.
Once created, this custom device type will immediately become available in the Things Manager when adding new devices to your projects.
Edit or Delete a Device Type
If you need to make changes, navigate to All Device Types, select the device type from the list, and click Edit or Delete on its details page.
Step 2: Create and Test a Decoder
Decoders translate raw, device-specific payload data into a structured format. You can create multiple decoders for a single device type.
You can only create decoders for your own custom device types. Ensure you have completed Step 1 before proceeding.
Create a New Decoder
From the Things Creator menu, click All Decoders.
Click Add new Decoder.
Select your custom device type from the drop-down menu.
Enter a Name and Description for the decoder, then click Add Decoder.
Write and Test the Decoder Script
On the decoder details page, locate the Script section and click Create.
Write your JavaScript parsing logic in the provided editor.
To test your script, use the built-in test payload section. You can use the provided sample payloads or paste your own raw device payload.
Click Run script with test payload to review the output and logs.
Once your script is validating data correctly, click Save.
To update a script, open the decoder's details page and click Edit. Make your adjustments and click Save. If you wish to remove the script entirely, click Delete within the edit dialog.
Step 3: Activate the Decoder in Your Flow
After creating your device type and writing its decoder, you must activate the decoder within your project's data flow using the Things Manager application.
Open the Things Manager and navigate to your project.
Select the specific Flow where your custom devices are active.
Click on Data Processing.
Locate your custom device type in the list and toggle on the decoder you wish to use.
Tip: If you realize you need a new decoder while configuring your flow, you can click Add new Decoder directly from this screen to jump back into Things Creator.
Organization
On the Organization page, you’ll find all your company information, a cost overview details and user settings.
My Organization
Organization details
On this page, you’ll find an overview of the company details linked to your account and the number of existing user profiles. Additionally, you can navigate from here to the Costs Overview to gain insight into expenses per billing cycle (if you have the necessary permissions).
Costs overview
Users with an Explorer or Modular contract can view their costs per billing cycle in the KPN Things Portal. To view the costs overview, enable access by assigning the Finance Read-only role to your users in GRIP. If you need help with how manage your users, check the next page.
The Organization details card shows an item called Costs overview (as shown in the image above), if at least one of your projects has an Explorer or Modular contract.
Costs overview
Click on the item Costs overview to navigate to the Costs Overview page. This page shows the costs that will appear on your invoices, presented in both a table and a chart. The costs are categorized by type; recurring costs, usage-based costs and one time costs (such as hardware). Any applicable discounts are already subtracted from the displayed amounts.
Costs details
Click on a row in the Costs table or on one of the bars in the chart to navigate to the Cost Details page for that billing cycle.
Under Base details information about the billing cycle, the rating period and the contract is shown. The items and discounts are shown under Items. The costs for the current month are a forecast of the upcoming invoice and are updated periodically throughout the billing cycle. Please not that the actual invoice may include additional costs and/or discounts that are not visible on this page. You can find all your previous invoices in MijnKPN Zakelijk.
The Previous and Next buttons above the card on the right allow you to navigate to the previous or next billing cycle.
Users
On this page, you will find an overview of the users under this account. Insight into the user details and which roles have been assigned to the user.
Support tickets
Create a support ticket to request for information, changes or report an issue
The Support tickets page provides you with an interface to our IoT Service Desk. This is a click out to ServiceNow to allow you to raise and edit tickets.
Support Tickets do provide Modular and Tailored subscriptions with an interface to our IoT Service Desk.
For Freemium and Explorer subscriptions we would like to refer you to Contact Support as described on the Support page via the link below.
If you have non-urgent technical questions and want to contact a specialist directly, this method can also be used by Modular and Tailored users.
To open the link and create a ticket you need the permission as shown below. Do you not have these rights? Then ask an administrator within your organization to assign this to your account in MijnKPN Zakelijk.
Need support now?
Click the method that matches your subscription below to contact us right away.
Contact a specialist
Ask for support when you have a Freemium or Explorer subscription
Contact our Support Desk
Raise a ticket when you have a Modular of Tailored subscription
Like to read the Contact Support manual first? Click on the Support link below.
Support tickets can be accessed via the following options.
Click on Support Tickets in the menu
Click on the Support Tickets tile
All items with the click out icon below will be opened in a new tab in another application. Don't worry, we use Single Sign On so you can continue working without logging in.
Support Tickets
News
We keep you updated about our platform and connectivity and planned maintenance
The news page provides you with all relevant information.
Click on News in the menu to see all news items under All News
Click on the title of a news item to open and read the full article
Use the search field to look for specific topics
This is the date the article is published, in case of maintenance check for the execution date in the full article
Scroll down on the News page to check for a comprehensive list of older articles.
News
Release notes
Access all release notes for our platforms in the Things Portal
The Release Notes page provides you with all new features and items we fixed or improved.
Click on the Release Notes links on the News page
Release Notes link
All releases come with a version number as reference in case you have questions
The items of changes and fixes in the according release are stated below every version number
This is the date the article is published
Use the search field to look for specific topics
In case Cisco Control Center is used you have the option to select for Release notes Cisco to see the information related to the platform
Scroll down on the Release Notes page to check for a comprehensive list of earlier releases.
Release Notes
Documents
All documents and manuals in one overview
The documents page provides you with documentation and manuals about our services.
Click on Knowledge Base in the menu for an overview of the available documentation
The highlighted documents contain important information and are shown in tiles
All other documentations about a topic are listed below the tiles
Every header indicates another topic, scroll down to check for more subjects
Use the search field to look for specific topics
This online KPN Things User Guide can be accessed through this link
Scroll down on the Documents page to check for all documentation grouped by topic.
Documents
Service status
Check the operational status of our platforms in case of issues
The Service status page provides you with the current operational status of our platforms.
Click on Incidents in the menu for an overview of the status of our platforms
If Overall status is OPERATIONAL all underlaying items are functional
All major incidents are shown in the overview with one of the statuses below
Investigating
Under investigation but no cause has yet been found
Identified
We found the cause, we are going to apply a fix
Monitoring
We applied a fix and monitor if the platform remains stable
Resolved
Everything is working fine again
Closed
All operational actions are done, we have taken up the learnings to improve our services
This is the date and time of the last update of the incident
The information on this page is also available on status.kpnthings.com in case the Things Portal itself is inaccessible and also more detailed updates on the incident are available
Scroll down on the Real-time status page to check what subsystem is impacted.
Subsytem details
Below the KPN Things Incidents overview more details are available to show which service has been affected.
Cisco Control Center API
There is a disruption to the API, please use Cisco Control Center as a workaround when possible
Cisco Control Center Portal
There is a disruption at the Cisco Control Center portal, please use Things Portal as a workaround when possible
KPN Things API
There is a disruption to the API, please use KPN Things Portal as a workaround when possible
KPN Things Engine
There is a disruption of the KPN Things backend that results in not receiving data for customers that use Flows
There is no workaround available for Freemium, Explorer and Modular subscriptions. In this case M2M data will be lost. LoRa data will be buffered and forwarded after the incident is resolved.
KPN Things Portal
There is a disruption to the user interface of Things Portal, please use the KPN Things API when possible or wait with making changes until the incident is resolved
LoRa Connectivity
There is a disruption of the whole or a large part of the LoRa network
There is no workaround available for LoRa network interuptions. Depending on the type of disruption, it may be possible that data will still be delivered after the incident is resolved.
M2M Connectivity
There is a disruption of the whole or a large part of the M2M networks of KPN in the Netherlands
M2M Roaming Connectivity
There is a disruption in the roaming domain or with a roaming partner.
There is no workaround. We are aware of the impact of disruptions in the domain of our roaming partners for you as a user. We report this as an incident to our partner to solve the issue.
RSS feed
The RSS feed (Really Simple Syndication) makes it possible to automatically receive status updates. You will need an RSS-feed reader or plugin in applications like Slack or Mattermost to be able to recieve the updates.
The RSS feed for status updates is located at the following URL:
The Service reports page provides in an overview of the availability of our service per month.
Click on SLA Reports in the menu for an overview of the availability of our services
Click on the calendar icon to choose another month to see report history
Click on the info icon for a brief explanation of the key performance indicator (KPI)
Click on a specific service for more report details on performance history
Shows the service level of a specific service for the selected month
Do you have a Modular or Tailored subscription? See your Service Level Agreement for the agreed availability.
Service Reports
Report details
The report details show more report details on performance history.
Choose a from date and to date to present the graphs for a certain period
The KPI Value is the measurement of an availability for the specific month
The KPI Norm is the standard we strive for and use as minimum availability standard
Click SLA Report overview to go back to the Service reports page
Report details
Invoices
Find a copy of your invoices
The Invoices page provides you with a copy of your invoices. This is a click out to MijnKPN Zakelijk portal to allow you to download invoices as Adobe PDF files.
Invoices do provide Modular and Tailored subscriptions with the option of a invoice history overview.
For Freemium and Explorer subscriptions we would like to refer you to Contact Support as described on the Support page via the link below in case an invoice must be provided again.
To open the link and check invoices you need the permission as shown below. Do you not have these rights? Then ask an administrator within your organization to assign this to your account in MijnKPN Zakelijk.
Need your invoices now?
Click the tile below to open MijnKPN Zakelijk right away.
Download your invoice
Go to the Invoices module in MijnKPN Zakelijk and open or download your copy
Invoices
Invoices can be accessed via the following options.
Click on Invoices in the menu
Click on the Invoices tile
All items with the click out icon below will be opened in a new tab in another application. Don't worry, we use Single Sign On so you can continue working without logging in.
Contact info
All methods to get in touch with us
The Contact info page provides you with all methods to contact us for questions and in case of an incident.
Click on Contact info in the menu to see all options to get in touch with us
We will always be there to help you, contact us if you have any questions
Support methods avaible for Modular and Tailored subscriptions
Best method in case of a high priority issue for Modular and Tailored subscriptions is to first create a support ticket and then call us to discuss the impact and help us to start the investigation as soon as possible.
The options shown differ based on the subscription type.
Contact info
Zone list
The Zone list replaces the separate roaming operator list documents.
The Zone list page provides a comprehensive view of available mobile technologies across the globe. It consists of two main components:
An interactive world map for visual exploration
A detailed Zone list table for in-depth analyses
Interactive Map
The Zone list map offers a global overview of operator availability by country. Key features include:
Zone filtering: toggle between Premium, Economy and Satellite zones
Color Legend: easily identify zone types using the map legend
Country details: click on a country to view available operators
Dynamic updates: the map shows the filtered countries and their operators from the Zone list table, divided/shown by economy or premium maps
Zone list Table
The Zone list table provides detailed, country-specific information about available mobile technologies. Users can:
Apply Filters: Narrow down results by country, zone type, technology and more
Check Technology status:
Live: the technology is currently active and available
Ending: the technology is still available but is being phased out
This table is designed to support decision-making by offering granular insights into global technology availability. Click the information button (next to 'Zone list' at the top of the table) for tips on how to use the table and additional details about the displayed data.
If new information has been added to the table and columns, we will notify you via the “Updates available” tag at the top of the Zone list table.
RRS column
A Roaming Restriction Set (RRS) determines with which foreign operators use of the data network is permitted or not. KPN IoT offers a rich set of predefined RRSs that can be assigned to a connection via the Communication Plan. These RRSs are largely linked to the countries within the available billing zones.
Tips for use
Use the Zone toggle on the top to toggle the map view between Premium & Economy zones
Use Alt (Windows) or Command (Mac) + Scrollwheel to zoom in on the map, drag it to pan the map
Use the toggle above the legend to make the map reflect what you filtered in the table
Click a county to pin the data in the information field, click unpin to show data on hover again
Use the right mouse button on the table to export to your spreadsheet software
Hover on the link on the bottom of the table to see when the table was last updated
Zone information
In the list the 2 standard sets of zones are represented: the Premium zones (also known as full zones) and the Economy zones. The list contains as well a column with the name of the zone as a separate column for each zone.
Note: The Premium Zones are based on countries. All for KPN IoT available networks are accessible for usage within that zone. Each higher zone actually also contains the countries (and operators) in the earlier zone. If a Rate Plan doesn't contain one of the first zones, the countries will be included in the first next mentioned zone.
Note: The Economy Zones are based on a selected set of operators within a country. KPN IoT tries to make the best balance between coverage, quality and price. This means that not all for KPN IoT available networks are accessible for usage within that zone. Note as well that each higher zone doesn't contains the operators (and countries) in the earlier zone. This means that if a Rate Plan doesn't contain one of the first zones, the usage on those operators (in those countries) will NOT be included in the first next mentioned zone, but will be stated as usage in 'Other' (which is most of the times highly priced). Always make sure that when a Rate Plan containing these zones is connected to a subscription (SIM), that also the Communication Plan is related and handles the roaming restriction set that belongs to the economy zones.
Introduction
Get a grip on your IoT solutions, so you can focus on your customers
KPN Things offers flexible building blocks with which you can easily build complete IoT solutions. You can build a solution for virtually any use case. Do you want to know how full a waste container is, or where it is physically located? You can connect your Solution with our KPN Things platform.
Building blocks are available for each part of the chain that can easily be used together.
Thanks to standard connections, you can also use your own Device or Data platform. And with the KPN Things Portal, you have full control over your solutions.
KPN Things Portal Introduction
Learn why we built Things Portal and how it will benefit your IoT business
Quick reference instructional videos
For a kickstart, watch our instructional videos. They say more than a thousand words!
Look for the icon in the menu for more Quick reference videos.
This page explains about Getting started by creating an account and logging in for the first time.
Flexible Building Blocks
KPN Things offers you a flexible package of building blocks that you put together yourself. This allows you to set up and manage all your IoT solutions quickly and easily. You manage these building blocks in our KPN Things Portal.
Device Management
With KPN Things Device Management you have the insights and control over all your devices.
Manage all your devices in one overview - From sensors to complex IP gateways and routers
Device Twin - Insight in the status of every device
Bulk actions - Manage solutions in bulk to control solution of any size
Firmware over the air - Update your devices remotely
Connectivity Management
Manage all your LoRa, LTE-M and M2M connectivity in a single platform.
All your connectivity in one view - Manage LoRa, LTE-M and M2M connectivity in one view
Manage connectivity for your device - Provide your devices with a connection
Extensive network information - Have insights in your solutions all the time
HTTP and MQTT protocols for M2M devices - You decide how to connect your devices
Destinations
A seamless integration of IoT data with any platform for maximum value.
Platform Independence - Easily connect any data platform to the KPN Things environment, regardless of which platform you use or want to use
Easy-to-Use Tools - We provide simple tools and extensive documentation to help customers create links and modify data.
Extensive Functionalities - Access to a wide range of functionalities and additional services, allowing customers to use a platform that directly suits their specific use case
Destination Management
Customer and User Management
Provide your customers and users with a easy access to IoT solutions.
Customer Management - Manage IoT solutions of your customers
Data Segregation - We provide in secure separation of data between your customers
Customer Insight Overview - Have an overview of the different IoT solutions per customer
Self Service - Provide your customers access to the Things Portal to manage their own solutions
User Management - Decide which users have access and to what functionality
Curious if our KPN Things fits your needs?
Then click on the link below to go the the Getting started page and build your first solution.
You don't have a device yet? No problem!
You can start testing using our free Device Simulator app.
Our KPN Things Device Simulator Web app allows you to test KPN Things with your own mobile phone/laptop as a device. If you do not yet have a suitable device, you can use the Web app to still build a working data flow.
Features
Mobile/laptop as a device - Easily add the Web app as a Device in your KPN Things account.
Choose sensors - The app allows you to choose which metrics to use as Device data.
Device simulator app features
Add the Device Simulator Web app
Follow the steps to add the Device Simulator Web appas a device.
1
Register your Web app in KPN Things
On your computer go to the KPN Things portal.
Click on Devices to show the device overview on the Things Manager tab
Click on Add new Device to add the Device Simulator
Click on Device Simulator Web app
Give your device a recognizable name
You can add a description, this is useful when you have multiple devices and want to provide context. This is not a mandatory field.
Click Add Device to finish this step
2
Open the Device Simulator Web app
You can open the Device Simulator Web app in three ways:
In your internetbrowser on your computer or laptop
On your phone with the QR code
Share the URL and open the Device Simulator Web app
3
Send your first measurement
Select which measurements you want to be send.
Click the corresponding checkboxes by selecting or deselecting to choose measurements
Click Send data now to send your first measurement
4
Check the incoming message
In KPN Things portal refresh the page. You now see a value next to Last message, indicating that the measurement is recieved from your Device simulator app.
5
Ready to build your data flow
You are now ready to setup your first data Flow in KPN Things.
Learn why we built Things Portal and how it will benefit your IoT Business
User interface
This video explains how the User Interface and main navigation works.
Tables
This video explains how Tables work.
Bulk by multiselect
This video explains how Bulk by multiselect works in the User Interface.
Bulk by file
This video explains how Bulk by file works in the User Interface.
Configure a flow
Learn how to forward the data from your device to your application
Now your Device is linked to the Flow!
With a Flow you configure the way your IoT data should flow through KPN Things, from device to destination. Learn more about flows.
1. Your first Flow
We have already created a first empty flow for you named My first flow. You can create new flows using the Add flow button on the top right.
2. Link Device to Flow
Click on Add Devices in the Flow overview page.
Now you see all Devices you can add to this Flow. Click on your Device to link it to the Flow.
Now your Device is linked to the Flow!
3. Activate a Decoder
Open your Project, open your Flow, and then click Data Processing.
Click on the Device type for which you want to activate a decoder (#1 in the screenshot below). At this moment you probably have only one type of device linked to the Flow, so open that one. All available decoders are now shown (#2 in the screenshot below).
Here you can toggle on and off what (decoded) data you want to receive in your application (like indicated with #3 in the screenshot below). If you want to know more about the decoder, click on the link in the description.
Note that the "Add new Decoder" button and "Edit" button are only visibleif this is your own device type. Own Device Types and Decoders can be created using the Things Creator app.
Connect a HTTPS destination
Learn how to connect your application through HTTPS
You can use KPN Things Destinations to forward your device data to any supported platform or destination. The tool Webhook.site is used for this tutorial. Although we have good experience with this tool, KPN is not responsible for the proper working of the tool.
1. Create test HTTPS endpoint
Go to https://webhook.site. Webhook.site is a service with which you can easily inspect incoming HTTP requests. When vising the site it will automatically create a unique HTTPS endpoint for you. Use the Copy to clipboard button that is highlighted in the screenshot below to copy the URL of your new endpoint.
2. Create your first Destination
Go to the Flows > My first flow and click Link destination
Choose Create a new Destination.
Select HTTPS endpoint as destination type.
3. Fill in your Destination Information
After selecting HTTPS Endpoint, fill in the following information:
Destination name: you can think of a good recognisable name for your first destination, like My First Destination.
URL: this should be the URL you just copied from webhook.site.
Shared secret: this is a kind of password that an application should use to verify that KPN Things sent the data to the endpoint. It should be at least 32 characters long and should contain at least an uppercase character, lowercase character, digit, and special character.
4. Test connection with test message
Send a test message, e.g. by using the Device simulator app. You should see incoming information on your webhook.
Congratulations! 🎉
You successfully set up your first IoT solution!
To continue learning you can continue with:
Create a simple IoT web application
Showing your data in an application
Note that this sample IoT web application is for testing purposes only and not a secure solution for processing data
With this tutorial you will create a simple web application showing a map showing your tracked LoRa data. This runs an in-memory data store, so on restart the store will be reset and all recorded data will be lost. The application runs on Next.JS
As an optional step the IoT web application can be deployed to Azure Web App.
Log into Azure, where ??? is the tenant ID from Azure Active Directory: az login --tenant ???
Deploy: az webapp up --sku B1 --location westeurope (takes about 5 minutes)
After deployment the URL is logged
Modify the URL in the HTTPS destination created in Connect a HTTPS destination to the URL returned by Azure CLI:[generated URL]/api/lora
Inspect logs: az webapp log tail
Open [generated URL] in the browser to see the web app
Send instruction to LoRa Device page
Learn how to send an instruction (downlink) to your LoRa Device
Note that for this tutorial you need to use a LoRa device.
1. Request downlink
Go to the All Devices page and click on the device you want to send a downlink to.
Open the Send Instruction tab. There you will find the input fields to send a downlink to your LoRa device:
FPort:is the LoRa application port on which to send the data. If you don't use application ports on your device, you can just use 1.
Payload: is the data you want to send to your device, written in hexadecimal characters. You could use for instance 010203.
Click Submit to request the downlink to be sent to the device.
2. Check status of downlink
After requesting the downlink, under Status Downlink your downlink will have appeared. Maybe you first see your downlink with the PENDING status, meaning it is still being processed, but if you hit the refresh button (#2 in the screenshot) you should see it switching to EXECUTING.
Queuing
At most one downlink can be in EXECUTING at a time. When you submit more downlinks, they will stay in the PENDING state and they will be processed "first in first out". You can have at most 5 downlinks in PENDING. As long as a downlink is in PENDING mode, you can cancel it. If you do so, it will not be send anymore and the status will change to CANCELLED.
Learn more about downlink statuses. LoRa Downlinks sent through KPN Things are always Confirmed downlinks. That way we trigger an Acknowledgement (ACK) from the device in the next uplink, and with that information we can determine whether a downlink was received or not.
Click on the refresh button (#1 in the screenshot) to refresh your Data History table. There should now be an uplink record following your downlink record that contains an ACK (#2 in the screenshot).
If the uplink containing the ACK was not received by the network, you will see your downlink is still in EXECUTING. When a next uplink is received we conclude the downlink as FAILED, since we do not know for sure whether the downlink has been received. You could state that the quality of service for downlinks through KPN Things is "at least once".
If you switch back to the Send Instruction tab, you should see that the status of your requested downlink has switched to DELIVERED. That means the acknowledgement has been received by the network.
You can also send downlinks by API calls
Are you interested in sending downlinks to your Devices through API calls? That is also possible! Head on over to our API access to learn how.
Optional: send your data to Azure SQL
Send your data to Azure SQL
Get your KPN Things device data in a Azure SQL database. This QuickStart will help you set up a KPN Things flow towards an Azure Eventhub. The Azure Eventhub is used to ingest data in to the Azure platform. An Azure Streamanalytics job will process incoming data. The data will be stored in an Azure SQL database. For this QuickStart you’ll need a KPN Things account with an active device (or download the ) and an active Azure subscription.
In this QuickStart you’ll learn how to:
Create and configure the necessary Azure resources
Create and configure Azure Eventhub
Connect devices
Connect your device to KPN Things
Choose one of the below device types to continue setting up your IoT solution.
Sim card
You can request KPN M2M sim cards at https://portal.kpnthings.com. Register for free and find the link in the M2M is now available notification to order your SIM cards.
We recommend starting with connecting the KPN Things device simulator app. You can use this app to simulate a device and send messages whenever your want.
KPN Things supports commonly used IoT devices out of the box. If you want to get started with one of these devices, continue with Supported devices & KPN devices.
Developer devices
Start experimenting and discover the wide range of possibilities with these developer devices.
These development boards are no longer available for purchase and should not be used for new designs.
To connect other devices head over to the .
Continue to the next step:
SIM cards
1. Check contents of the delivery
First, let us check if you received everything correctly. There should be two KPN Things SIM cards in the package.
2. Check KPN Things Portal
Then, the SIM cards should be visible in your KPN Things Portal on the All Connectivity page.
If you don't see your SIM cards, please contact us on iot@kpn.com and we will check if everything is correctly configured.
3. Obtain a Device
You now have a KPN Things SIM card in your possession, a SIM card that can be put in a programmable device to grant it direct access to KPN Things through a secure channel.
This SIM card supports connection to the following networks of KPN:
LTE-M
2G
3G
4G
5G
Don't you have a programmable M2M Device yet? You should get one! We have some tips for you:
We have the most elaborate documentation on getting the SODAQ SARA AFF R412M to work with KPN Things, so getting such a device will provide you the best getting started guide that we have.
Other SODAQ SARA devices, like the SFF R412M or devices with a different modem should also work with our developer kit guide. You should only take into account some different settings.
For instance for SARA SFF devices, you should use Board type SODAQ SFF.
Our Device SDK also contains example code for the Arduino MKR GSM 1400, laying the basics for all Arduino based M2M devices.
If you want to use non-Arduino based devices, you would need to write your own code to interface with KPN Things. This M2M interface is explained in the Things M2M documentation.
Supported devices and KPN Devices
For more information about the devices that are supported in Things portal head over to IoT devices. Would you like to add your own device, head over to the Things Creator section.
1. Add new Device
Head to the Devices in the left menu. Click the Add new device button in the left top corner. This is the place where you register new Devices and add them to KPN Things and our networks.
If you have more than one Project, you will have to select to which Project you would like to add your Device.
2. Select your Device type
Depending on your , available Device types may vary.
You can select an existing device-type offered by KPN Things, or create a new device type using the Things Creator app.
3. Fill in Device Information
Name: Typically can be a Device ID or the name of a physical asset which the device is linked to.
Barcode (optional): Barcode or serial number used to identify a device.
Description (optional): Any additional device information.
When done, click Add Device to continue.
This step will look differently, depending on the type of network information.
If you selected Own LoRa device (programmable) device type in the previous step, the Portal will give you the OTAA join information (DevEUI, AppEUI and AppKey). Make sure to copy-paste or write down the provided identifiers. For security reasons the secret values will not be retrievable through the Portal after closing this page.
Click Finish to continue.
If you selected Own LoRa device (preset connectivity) or a supported device type, you should provide the LoRa network information for your device in this step.
Click Add network info to save the network information and then Finish to continue.
IMEI of your Device.
ICCID of your SIM-card - select the correct SIM card from the drop down. If you have an Early access SIM, you choose the option "Add early access SIM" and enter the ICCID of the SIM manually in the newly appeared input field (see A in the screenshot below).
Shared secret
After entering the values, click Add network info to save the information, or click Finish without adding Network to continue without adding network information to your Device object.
DvnUUID - the unique number to identify incoming data from your Device. Your Device UUID is prefilled, but you can enter any UUID you like.
Shared secret
You can visit the LoRa data or M2M data tab on your Device Detail Page in the Portal. You should see messages here as soon as the device has activity on the network.
You're ready for the next step:
Smartrak
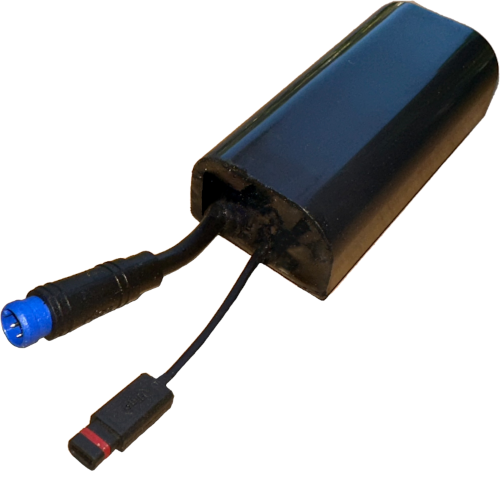
The Smartrak M2M GPS tracker is a device produced by Streamline and used for demo purposes. When you push the button the device will send its location to KPN Things.
Smartrak M2M tracker
Check contents of the test device box
The first step is to check if everything is present in the box:
Contents:
Battery (1)
Logic board (2)
Bottom part of the casing (3)
Top part of the casing (4)
KPN M2M SIM card (5)
Wireless Charger (not shown)
Step 1: Insert the SIM-card and write down the IMEI (1), we need that later.
Step 2: Connect the battery.
Step 3: Connect the vibration motor. This can be a bit of challenge, but you can do this. The connector has to be pushed on the terminal from above instead of sliding
Step 4: Connect the bottom part. This is the wireless charging circuit.
Step 5: Put everything together.
Step 6: Rotate the two parts as shown. The on/off button has to be on the side of the vibration motor.
Step 7: Click two parts of the casing together.
Plug in your QI charging device.
Place the device on the QI charging device and allow it to charge for a few hours.
You should hear a beep when the device starts charging.
Open the , and log in with the credentials you received in the mail. Go to the All Devices page and click on Add new Device.
Select the Streamline M2M device device type
Enter a name for your test device
Click Add Device to continue
Now enter the Streamline M2M specific information of your Device.
IMEI of your Device. This value is printed on the logic board. If you followed the , you have written this value down.
2. ICCID of your SIM card. This value is printed on your SIM card. Select the correct SIM card from the drop down.
3. Click Add Network Info to save the network information and then Finish to continue.
If you want, you can .
Push the button on the device and it will send its location to KPN Things! After the push the LEDs start blinking:
Lightning icon: GPS location is being searched
Battery icon: Device is turned on / charging
Waving person icon: indicates the button is pressed
The first time after connecting the battery it can take up to 5 minutes to receive a message. If the LEDs do not start blinking try to push and hold the on / off button for 10 seconds. The battery LED in the middle should start blinking. If still nothing happens, try to charge the device for at least 2 hours.
You should now visit the in the Portal of this Device. In the connectivity block, you should see that the last message time indicates that KPN Things just received a message from your Device!
Continue to the next step:
LoPy5
This is an old development board which is no longer available for purchase and should not be used for new designs.
The LoPy4 is a quadruple bearer MicroPython enabled development board (LoRa, Sigfox, WiFi, Bluetooth) perfect enterprise grade IoT platform for your connected Things. With the latest Espressif chipset the LoPy4 offers a perfect combination of power, friendliness and flexibility.
1. Setup your LoPy4 device
Use the getting started from the Pycom documentation to get started with your LoPy4. Make sure you setup both the hardware and software. You should be able to program the module when continuing this getting started.
2. Determine device identifiers
The LoPy4 is a LoRa device, and to register a LoRa-device to a network you need three values: DevEUI, AppEUI and AppKey. These values must be registered in KPN Things and in the device. For more information on these three values you can read Device Identification in the LoRa documentation.
Open the . Go to the All Devices page and click on Add new Device.
Select the Own LoRa device (preset connectivity) device type
Enter a name for your LoPy4
Click Add Device to continue
Fill in the three values you determined in the previous step . Then click Add Network Info to save the network information and then Finish to continue.
You are now on the Device Detail Page. In the LoRa tab you will see the network status. This can temporarily be Pending creation, but if you refresh the page it should switch to Active. This means your device is correctly registered to the network.
If the network status sticks to Pending creation, you could try to delete the Device and register the device again.
Use the example from Pycom to get your device connected with our LoRa network and have it send data to KPN Things.
Now your LoPy4 has joined and is sending data, you could visit the LoRa data tab on your Device Detail Page in the Portal. You should see your Join request and Join accept appear like in the screenshot below and at this point you will see more data as well.
Read more information about what you see on the tab.
You now successfully connected your LoPy5 device to KPN Things! To further setup your data flow in KPN Things, you can go to the next step:
Projects
Project types
The Project type determines what you can and may do in KPN Things Portal. Some KPN Things Projects provide you with more features in the Portal than others.
Depending on the subscription of your Project, one or more of the following restrictions can apply:
Limit
Description
End date
The moment your project will expire. Make sure to extend
your Project before this date to prevent loss of data.
You can find applicable restrictions on the of a Project.
A project has the following attributes:
UUID - the technical identifier of your project.
Name - the name you give to your project.
Description (optional) - further explanation of your project.
The Freemium Project gives you free limited access to the KPN Things Portal:
One Project in KPN Things Portal.
Access to our to get you started with programming your Device.
Integrated KPN LoRa functionality:
You can find your Projects by clicking on your Customer name in the left menu. If you are a free user, you will get one project named My first project.
Do you want to upgrade one of your Projects? Click on Upgrade.
When clicking a project you go to the Project overview page. It gives you an overview of a selected Project:
You can see the name, description and type of subscription of the selected project.
Link to the .
You can also see which , and are part of this project.
On this page you will find technical details of your project. At the project details page, you can edit the name and description of your project yourself.
Customer management
💎 Add-on feature
This feature is only available when purchased the Customer Management add-on. Please contact iot@kpn.com if your are interested!
With Customer Management, you get the possibility to manage your own customers using separate customer environment in KPN Things. It is an extra administrative layer in the KPN Things Portal.
If you have Customer Management enabled in your KPN Things license, you will have an additional link in your side menu: All Customers (as indicated in the screenshot below). Click on it to open your customer list.
All Customers page
After clicking All Customers in the side menu, you will get an overview of all your customers.
In the screenshot the following elements are highlighted:
The number of Customers in your current view and your total number of Customers.
The company name of your Customer.
The name of the primary contact of your Customer.
The number of Projects your Customer has.
The number of Devices your Customer has.
The number of Destinations your Customer has.
A quick link to the All Devices page of your Customer.
Clicking on a row in the table will direct you to the Customer details page of the selected Customer.
A search bar to search for a specific Customer name.
Switching to Customer environment
After opening one of your Customers, your submenu will change. The top part will stay the same and will provide you a way back to your own Customer environment (#1 in the screenshot below). The bottom part of the side menu will now show you navigation for the environment of your Customer (#2 in the screenshot below), allowing you to open and/or manage the objects in the environment of your Customer.
Add new Customer
Adding new Customers will be added later. For now, if you want to add a new Customer, you should contact our service desk.
Customer overview
The Customer overview page provides you with a quick overview of the environment of your customer.
The number of Projects of your Customer and a link to those Projects.
The number of Devices of your Customer and a link to those Devices.
The number of Destinations of your Customer and a link to those Destinations.
Quick links to add new objects to your Customer (buttons are disabled if you do not have rights)
Customer details
After switching to the Customer environment, you see the Customer details page. This page gives you a quick overview of the Customer details, like name and email address.
Release notes
Stay up to date with the latest features and improvements in the Things Portal, in addition to the regular bug fixes and technical improvements.
Latest releases
Release 08-12-2025: Costs overview and Contract
In addition to the release of the Organization tab, we have also introduced the Costs Overview and contract.
The Costs Overview gives you more insight into the costs of your IoT contract and what your upcoming invoice will look like. The cost overview and contract are only visible to customers with an Explorer and/or Modular contract. In addition, it is only available to users with the appropriate role (managed by Admin users). Customers with a Tailored contract can't make use of this feature.
We have made several improvements to the KPN Things Portal to enhance usability, streamline navigation and make the interface more clearer. Below is an overview of what's new in this release.
New Sidemenu
The sidemenu now follows the IoT building blocks, making it easier to find what you need with fewer clicks. You'll find section headers such as 'IoT Devices', 'Connectivity', 'Data Processing', and 'Destinations'.
Easily add devices, a flow, or a destination using the + button (hover next to the section header).
Devices and Connectivity are shown in seperate tables, each displaying only the most relevant data.
The project picker shows which project's information you are currently viewing. If no project has been selected yet, it will display 'Project'.
Main Menu Enhancements
The main menu has been redesigned to maximize space for page content, allowing more data to be visible at once.
The KPN IoT logo has been updated.
We've added a new tab: Organization.
New 'Organization' tab in Main Menu
A new "Organization" tab where you can find all your organization information.
Go to 'Users' to manage the users of your organization and navigate from here to User Management.
Release 01-12-2025: Zone List Roaming partners
The Zone list provides information about the available roaming partners around the world. Check the map for an overview and filter on one of the two zones. The page also offers a table with specific information per country and the operators available there. The Zone list replaces the separate roaming operator list documents. You can find the Zone List via the side menu on the Support page.
This video explains how the User Interface and main navigation works.
Tables
This video explains how Tables work.
Bulk by multiselect
This video explains how Bulk by multiselect works in the User Interface.
Bulk by file
This video explains how Bulk by file works in the User Interface.
Look for the icon in the menu for more Quick reference videos.
User Interface
An introduction to the user interface
User interface
This video explains how the User Interface and main navigation works.
Tables
An introduction about how tables work
Tables
This video explains how Tables work.
Bulk actions
An introduction about how bulk actions work
Bulk by multiselect
This video explains how Bulk by multiselect works in the User Interface.
Bulk by file
This video explains how Bulk by file works in the User Interface.
User Management
Configure users, roles and permissions
Managing access to your IoT services is essential for maintaining control, security and efficiency. We offer a range of IoT propositions, each designed to meet different business needs. For each service, there is a need for clear and effective user management.
User Management ensures that the right people in your organization have the appropriate access to the tools and data they need.
Tips for effective user management
Define clear roles and responsibilities - Assign roles based on actual responsibilities. Avoid giving users more access than they need, this helps reduce security risks and keeps your environment organized.
Regularly review User Access - Periodically check who has access to the services. Remove inactive users and adjust permissions when their roles changes.
Train your users - Make sure users understand their roles and how to use the platform securely and effectively. A little training goes a long way in preventing mistakes.
Ask for KPN support - If you're unsure about how to structure your user access or need help, don’t hesitate to reach out to for guidance.
Next Step
To learn more about how to manage users within your specific IoT service, please select the page that matches your KPN IoT solution. Each section provides tailored guidance to help you manage users effectively within your environment.
Edit email subscriptions
Change your preferences for receiving operational updates
We aim to keep you well-informed. You’ll receive relevant updates based on your email subscriptions. However, some content may not apply to you, or you might prefer not to receive updates at all. You can adjust your preferences anytime in the Things Portal.
To change email subscriptions, you need to have a Things Manager role.
Changing mail subscriptions is not available for Freemium and Explorer users.
If there are issues with the KPN Things Portal, Explorer customers will always be informed by email.
Click your name in the top-right corner in the KPN Things Portal.
Click My Things user details
2
Under the Operational Email Subscriptions section, select Edit Subscriptions.
3
Select only the update types you want.
Click Save to apply your settings.
Via Things Manager Tab
Before you start
To manage email subscriptions of other users, you need the Things Manager - Admin role.
Already an admin? Great! Let’s get started!
Not an admin yet? Ask your organization’s administrator to grant you admin rights
Not sure who that is? Contact us and we’ll help you out
1
Click the Things Manager tab in the KPN Things Portal
Click your Company in the menu
Select User Profiles under Account
2
Click the button at the end of the selected user.
3
Under the Operational Email Subscriptions section, select Edit Subscriptions.
4
Select only the update types you want.
Click Save to apply your settings.
Service Updates – Stay informed about new features that enhance your services.
Planned Maintenance – Get notified about scheduled maintenance so downtime never catches you off guard.
Incidents – If an incident occurs, we’ll let you know immediately.
Connector Bindings
Connector Bindings define the configuration that enables a device to communicate with the Things platform through a specific connector.
While connectors provide the communication interfaces themselves, a device typically needs connector-specific settings—such as credentials, shared secrets, or protocol parameters—to authenticate and exchange uplinks or downlinks. This per-device configuration is captured in a Connector Binding.
The Things platform supports multiple binding types aligned with the available connectors:
http for devices sending SenML or Streamline-protocol uplinks over HTTP(S)
lora for devices using ThingPark LoRaWAN
mqtt for devices exchanging messages via MQTT
Connector Bindings let you precisely define how each device connects and communicates through the Things platform.
In addition to the standard create, retrieve, update, delete, and list actions, devices expose two important sub-collections.
The device-groups sub-resource allows you to view and manage the groups a device belongs to, complementing the platform’s top-level /device-groups resource.
The network-adapters sub-resource provides access to the physical connectivity interfaces of a device—such as cellular (IMEI-based), LoRa (DevEUI-based), or generic internet adapters—which determine how the device connects to the platform.
Device Groups provide a way to organize and manage devices within a project. Each group represents a subset of the project’s registered devices, and a device may belong to multiple groups in the same project. Beyond simple grouping, a Device Group also defines the project’s “processing plan” for incoming device data—known as a flow in the Things Manager. A flow brings together four elements: the devices it applies to, the decoders used to interpret their uplinks, encoders used to encode downlinks, and the destinations where decoded messages are forwarded.
At present, the Device Groups API focuses on device membership, allowing you to add or remove devices from a group. Configuration of flows themselves—such as managing decoders, encoders, or destinations—remains available through the Things Manager web interface.
Downlinks
Downlinks are messages sent from KPN Things to a device. The API provides two main approaches to sending downlinks:
Actuator-style downlinks (recommended for most cases)
Use the /downlinks resource.
You provide a high-level command, and KPN Things translates it into the correct low-level protocol format using the configured encoder for your device.
This approach is safer and easier to use, since KPN Things handles protocol-specific details.
Connection-specific downlinks (advanced usage)
Use protocol-specific APIs such as /http/downlinks, /mqtt/downlinks, /sms/downlinks, /lora/downlinks, or /digitalmatter/downlinks.
You send downlink payloads in the native format of the underlying connection type.
This allows greater flexibility but comes with risks: you may send commands that disrupt device operation (for example, disabling communication). Use these APIs only when actuator-style downlinks do not meet your requirements.
Choosing the Right API
Use actuator-style downlinks whenever possible. They are protocol-agnostic, simpler, and safer.
Use connection-specific APIs if you need full control over the payload format or protocol-specific features.
The Devices Landing Page in the KPN Things platform provides an overview and management interface for all your registered devices.
Device Management
Search and Filter: At the top, there’s a search bar that allows you to quickly find specific devices by name or other attributes. You can also apply filters to narrow down the devices based on type, status, or other criteria.
Add a New Device: You can manually add a new device by clicking on the "Add new Device" button. This will guide you through the process of registering a new device with details such as its type, unique ID, and configurations.
Bulk Management Options:
Bulk by CSV File: This is a key feature that allows you to upload multiple devices at once using a CSV file. You can use this feature to save time when you need to add or manage large numbers of devices at once.
Firmware Management: This option lets you add new firmware version on your devices. Keeping firmware updated is important for security and functionality improvements.
Bulk actions
Next to the device list, you will see options for bulk actions, like activating or deactivating your M2M devices, or editing device settings in batches. These actions can be initiated by selecting multiple devices from the list or by uploading a CSV file that contains the necessary device information.
Exporting to CSV
You can easily download the Devices - Data result set by clicking the Download icon just below the Search icon.
This will generate CSV file, containing all devices in the current selection. The CSV file will contain the measurements accompanied with the timestamp of that specific measurement.
Devices overview
Click on the Bulk by CSV file button.
This step opens the process for uploading multiple devices at once via a CSV file. This saves time since you don’t need to add each device individually.
Upload bulk file
You are asked to upload a CSV file with the device data. Ensure that the structure of the file matches the template exactly, which you can download. Use a comma (,) as the CSV separator.
After uploading the CSV file, it will be validated.
Bulk file validation
This screen gives you feedback on the validation. All devices with valid data are displayed, and devices with errors won’t be processed. The system checks fields such as IMEI, ICCID, and other required fields.
After validation, choose the target project and flow where the new devices should be added. You can also specify the device details, such as the device type.
Bulk upload target location
Here, you define the project and flow in which the new devices will be processed. You can also choose the type of devices being added, for example, M2M devices or another type.
Click on Add new M2M Devices to start adding the devices.
Bulk upload execution
The system will now begin adding the devices. You can monitor the process by following the progress in the Bulk reports where you can see if all devices were successfully created.
Destination Formats
Customize your data output by transforming standard SenML payloads into the exact format your endpoints require.
By default, KPN Things forwards ingested uplink data to your destinations (such as HTTPS, MQTT, AWS Lambda, or Google Cloud Functions) in standard SenML format (RFC 8428 - Sensor Measurement Lists).
If your external systems or third-party applications require data in a specific or proprietary layout, you can create a custom Destination Format. This allows you to write a JavaScript script that automatically transforms the standard SenML payload into your desired format before it is sent.
Creating a Custom Destination Format
Follow these steps to set up and configure a custom destination format:
Step 1: Create the Format Profile
In the Things Creator menu, click All Destination Formats.
Click Add new Destination Format.
Enter a Name and Description for your format.
Tip: Choose a clear, recognizable name. This name will appear in the "Destination Format" drop-down menu when you configure destinations within your projects.
Click Add Destination Format to save the profile.
On the Destination Format details page that appears, locate the Script section and click Create.
A JavaScript editor will open, pre-populated with a placeholder example script to help you get started.
Write your transformation logic. You can use the built-in testing tool to validate your script against a sample SenML input payload and preview the output. See for more details.
Your new custom format is now ready for use. When adding a new destination or updating an existing one in any of your KPN Things projects, simply select your custom format from the Destination Format drop-down menu to apply the transformation.
Support
All help and resources in one place
The support page provides access to all service related items. Here you can submit a request for information of report a service disruption.
The options shown differ based on the subscription type.
These support items are available for everyone
Support tooling avaible for Modular and Tailored subscriptions
We will always be there to help you, contact us if you have any questions
When support is needed, click on the Contact Support tile. This opens the General inquiries form.
1
Provide your name and email address so we can reach you.
2
Choose the subject so that your question will be directed to someone who knows the subject.
General Inquiry
Any general question, you can ask us anything about the product.
Technical Inquiry
Sensors
Interested in buying some of these KPN Things devices? Head on over to for more information!
In KPN Things the Device type is used to express the connectivity and data capabilities of a Device, like whether it is a LoRa or an M2M device, and its compatibility to Data Processing components such as decoders and encoders.
KPN Things supports the devices as shown in the subpages of this page.
KPN Things Devices versus Supported Devices
We have two categories of Device types, namely KPN Things Devices, when you buy a Device from us, and Supported Devices, when you bring your own Device to KPN Things. Each categorie has its own set of Device Management features in the Portal.
KPN Things Devices
Legenda
✅ - Available for this device type.
🟡* - Configurable for your own device, coming soon.
❌ - Not available for this device type.
Device Simulator (Mobile Phone app)
Device Simulator (Mobile Phone app)
A device specification for the Things Device phone App.
Description: One decoder to forward raw SenML data and decoded ThingsML data sent by the device.
Exchange: decoder.thingsml.json.exchange
Unknown
Decoder that forwards raw SenML data and decoded ThingsML data sent by the device.
This is completely dependent on the SenML or ThingsML input and could output almost any SenML. The decoded ThingsML below is just illustrative of what is possible.
Protocol: HTTP response
Description: Send SenML data to your device.
Multiple commands in one downlink: No
No input mapping
Generic Device (Internet connected)
Generic Device (Internet connected)
Connect your (virtual) Internet-connected device to KPN Things.
One decoder to forward raw SenML data and decoded ThingsML data sent by the device.
› Decoded ThingsML and raw SenML data (v2)
4a8f1ec7-df52-5a57-a281-422e000d3b1d
Decoder that forwards raw SenML data and decoded ThingsML data sent by the device.
Encoders
encoderSpecificationUUID
Description
= SenML data
86805e45-c394-4ebc-a2e1-a47079a57999
Send SenML data to your device.
› Decoded ThingsML and raw SenML data
UUID: 16799a1c-9dea-4fc9-83b1-03d4562aba69
Description: One decoder to forward raw SenML data and decoded ThingsML data sent by the device.
Exchange: decoder.thingsml.json.exchange
Expected SenML outputs
Unknown
› Decoded ThingsML and raw SenML data (v2)
Decoder that forwards raw SenML data and decoded ThingsML data sent by the device.
Example SenML
This is completely dependent on the SenML or ThingsML input and could output almost any SenML. The decoded ThingsML below is just illustrative of what is possible.
One decoder to forward raw SenML data and decoded ThingsML data sent by the device.
› Decoded ThingsML and raw SenML data (v2)
52a80810-0225-5831-9596-c07d8a746f10
Decoder that forwards raw SenML data and decoded ThingsML data sent by the device.
Encoders
encoderSpecificationUUID
Description
= SenML data
58e00104-d1ce-4a8f-acc0-8fe860b9ba88
Send SenML data to your device.
› Decoded ThingsML and raw SenML data
One decoder to forward raw SenML data and decoded ThingsML data sent by the device.
› Decoded ThingsML and raw SenML data (v2)
Decoder that forwards raw SenML data and decoded ThingsML data sent by the device.
Example SenML
SenML can be structured in different ways, and we do not guarantee the examples below will look the same as what you will receive on your Destination. To make sure you can handle the SenML optimally, take a look at our documentation about .
Example SenML
This is completely dependent on the SenML or ThingsML input and could output almost any SenML. The decoded ThingsML below is just illustrative of what is possible.
Connect your own M2M Device that communicates over the Internet. Useful when only Device management data is sent to KPN Things. Part of the Device Management + Connectivity only proposition.
One decoder to forward raw SenML data and decoded ThingsML data sent by the device.
› Decoded ThingsML and raw SenML data (v2)
45b27e02-8136-540b-a4e1-509d7a2c2aa2
Decoder that forwards raw SenML data and decoded ThingsML data sent by the device.
Encoders
encoderSpecificationUUID
Description
= SenML data
cc35ab44-01d3-4086-885a-a30cb37c0a12
Send SenML data to your device.
› Decoded ThingsML and raw SenML data
UUID: c876bac7-c664-4297-a954-2666eb6aae54
Description: One decoder to forward raw SenML data and decoded ThingsML data sent by the device.
Exchange: decoder.thingsml.json.exchange
Expected SenML outputs
Unknown
› Decoded ThingsML and raw SenML data (v2)
Decoder that forwards raw SenML data and decoded ThingsML data sent by the device.
Example SenML
This is completely dependent on the SenML or ThingsML input and could output almost any SenML. The decoded ThingsML below is just illustrative of what is possible.
Interested in buying some of these KPN Things devices? Head on over to for more information!
In KPN Things the Device type is used to express the connectivity and data capabilities of a Device, like whether it is a LoRa or an M2M device, and its compatibility to Data Processing components such as decoders and encoders.
KPN Things supports the devices as shown in the subpages of this page.
KPN Things Devices versus Supported Devices
We have two categories of Device types, namely KPN Things Devices, when you buy a Device from us, and Supported Devices, when you bring your own Device to KPN Things. Each categorie has its own set of Device Management features in the Portal.
KPN Things Devices
Legenda
✅ - Available for this device type.
🟡* - Configurable for your own device, coming soon.
❌ - Not available for this device type.
Once you are satisfied with the transformation results, click Create.
Step 2: Write and Test Your Script
Next Steps
Tip: add a Test Endpoint with your new custom format to an existing flow to quickly verify your new format with real uplinks
If you don't have an Azure subscription, create a .
In this section you’ll be guided through the creation and configuration of an Azure event hub, a stream analytics job and an Azure SQL database. It’s advised to create a new resource group in which to bundle these newly created resources.
The Azure EventHub is used for the ingestion of data. Don't have an Azure Event Hub yet? Head on over to the Microsoft documentation to learn to create an Azure Event Hub:
From this point, when following the link, you’ve created everything to ingest data to Azure. You have created a resource group, an Event Hubs namespace, and an event hub.
Now we have prepared the input data by creating the Event Hub. We can now proceed to the creation of the Azure SQL database for the data output. Don't have an Azure SQL database yet? Head on over to the Microsoft documentation to learn how to create an Azure SQL database:
At creation, remember to select the resource group created earlier. This way all resources for this quick start will be grouped together. Furthermore, make sure to write down the ‘Server admin login’ and ‘Password’. Under additional settings don’t select sample as we want to create our own data table later on.
When the creation of the database is complete we can create the necessary table. Go to the query editor in the Azure portal as described in the documentation link:
In the query window run the query underneath to create a new data table in the database:
When completed a new data table called eventhub will be created. Additionally, two indexes will be created to enable quick searches on ‘bn’ and ‘bt’. These columns will hold the KPN Things device identifier and measurement timestamp. The newly created data table will be visible in the left view under tables.
At this point you’ve created the data input and the data output by leveraging an Event Hub and an Azure SQL database. In the next step we’ll set up the data stream from input to output by using Azure Streamanalytics.
Now we have prepared the input data by creating the Event Hub and the data output by creating an Azure SQL data store. Now let’s set up Streamanalytics to tie it all together.
The following Microsoft quickstart will guide you through the creation of an streamanalytics job. The entire article describes the usage of an iothub for input data and blob storage for output. Remember in this quickstart we will be using Eventhub for input and Azure SQL database as output.
At ‘Configure job input’ select Event Hub and point to the Eventhub created earlier. Use ‘eventhubinput’ as alias.
At ‘Configure job output’ select SQL database and point to the Azure SQL database created earlier. Set the database table to ‘eventhub’ to match the table created during the previous step. Use ‘sqloutput’ as alias.
At ‘Define the transformation query’ select Query and update with the query underneath. Make sure you are using the input and output aliases as created under input and output
Now Save your input and start the Stream Analytics job.
At this point you’ve created a data ingestion point (Event Hub) a streaming data processor (Stream analytics job) and data storage (Azure SQL database) . In the next step we’ll connect KPN Things to Azure!
Let’s put things together! Now everything is set up in Azure all we need to do is setup a data flow in KPN Things. This Flow will send device data towards an Azure Event Hub destination.
Go to KPN Things and add a flow and give it a name and description
Link new or existing device(s)
Now go back to the flow and set up the data processing by enabling the decoders for the selected device
Add a destination for the flow. Select ‘Create new Destination’. Fill in all necessary details related to the Azure event hub created in Step 1. Don’t know where to find all the required parameters? Follow the instructions here.
When all parameters are set the destination should be active. You should now have a working KPN Things Flow towards Azure Event hub.
You’ve created your first flow towards Azure. All Data produced by the devices in the flow will now be sent to Azure, get processed by the Stream Analytics Job and will be stored in the Azure SQL database.
CREATE TABLE [dbo].[eventhub](
[Id] [int] IDENTITY(1,1) NOT NULL,
[EventProcessedUtcTime] [datetime] NULL,
[bn] nvarchar NULL,
[bt] [float] NULL,
[EventEnqueuedUtcTime] [datetime] NULL,
[n] nvarchar NULL,
[u] nvarchar NULL,
[v] [numeric](18, 2) NULL,
[vs] nvarchar NULL,
[PartitionId] datetime2 NULL,
PRIMARY KEY CLUSTERED
(
[Id] ASC
)WITH (STATISTICS_NORECOMPUTE = OFF, IGNORE_DUP_KEY = OFF) ON [PRIMARY]
) ON [PRIMARY]
GO
CREATE INDEX eventhubbn
ON eventhub (bn)
GO
CREATE INDEX eventhubbt
ON eventhub (bt)
GO
--Saving the measurements to SQL
SELECT
CASE
WHEN bn IS NULL THEN LAG(bn) OVER (PARTITION BY EventEnqueuedUtcTime LIMIT DURATION(second, 1)WHEN bn IS NOT NULL)
ELSE bn
END as bn,
CASE
WHEN bt IS NULL THEN LAG(bt) OVER (PARTITION BY EventEnqueuedUtcTime LIMIT DURATION(second, 1)WHEN bt IS NOT NULL)
ELSE bt
END as bt,
EventProcessedUtcTime,
EventEnqueuedUtcTime,
n,
u,
v,
vs,
PartitionId
INTO
[sqloutput]
FROM
[eventhubinput]
Prerequisites
Step 1: Setting up the Azure environment
Creating and configuring Azure event hub
Create an Azure SQL database with appropriate data tables
Query the database
Create and configure a Stream Analytics job
Step 2: Setup a KPN Things Flow with Azure Event Hub destination
Congratulations!
Value
How to get it
DevEUI
Use this code snippet from the Pycom documentation to retrieve the pre-programmed EUI from your LoPy4. You can use that one as DevEUI.
AppEUI
You can use this general purpose AppEUI: 0059AC00000FFFFF
AppKey
Every device should have its own unique AppKey, since it is the root security key of your device. You can generate a unique AppKey here: https://www.loratools.nl/#/keys.
3. Register your LoPy4 to KPN Things
Open the KPN Things Portal
Fill in your device information
Provide Network Information
Check your newly created Device
If the Network Status ended up in Failed, something has gone wrong. Most likely the DevEUI is already registered through another application like Thingpark or the LoRa Developer Portal. Please make sure you remove the device registration from the other application and re-add the device in the Things Portal. For more information consult our FAQ.
SenML can be structured in different ways, and we do not guarantee the examples below will look the same as what you will receive on your Destination. To make sure you can handle the SenML optimally, take a look at our documentation about Understanding and Interpreting SenML Data.
This describes the Beta API that is now deprecated. We recommend transitioning to the new API as soon as possible to take advantage of new features, improved performance, and long-term support.
Currently the APIs of KPN Things are documented using Postman. is an easy to use API development tool.
To get the Postman collection working, you need to create a with the following variables:
If you have Customer Management in your account, you can manage Things accounts for your own customers. These customers of you, let's call them sub-customers, have their own customer account in KPN Things. But you have access rights with your API Key to perform actions in their account.
To perform an API call in a sub-customer environment, there are two requirements:
You should have requested the access rights to the individual sub-customer environment
For all API calls you perform, you should add the following HTTP header:
This only has to be one once per API Key per sub-customer.
Find the Customer ID from the sub-customer you want to perform an action on. You can use the to search in your Customers and then open the of the concerning Customer to find its Customer ID.
Perform the Request KPN Things access token through GRIP API call.
Now you have access rights to the sub-customer environment with your API key. Now you can perform any API call you have the rights for in the sub-customer environment by simply adding the x-client-id header to the API call when you execute it.
Arduino MKR NB 1500
Arduino MKR NB 1500 is the fastest start with LTE-M and the Internet of Things. It’s the perfect introduction to IoT for your organization, and is also used in education. Arduino MKR NB 1500 uses its LTE-M connectivity to connect to the internet from anywhere in the world where there is LTE-M coverage.
Before you can start you need a KPN simcard. You can order 2 free cards via
On this page you will find the window below to order a simcard.
To connect the Arduino MKR NB 1500 to the computer you must use a USB cable.
Marvin development board
This is an old development board which is no longer available for purchase and should not be used for new designs.
Marvin is the fastest start with LoRa and the Internet of Things. It’s the perfect introduction to IoT for your organization, and is also used in education. Marvin uses its LoRa connectivity to connect to the internet from anywhere in the world where there is LoRa coverage.
This part of the getting started is based on the .
Download the and follow the installer. We'll use it later on to program the Marvin.
Arduino MKR WAN 1300/1310
Arduino MKR WAN 1300/1310 is the fastest start with LoRa and the Internet of Things. It’s the perfect introduction to IoT for your organization, and is also used in education. Arduino MKR WAN 1300/1310 uses its LoRa connectivity to connect to the internet from anywhere in the world where there is LoRa coverage.
To connect the Arduino MKR WAN 13X0 to the computer you must use a USB cable.
Download the and follow the installer. We'll use it later on to program the Arduino MKR WAN 13X0.
Frequently asked
See if your question has already been asked
For security reasons our platform uses the latest browser technologies for the KPN Things Portal. This means that the Portal will not work optimally in not-up-to-date browsers and underdeveloped browsers. Please use an up-to-date version of Google Chrome or Mozilla Firefox for the best user experience.
When you get this error, first check whether you already have registered a KPN Developer account with the email address you are using. Do this by trying to login. If you reach a page where you can enter your password, you do already have an account. You can use the forgot password link to reset your password in case you forgot.
To reset your password, execute the following steps:
Go to
Freemium user management
Configure users, roles and permissions
You and your team want secure and sustainable access to your IoT solution, with full insight and control. To achieve this, assigning the right roles and permissions is essential.
To achieve this, assinging the right roles and permissions is done in GRIP. This Identity and Access Management platform is developed by KPN, specifically designed for Business Users. It enables organizations to securely and efficiently manage access to their applications and services.
To assign roles, you must be an admin of the account. As an administrator, you can add or remove users and configuratie roles and permissions for your services.
As a Freemium user, you always access the user management section through the Things Portal.
1
🟡 302 Found
Your access token is incorrect or does not have access to KPN Things. Please check your API Key in GRIP.
🔴 400 Bad Request
Something in your request is not correctly formatted. For instance your body structure, your accept header or a query parameter.
🔴 403 Forbidden
Your access token is correct, but you do not have the authorization to access that resource.
keyId
Your key id
keySecret
Your key secret
baseUrl
https://api.kpnthings.com
number
0
pageSize
number
20
search
string
(case sensitive partial string search)
sortBy
string
name
sortOrder
string
ASC
Authorization
string
Bearer {accessToken}
Accept
string
application/vnd.kpnthings.device.v1.response+json
Code
Description
🟢 200 OK
Your request was correct.
🟢 201 Created
You created an object with your request.
🟢 204 No Content
Your request was correct, but there is no information to return, for instance after deleting an object.
{"content": [{"uuid":"xxxxxx","name":"My first own device","description":"","metadata":null,"deviceSpecificationUUID":"d2723e99-1fe4-4d60-9b6d-8061f7414b24","barcode":null},... ],"last": true,"totalPages": 1,"totalElements": 2,"sort": [{"direction":"ASC","property":"name","ignoreCase":false,"nullHandling":"NATIVE","ascending":true,"descending":false} ],"first": true,"numberOfElements": 2,"size": 20,"number": 0}
All Customers page
Download the Arduino IDE and follow the installer. We'll use it later on to program the Arduino MKR NB 1500.
Connect your Arduino MKR NB 1500 to your computer.
From the Tools menu, under Board, under Arduino SAMD boards (32-bits ARM Cortex M0+), select Arduino MKR NB 1500.
If the board is not available go to Tool menu, under Board select Board Manager and search for the Arduino SAMD boards (32-bits ARM Cortex M0+). Click install to install the board.
Also from the Tools menu, under Port, make sure the correct COM port is selected. If you have multiple options, select the one stating Arduino MKR NB 1500. If non of your ports is labelled that way, disconnect your Arduino MKR NB 1500, reopen the menu, check which COM port disappeared, reconnect the Arduino MKR NB 1500 and choose the previously identified COM port.
We will now test whether the Arduino MKR NB 1500 device is working by letting a LED blink.
In the Arduino IDE go to File, under Examples, under 01. Basics, select Blink.
From the Sketch menu, click Upload or select the big arrow on de left of the Arduio IDE to send the software to the Arduino MKR NB 1500. If all went well it will say Uploading complete in the bottom of the Arduino IDE and the LED on the Arduino MKR NB 1500 board will blink!
The LTE-M connectivity on your Arduino MKR NB 1500 device is managed by the uBlox SARA-R410M-02B module. With the following steps we check whether this module works correctly.
In the Arduino IDE select from the sketch menu, under Include Library select Manage Libraries or click on the library icon on the left side of the IDE. Search for MKRNB and select the 1.6.0 version.
After the library is downloaded go to File, under Examples, under MKRNB select Tools and select TestModem.
Upload the sketch to the Arduio MKR NB 1500.
Meanwhile, from the Tools menu, open the Serial Monitor. Here we will find the unique IMEI. Store the value in a text file. You'll need it when adding the device to KPN Things.
Open the KPN Things Portal. Go to the All Devices page and click on Add new Device.
Select the Own M2M device device type
Enter a name for your Arduino MKR NB 1500 device
Click Add Device to continue
IMEI: the value you retrieved from the Ublox module in the step Test the LTE-M module on the Arduino MKR NB 1500
ICCID: you must use the ICCID form the simcard you ordered via KPNThings:
Shared secret: Every device should have its own unique shared secret You can generate a unique secret by pressing Generate:
You are now on the Device Detail Page. On this page you can see the network status. If everything is done the status should be Activated. This means your device is correctly registered to the network.
To receive data in the KPNThings portal you must create a flow. Click on Flows and then on Link to another Flow.
Select My first Flow.
The flow is now created and you must add a decoder to the flow to decode the payloads from the device.
Click on My first flow.
Click on Data Processing
Enable the switch Decoded ThingsMLand raw SenML data (v2).
The decoder is now enabled and device data send by the Arduino MKR NB 1500 will be decoded and visible in the Device twin.
The decoded data can be send to a destination. For testing you can use the KPN Test Endpoint destination.
Click on Destination on the left side on the screen, next click on Add new Destination in the upper right side of the screen.
Select the Test Endpoint destination. Give it a name and click on Create Test Endpoint. The endpoint is created and there is a button and link to view the destination. Later the endpoint can always be accessed via the destination menu option on the left side of the main screen.
· From the Sketch menu in your Arduino IDE click on Include Library, Manage Libraries... or click on the library icon on the left side of the IDE.
Now, in the Library Manager, search for ThingsML and click Install.
Search for TemperatureZero and click install. When the installation is finished, click on the Library manager icon to close the left window.
From the File menu, click on Examples.
Now find ThingsML, then select Arduino, MKR_NB_1500, and within that choose mkr_nb_1500_uplink_example.
A sketch will open. Now update the values for the variables IMEI, and shared secret in the code with the values you get earlier from the device and the KPNThings.
Upload the sketch to your Arduino MKR NB 1500 and open the Serial Monitor. You will see the AT commands and some other information. Check incoming data in the Portal.
Now your Arduino MKR NB 1500 is sending data, you could visit the Device twin tab on your Device Detail Page in the Portal. You should see the measured temperature.
If the Test endpoint was setup the data from de device is also visible there.
When ordering the Arduino MKR NB 1500 make sure that an antenna is included in the order since it's not delivered with the board
2. Register your Arduino MKR NB 1500 to KPN Things
Add device
Provide network information
Store these three values somewhere, because you will be needing them to program your device later on.
Check your newly created Device
Create a flow
Enable the ThingsML decoder
Add a destination
Program your device to send a message
Install the ThingsML and TemperatureZero library
Upload a sketch
Run the sketch
Connect your Marvin to your computer.
We will now test whether the Marvin device is working by letting a LED blink.
Download blinky.ino and open it in the Arduino IDE, or copy-paste the code into an empty Arduino IDE sketch.
From the Tools menu, under Board, select Arduino Leonardo
Also from the Tools menu, under Port, make sure the correct COM port is selected. If you have multiple options, select the one stating Arduino Leonardo. If non of your ports is labelled that way, disconnect your Marvin, reopen the menu, check which COM port disappeared, reconnect the Marvin and choose the previously identified COM port.
From the Sketch menu, click Upload to send the software to the Marvin. If all went well it will say Uploading complete in the bottom of the Arduino IDE and the second LED on the Marvin board will blink!
The LoRa connectivity on your Marvin device is managed by the Microchip RN2483 module. With the following steps we check whether this module works correctly.
Download MarvinMultiSerial.ino and open it in the Arduino IDE, or copy-paste the code into an empty Arduino IDE sketch. With this program we can communicate directly with the LoRa module.
Upload the sketch to your Marvin.
Meanwhile, from the Tools menu, open the Serial Monitor
In the Serial Monitor, set the baud rate to 57600 baud (same as detailed in the sketch) and select Both NL & CR (#1 in the screenshot below).
Now you can directly speak to the LoRa module and get a response! #2 in the screenshot above shows you where to enter commands you want to send, and #3 highlights where answers from the module will be shown.
If you for instance send sys get ver, the module will return its firmware version back. This will be 1.0.1 with some historic date.
Now execute the command sys get hweui to retrieve the DevEUI that is stored in the module. Store the value in a text file. You'll need it when adding the device to KPN Things.
AppEUI: you can use the following value: 0059AC00000FFFFF
AppKey: Every device should have its own unique AppKey, since it is the root security key of your device. You can generate a unique AppKey here: https://www.loratools.nl/#/keys
Store these three values somewhere, because you will be needing them to program your device later on.
4. Click Add Network Info to save the network information and then Finish to continue.
You are now on the Device Detail Page. In the LoRa tab you will see the network status. This can temporarily be Pending creation, but if you refresh the page it should switch to Active. This means your device is correctly registered to the network.
If the network status sticks to Pending creation, you could try to delete the Device and and provision again (Restart at step Register your Marvin to KPN Things).
From the Tools menu in your Arduino IDE click on Manage Libraries...
Now, in the Library Manager, search for ThingsML and click Install. When the installation is finished, click Close.
From the File menu, click on Examples.
Now find ThingsML, then select marvin, and within that choose marvin_example, as such:
A sketch will open. Now update the values for the variables DevEUI, AppEUI, and AppKey in the code with the values you entered earlier in the Portal.
Upload the sketch to your Marvin and open the Serial Monitor. You will see a lot of commands being send to the LoRa module to configure it and to join the network. At some point you will see the following:
This means your Marvin is trying to join the network. After some seconds the following line will appear
This means the device has joined our network!
If you see denied instead of accepted , move closer to your window or walk out into the garden to improve reception from the LoRa network. Then disconnect and reconnect the Marvin to your computer. You probably need some more coverage to be able to join the network.
After joining, your Marvin will send a message every 30 seconds containing an empty temperature measurement in ThingsML format. Read more about ThingsML.
Now your Marvin has joined and is sending data, you could visit the LoRa Data tab on your Device Detail Page in the Portal. You should see your Join request and Join accept appear like in the screenshot below and at this point you will see more data as well. Learn more about LoRa data history.
You now successfully connected your Marvin device to KPN Things! To further setup your data flow in KPN Things, you can go to the next step:
If the Network Status ended up in Failed, something has gone wrong. Most likely the DevEUI is already registered through another application like Thingpark or the LoRa Developer Portal. Please make sure you remove the device registration from the other application and re-add the device in the Things Portal. For more information consult our .
3. Program your device to send a LoRa message
Download the ThingsML library
Make a sketch
Run the sketch
4. Check incoming data in the Portal
Setup data flow in KPN Things
Connect your Arduino MKR WAN 13X0 to your computer.
From the Tools menu, under Board, under Arduino SAMD boards (32-bits ARM Cortex M0+), select Arduino MKR WAN 1300 or 1310.
If the board is not available go to Tool menu, under Board select Board Manager and search for the Arduino SAMD boards (32-bits ARM Cortex M0+). Click install to install the board.
Also from the Tools menu, under Port, make sure the correct COM port is selected. If you have multiple options, select the one stating Arduino MKR WAN 13X0. If nonee of your ports is labelled that way, disconnect your Arduino MKR WAN 13X0, reopen the menu, check which COM port disappeared, reconnect the Arduino MKR WAN 13X0 and choose the previously identified COM port.
We will now test whether the Arduino MKR WAN 13X0 device is working by letting a LED blink.
In the Arduino IDE go to File, under Examples, under 01. Basics, select Blink
From the Sketch menu, click Upload or select the big arrow on the left of the Arduio IDE to send the software to the Arduino MKR WAN 13X0. If all went well it will say Uploading complete in the bottom of the Arduino IDE and the LED on the Arduino MKR WAN 13X0 board will blink!
The LoRa connectivity on your Arduino MKR WAN 13X0 device is managed by the Murata CMWX1ZZABZ module. With the following steps we check whether this module works correctly.
In the Arduino IDE select from the sketch menu, under Include Library select Manage Libraries. Search for MKRWAN and select the 1.1.0 version.
After the library is downloaded go to File, under Examples, under MKRWAN select FirstConfiguration.
Upload the sketch to the Arduio MKR WAN 13X0
Meanwhile, from the Tools menu, open the Serial Monitor. Here we will find the unique Device EUI. Store the value in a text file. You'll need it when adding the device to KPN Things.
If your device has not the latest firmware version you can load the MKRWANFWUpdate_standalone.ino sketch via File, under Examples, MKRWAN to update the device firmware.
Open the KPN Things Portal. Go to the All Devices page and click on Add new Device.
Select the Own LoRa device (preset connectivity) device type
AppEUI: you can use the following value: 0059AC00000FFFFF
AppKey: Every device should have its own unique AppKey, since it is the root security key of your device. You can generate a unique AppKey here: https://www.loratools.nl/#/keys
Click Add Network Info to save the network information and then Finish to continue.
You are now on the Device Detail Page. In the LoRa tab you will see the network status. This can temporarily be Pending creation, but if you refresh the page it should switch to Active. This means your device is correctly registered to the network.
If the network status sticks to Pending creation, you could try to delete the Device and and provision again (Restart at step Add device)
If the Network Status ended up in Failed, something has gone wrong. Most likely the DevEUI is already registered through another application or account. Please make sure you remove the device registration from the other application or account and re-add the device in the Things Portal.
From the Sketch menu in your Arduino IDE click on Include Library, Manage Libraries...
Now, in the Library Manager, search for ThingsML and click Install. When the installation is finished, click on the Library manager icon to close the left window.
From the File menu, click on Examples.
Now find ThingsML, then select Arduino, MKR_WAN_1300, and within that choose Arduino_mkr_wan_1300_example.
A sketch will open. Now update the values for the variables AppEUI, and AppKey in the code with the values you entered earlier in the Portal. The DevEUI is automatically filled in on the background.
Upload the sketch to your Arduino MKR WAN 13X0 and open the Serial Monitor. You will see your module version and if your device is successfully connected and joined the network. At some point you will see the following:
If you see something else instead of connected , move closer to your window or walk out into the garden to improve reception from the LoRa network. Then disconnect and reconnect the Arduino MKR WAN 13X0 to your computer. You probably need some more coverage to be able to join the network.
After joining, your Arduino MKR WAN 13X0 will send a message every 300 seconds containing a fixed temperature “measurement” in ThingsML format. Read more about .
Now your Arduino MKR WAN 13X0 has joined and is sending data, you could visit the LoRa Data tab on your Device Detail Page in the Portal. You should see your Join request and Join accept appear like in the screenshot below and at this point you will see more data as well.
You now successfully connected your Arduino MKR WAN 1300/1310.
When ordering the Arduino MKR WAN 1300/1310 make sure that an antenna is included in the order since it's not delivered with the board
Your module version is: ARD-078 1.2.3
Your device EUI is: a8610a………….
Connected!
Sending message...
Message sent correctly!
Sending message...
Message sent correctly!
Test your Arduino MKR WAN 13X0 device
Test the LoRa module on the Arduino MKR WAN 13X0
2. Register your Arduino MKR WAN 13X0 to KPN Things
Add device
Provide network information
Store these three values somewhere, because you will be needing them to program your device later on.
Check your newly created Device
3. Program your device to send a LoRa message
Download the ThingsML library
Make a sketch
Run the sketch
4. Check incoming data in the Portal
Click Login
Enter your Email address and click Doorgaan
Click Wachtwoord vergeten
Enter your Email address again in the field for Gebruikersnaam and click Doorgaan
Choose E-mail naar ****@*****
Check your email for the authentication code, enter it in the field for Code in and click Doorgaan
Enter a new password and click Doorgaan
It should be between 10 and 100 characters
It should contain at least three of the following types of characters: capital letter, small letter, number, and special character
Your password has now been reset
When adding a device you can get the error "The network identifier already exists for this network type". This means the network identifier, DevEUI for LoRa or IMEI for M2M, you are using to register your device is already known in our systems.
You should delete the device record from the device table page using the three dot menu on the right side of the column.
When you are sure you did not register the same device earlier, please contact our support through our contact form and state the network identifier with which you got the problems. If you are trying to register a device that was also registered in the LoRa Developer Portal, please state the account name in your question to our support as well. We could transfer your keys from the LoRa Developer Portal to the Things Portal.
This means you try to add more devices to your account than is allowed by your subscription. You could try to remove another device from your registrations or you can contact our commercial support on iot@kpn.com to get more information on upgrading your subscription.
This means your LoRa device could not be registered to our LoRa network. Probably the DevEUI is already in use in another application on our network like Thingpark or the LoRa Developer Portal. If you want to register your device in the Things Portal, first remove the device registration from the other application. Then you can re-add the devices in the Things Portal.
Since the DevEUI's you are trying to register are still registered in the LoRa Developer Portal, they cannot be registered in the Things Portal. DevEUI's can only be registered once in our network.
Please send an email to iot-developer@kpn.com stating your account name (email address) and the DevEUI's you want to be able to move. We will remove them from the LoRa Developer Portal and our network and we will answer you when we did it. From then on you can register your device in the Things Portal.
If you have a device with pre-programmed identifiers and key that you cannot change, you should contact your supplier to get the information.
If you registered a device and got the identifiers from KPN Things, then there is no way to reset your AppEUI or AppKey for your device at the moment. You should delete your device from your account and add it again, get new identifiers and program the device with the new identifiers.
In time you will be able to view the AppEUI in the Portal and you will be able to generate a new AppKey for your device without having to delete and re-add it.
You can check the following configuration items in the Portal to verify whether the path is correctly set up:
Does your device have (the correct) connectivity information configured?
→ Visit the device detail page and go to the Connectivity tab. You can check the information and if necessary add connectivity information.
Is the connectivity indeed activated?
→ Visit, on the device detail page, the Connectivity tab and verify that Network Status is set to ACTIVE. If not, read this FAQ.
Can you see data coming in from your device in the Data History?
→ Visit, on the device detail page, the Data History tab to verify incoming data. If you do not see your device joining, you could get more info in . Else you should use your device documentation to get it to send data.
Is your destination configuration correct? E.g. the URL, etc.
→ Visit, on the destination detail page, the Destination Specification tab to check your destination configuration.
→We are working on giving you more insight into the logs of a destination, stay tuned!
Is your destination status Active?
→Visit the destination detail page. The Processing status in the top right card should say Active. If this is not the case, click the Activate button in the top right of the card to activate the destination again.
Is your Device linked to the Flow?
→Visit, on the Device detail page, the Flows tab to check to which Flows your Device is linked. If the correct Flow is missing, go to Devices in Flow page, click Add Device, click Link an existing Device, and select your Device from the list.
Is your Destination linked to the Flow?
→ Visit, on the Destination detail page, the Flows tab to check to which Flows your Destination is linked. If the Flow is missing, go to Destinations in Flow page, click Add Destination, click Link an existing Device, select your Destination from the drop down and click Add Destination.
Is the correct decoder activated?
→ Go to the Data Processing page of your Flow. Click on the Device type of your Device. Verify that one or more Decoders are enabled (The device type can be found in the main card of the Device detail page).
→ If no correct Decoder is activated, click on the toggle of the desired Decoder(s) to enable it.
Do you have a question that is not answered here? Ask for support via our contact form. The support team is available to provide guidance, ensuring you have the assistance you need along your IoT journey.
General questions
The Portal does not look very nice in my browser
Registration and logging in
I get the error "Registration failed" when registering for a new KPN Developer account
I get the error "The network identifier already exists for this network type" when adding a device.
I get the error "Device could not be created: The maximum amount of devices for this product has been reached"
After adding my LoRa device, the Network status of my LoRa Network Details says "FAILED"
After (re-)registering the device in the Things Portal, you should rejoin your Device to the network.
I get this error when I am trying to register my LoRa Developer Portal DevEUI's
What should I do when I lost the AppEUI or AppKey of my registered device?
Device communication
My LoRa device won't join the network
I do not receive any data from my device in my application
Device's connection to the Network
Destination's configuration
Flow's configuration
Decoder activation
Other technical in depth documentation
How can I get in touch if I have a question not answered in the FAQ?
Go to portal.kpnthings.com/manager or go to KPN Things Portal and click on My KPN user details the account details menu in the top right corner to display the Services and Roles menu
2
Click on your name in the account details menu in the top right corner to display the management overview page
3
For documentation about how to manage users read the next section.
The information below explains how to manage users, including adding and removing users, and managing roles and permissions.
Once you have accessed the User Management section in GRIP, you can perform several actions to control access within your organization.
Review existing users, add and delete users
View the list of all users in your organization, including their roles and assigned services. Invite new team members by creating users accounts or deleting users who no longer need access to your services.
Edit or give permissions to an added or existing user
Modify user information, roles and permissions to ensure they have the correct level of access to your services.
In the User Management table, you can see all current users along with their assigned roles and permissions. This overview helps you quickly check who has access to which services.
Add, Remove or Modify Users
To add a new user, click Add User at the top of the page
To modify a user, click the three dots ⋮ and select Edit
To remove a user, click the three dots ⋮ and select Deactivate or Delete
Modify users
For a New User you click on the Add User at the top of the page and provide the general information.
1
Provide the general information
Fill in the general details of the new user
Select the Send email to set password option to send a password email immediately. This can also be done at a later time, for example after you’ve configured all roles and permissions.
Click the Add User button
After adding the user, the next screen opens where you can optionally enter additional information about the user. This information is not required for using your account, but it can be used for your own administration.
Add additional general details (optional)
Add even more information like job title or office location (optional)
Select the preferred language setting
1
Select Services and Roles
Navigate to the Services and Roles tab
If the user should be able to manage other users, enable the Admin role
Click Save Changes
Click + Assign services and roles button to add specific services
Select the appropriate services and roles based on the user’s responsibilities. The example below grants the user full access to the features within the KPN Things Portal.
The below list shows the available roles for services that are used within the KPN IOT solution and describes what levels of access each of the roles gives to the user in KPN Things portal.
The central identity solution behind every account
Provides the user with an Admin account to access and give assigned services.
Role
Description
Access
Admin
Full user management, including own account.
View and manage services and roles of other users; add, modify or remove users.
The foundation for your IoT applications
The starting point for your IoT service and manage the IoT solution.
We advise that every user has a Things Manager and Things Support role.
These roles are only needed if you manage your devices, decoders and scripts via KPN Things. If only connectivity features are used, these roles are not required.
Role
Description
Access
Things Creator - Admin
Full access to Things Creator tab.
Add modify or remove devices types, decoders and scripts.
Things Creator - Read Only
Read-only access to Things Creator tab.
View device types, decoders, and scripts.
We recommend granting the user at least KPN Things - Read Only access. This ensures insights into the IoT solution and enables options such as making exports of connectivity items available.
Role
Description
Access
Things Manager - Admin
Full access to Things Manager tab.
Add, modify, or remove devices, flows, destinations and manage connectivity.
Things Manager - Editor
Full access except for deleting to Things Manager tab.
Add, modify, or remove devices, flows, destinations and manage connectivity except the right to delete.
We advise that every user has access to this role in order to see documents and access to links to contact information. Assigning this role also subscribes you to service emails.
Role
Description
Access
Things Support - User
Access to the Things Support tab.
View news, release notes, documents, service status, reports and contact info and recieve service emails.
If you’re the one who created the Freemium account, you automatically become the account admin.
Access the User Management section
Managing Users in GRIP
What functionalities do you have
Why this matters
Managing users and permissions in GRIP ensures that only authorized individuals can access your applications and IoT services. This helps maintain security and compliance across your organization.
Review existing users, add and delete users
To give you the opportunity to reactivate an account without having to create it again, a deleted user will remain visible in the overview for 10 days before it is completely removed.
Edit or give permissions to an added or existing user
Assigning Services and Roles
Services and Roles explained
Make sure to select only one role per item
If you choose multiple roles - such as Thing Manager - Admin and Thing Manager - Read Only - the lowest role will override the highest.
In this example, you would only have Read Only access.
Add data to messages where location could be calculated.
Decoder for Streamline LoRa message type 0xD282.
Expected SenML records
name
type
unit
Decodes fields from a Streamline LoRa payload, specifically for waste control application.
The following SenML records can be present, amongst others:
name
type
unit
example
description
Things Creator
Define custom device types, decoder scripts, and destination formats for your KPN Things projects.
KPN Things supports a wide range of IoT devices out of the box. However, if your project uses devices that are not yet supported, you can define your own private device types and decoders within Things Creator. Once created, these custom device types and decoders will be available across all of your projects.
To access Things Creator, log in to the KPN Things Portal and select Things Creator from the top navigation menu. If this option is not visible, you do not have the required permissions. Access is managed via roles in KPN Grip; please contact your Grip tenant administrator to request access.
The Things Creator includes the following menu items
Explorer user management
Configure users, roles and permissions
You and your team want secure and sustainable access to your IoT solution, with full insight and control. To achieve this, assigning the right roles and permissions is essential.
To achieve this, assinging the right roles and permissions is done in GRIP. This Identity and Access Management platform is developed by KPN, specifically designed for Business Users. It enables organizations to securely and efficiently manage access to their applications and services.
To assign roles, you must be an admin of the account. As an administrator, you can add or remove users and configuratie roles and permissions for your services.
To manage users and roles, you need admin rights
Click the Save Changes button
Things Manager - Read Only
Read only access to Things Manager tab.
View devices, flows, destinations and connectivity.
For Freemium users a phone number is optional.
The admin is responsible for assigning thecorrect permissions to the user. Please note that someone with admin rights can also grant themselves additional permissions.
Device Types
Add and configure custom device types.
Decoders
Manage payload decoders for your custom device types.
Destination Formats
Add and configure custom data formats if your destinations require an alternative to SenML.
41fdc428-12cb-52b0-9e0c-e160b97bdcd5
Decodes fields from a Streamline LoRa payload, specifically for waste control application.
number
detectedBeacon
string
distance
number
m
distanceMeasurementIsValid
boolean
/
lidOpenedSincePreviousTransmission
boolean
/
temperature
number
Cel
boolean
false
the battery level low indication of the detected beacon
count_LidOpen
number
1
number of times the bin lid has been opened
detectedBeacon
string
"a1e2093368d4e7b8"
DevEUI of the last detected beacon
distance
number
m
0.684
distance to the detected object from the fill sensor
distanceMeasurementIsValid
boolean
true
lidOpenedSincePreviousTransmission
boolean
true
temperature
number
Cel
18.875
timeOrigin
string
NETWORK
the source of time information for measurements
+ LoRa Geolocation data
4c0bf70f-cde5-4f5a-aac2-8480a875ec86
Add LoRa Geolocation data to messages where location could be calculated.
SenML can be structured in different ways, and we do not guarantee the examples below will look the same as what you will receive on your Destination. To make sure you can handle the SenML optimally, take a look at our documentation about Understanding and Interpreting SenML Data.
› Decoded payload for Waste Control application (v2)
count_LidOpen
batteryLevelLow_beacon
Already an admin? Great! Let’s get started!
Not an admin yet? Ask your organization’s administrator to grant you admin rights
Not sure who that is? Contact us and we’ll help you out
As a Freemium user, you always access the user management section through the Things Portal.
1
Go to portal.kpnthings.com/manager or go to KPN Things Portal and click on My KPN user details the account details menu in the top right corner to display the Services and Roles menu
2
Click on your name in the account details menu in the top right corner to display the management overview page
3
For documentation about how to manage users read the next section.
The information below explains how to manage users, including adding and removing users, and managing roles and permissions.
Once you have accessed the User Management section in GRIP, you can perform several actions to control access within your organization.
Review existing users, add and delete users
View the list of all users in your organization, including their roles and assigned services. Invite new team members by creating users accounts or deleting users who no longer need access to your services.
Edit or give permissions to an added or existing user
Modify user information, roles and permissions to ensure they have the correct level of access to your services.
In the User Management table, you can see all current users along with their assigned roles and permissions. This overview helps you quickly check who has access to which services.
Add, Remove or Modify Users
To add a new user, click Add User at the top of the page
To modify a user, click the three dots ⋮ and select Edit
To remove a user, click the three dots ⋮ and select Deactivate or Delete
Modify users
For a New User you click on the Add User at the top of the page and provide the general information.
1
Provide the general information
Fill in the general details of the new user
Select the Send email to set password option to send a password email immediately. This can also be done at a later time, for example after you’ve configured all roles and permissions.
Click the Add User button
After adding the user, the next screen opens where you can optionally enter additional information about the user. This information is not required for using your account, but it can be used for your own administration.
Add additional general details (optional)
Add even more information like job title or office location (optional)
Select the preferred language setting
1
Select Services and Roles
Navigate to the Services and Roles tab
If the user should be able to manage other users, enable the Admin role
Click Save Changes
Click + Assign services and roles button to add specific services
Select the appropriate services and roles based on the user’s responsibilities. The example below grants the user full access to the features within the KPN Things Portal.
The below list shows the available roles for services that are used within the KPN IOT solution and describes what levels of access each of the roles gives to the user in KPN Things portal.
The central identity solution behind every account
Provides the user with an Admin account to access and give assigned services.
Role
Description
Access
Admin
Full user management, including own account.
View and manage services and roles of other users; add, modify or remove users.
The foundation for your IoT applications
The starting point for your IoT service and manage the IoT solution.
We advise that every user has a Things Manager and Things Support role.
This role is needed to view contract and usage information that is used as input for the invoice. It also allows you to see which costs will be charged on the upcoming invoice.
Role
Description
Access
Finance - Read Only
Read-only access to invoices and contracts in the Things Portal.
View contract and usage information that is used as input for the invoice. It also allows you to see which costs will be charged on the upcoming invoice.
These roles are only needed if you manage your devices, decoders and scripts via KPN Things. If only connectivity features are used, these roles are not required.
Role
Description
Access
Things Creator - Admin
Full access to Things Creator tab.
Add modify or remove devices types, decoders and scripts.
Things Creator - Read Only
Read-only access to Things Creator tab.
View device types, decoders, and scripts.
We recommend granting the user at least KPN Things - Read Only access. This ensures insights into the IoT solution and enables options such as making exports of connectivity items available.
Role
Description
Access
Things Manager - Admin
Full access to Things Manager tab.
Add, modify, or remove devices, flows, destinations and manage connectivity.
Things Manager - Editor
Full access except for deleting to Things Manager tab.
Add, modify, or remove devices, flows, destinations and manage connectivity except the right to delete.
We advise that every user has access to this role in order to see documents and access to links to contact information. Assigning this role also subscribes you to service emails.
Role
Description
Access
Things Support - User
Access to the Things Support tab.
View news, release notes, documents, service status, reports and contact info and recieve service emails.
Before you start
Access the User Management section
Managing Users in GRIP
What functionalities do you have
Why this matters
Managing users and permissions in GRIP ensures that only authorized individuals can access your applications and IoT services. This helps maintain security and compliance across your organization.
Review existing users, add and delete users
To give you the opportunity to reactivate an account without having to create it again, a deleted user will remain visible in the overview for 10 days before it is completely removed.
Edit or give permissions to an added or existing user
Assigning Services and Roles
Services and Roles explained
Make sure to select only one role per item
If you choose multiple roles - such as Thing Manager - Admin and Thing Manager - Read Only - the lowest role will override the highest.
In this example, you would only have Read Only access.
Finance
Learn more about the finance information on the page.
The M2M Connectivity configuration page gives you the opportunity to choose the communication and rate plan that best suits your application.
Cisco synchronisations
For M2M connectivity, the information is synchronised with the source system, Cisco Control Center. This sync is performed daily. If you’ve made changes directly in Cisco Control Center, the list may show outdated information. However, when you view an individual connection, the latest data for that item is always retrieved.
You can check when the last synchronisation took place by clicking the icon.
Last Cisco sync
Search by ICCID
Use the search field to look up the ICCID number of the simcard. If you enter part of the number, you’ll get a list of all ICCIDs containing those digits.
In the Things Portal, we can show you all M2M details for an ICCID, such as activation dates, usage, and technical information.
Click anywhere on the line or the icon at the end of the row
When the Cisco button is available, you can open the ICCID information in Cisco Control Center directly from the Things Portal
In the M2M detail overview, you will find all the information and can adjust settings:
Summary of the device linked to the SIM card (optional)
Summary of the ICCID reference and status
Change the Communication and Rate Plan
In the Connectivity Details overview, you can also see the device linked to an ICCID. When you click on the device properties, you are automatically redirected to Device Details. A more detailed explanation of how this works can be found in .
Below is a brief description of the fields displayed:
Label This is the name of the device
Barcode This is the unique identifier of the device, such as a barcode or serial number
Device type This defines the type of device and determines which decoder is applied
In the M2M Summary Details overview, you see an overview of the current settings of the simcard.
Below is a brief description of the fields displayed:
Cisco Clickout button to Cisco Control Center
ICCID This is the unique identifier of the simcard
Connection This is the status of the simcard
You can change the simcard settings in the this section. If you are a Tailored user and also use Cisco for simcard management, you’ll notice that this information is synchronized automatically.
1. Connection
This hows the current status of the SIM card. You can change this status in this menu. Below is an overview of the available statuses, their meaning, and when to use them.
Status
Description
When to use
2. Last message
The Last Message field shows when data was last received from the SIM card. It provides an indication of whether the SIM is functioning correctly or when it was last used.
3. Edit Communication and Rate Plan
You can use the pull-down menus to change the SIM card settings. The available options may vary. If you are a tailored customer, there might be custom options designed specifically for your environment.
4. Communication and Rate Plan information
These are the current settings for this simcard. When you change the communication and rate plan, the new settings will appear here.
5. APN(s)
The Access Point Name (APN) determines which gateway delivers your data traffic. This value cannot be set separately. It is linked to your communication plan. When you change the communication plan, the APN shown here may also change. For customers without a Tailored subscription, the APN is always kpnthings2m2m, ensuring that traffic is delivered to the Things Portal.
In this section, you can disconnect a SIM card from a device or link it to one. If there are issues with a SIM card, you can insert a different SIM card into the device and confirm the swap in the Things Portal.
1. M2M Connectivity Configuration details
Here you can view the hard configured details of the SIM card.
2. M2M Device Configuration
The IMEI number (International Mobile Equipment Identity) is a unique 15-digit code that identifies your device. This number is linked to the device, not to the SIM card.
3. Unlink SIM card
This action disconnects the SIM from the device. Besides ending the administrative link, flows and destinations also stop the delivery of device data.
4. Switch SIM card
If you don't want to end a relationship between a SIM and a device but want to link the device to a different SIM, you can use this function to select another SIM.
5. Link Device
When a SIM is not linked to a device, you can select a device here.
Billing shows the current billing status, including the start date of connectivity and whether the grace period or minimum term has passed.
1. Billing state note
If it is not immediately clear why connectivity is billed, the note explains the reason, for example because a contract term has expired or because it simply became active through usage.
2. Billable
This section shows whether the SIM is currently billable, indicated with a simple yes or no.
3. Shipped date
This date shows when the SIM was registered in the system and for physical SIMs, the date on which it was shipped.
4. Grace period and end data
The grace period is the timeframe within which a SIM becomes billable in accordance with the contract. If a grace period applies, you will see its duration here and the date on which it will end.
5. First activation date
This date indicates when data usage was first observed for the SIM.
6. Minimum term and end date
The minimum term is the timeframe within which a SIM stays billable in accordance with the contract. If a minimum term applies, you will see its remaining duration here and the date on which it will end.
Ownership shows which account and project in the Things Portal the connectivity belongs to.
1. Things Customer
This is the name of your own Things Portal client.
2. Project
This is the project where the connectivity is managed. Each project is linked to a single Cisco account or Cisco Customer.
3. Connectivity provider
This is the connectivity solution linked to the project. The provider is M2M Cisco, with the account acting as the provider. In most cases, it includes the name of the Cisco account, or a combination of the Cisco account and Cisco customer, where applicable.
4. Cisco Account
This is the account as it exists within Cisco.
5. Cisco Customer
This is an optional sub-level within Cisco accounts.
KPN FillTag II
KPN FillTag II
FillTag device for Waste Control applications, also known as Syren II-L Waste device.
Bearer authentication header of the form Bearer <token>.
Path parameters
projectIdstring · uuidRequired
Project identifier
get
Retrieve all projects that match the query parameters given. If a search parameter is provided, projects whose name or description (partially) match are returned.
Required scopes
This endpoint requires the following scopes:
Authorizations
AuthorizationstringRequired
Bearer authentication header of the form Bearer <token>.
Query parameters
cursorstring · cursorOptional
String that encodes all necessary information to retrieve a page.
limitintegerOptional
Limit the number of results (per page).
Default: 50
sortstringOptional
Sorting fields separated by comma. Default order is Ascending (ASC), minus(-) should be used in front of field name for Descending (DESC) order.
Example: createdAt,-name
qstring · min: 1Optional
Include only projects whose name or description contain the search term. Matching is done case-insensitively.
clientIdstring · uuidOptional
Include only projects owned by the client matching clientId.
createdBeforestring · date-timeOptional
Include only projects created before the provided date and time. The date-time must be in ISO 8601 format.
createdSincestring · date-timeOptional
Include only projects created at or after the provided date and time. The date-time must be in ISO 8601 format.
modifiedBeforestring · date-timeOptional
Include only projects modified before the provided date and time. The date-time must be in ISO 8601 format.
modifiedSincestring · date-timeOptional
Include only projects modified at or after the provided date and time. The date-time must be in ISO 8601 format.
Click the Save Changes button
Things Manager - Read Only
Read only access to Things Manager tab.
View devices, flows, destinations and connectivity.
For Freemium users a phone number is optional.
The admin is responsible for assigning thecorrect permissions to the user. Please note that someone with admin rights can also grant themselves additional permissions.
Ownership View the project and linked account details
Processing This shows whether the data is processed and delivered to an endpoint
Flows This shows which data flow the device is linked to
Comm Plan This shows the current communication plan setting
Rate Plan This shows the current rate plan setting
simcard was active but is now turned off
for simcards that are temporarily not in use but reusable later
Retired
simcard is permanently disabled and cannot be reactivated
for simcards that are lost, damaged, or no longer needed
Activated
simcard is live and ready for data, voice, or sms services
for simcards actively in use by a customer or device
Activation Ready
simcard is configured and ready for quick activation after exceeding a minimum data threshold
for simcards prepared for deployment or large rollouts
Open ICCID details
If you are not logged in to Cisco Control Center, you will first see a login screen when you click the Cisco button.
If you are already logged in, clicking this button will immediately open the ICCID in Cisco Control Center.
Device Summary
For connectivity in a Tailored project, linking a device is optional. It can be used to keep track of which connectivity is associated with which device. However, the data is handled outside the Things Portal, and device management is not mandatory for Tailored projects.
M2M Summary
For a Tailored project, the clickout button to Cisco Control may be available.
M2M Details
When you change simcard settings directly in Cisco, the updated information will be visible in Things Portal after the daily Cisco synchronization.
M2M Connectivity Configuration
This option is only available if no device is currently linked.
Billing
From the connectivity list, you can easily filter all billable SIMs and recommend deploying these first to make sure they are put to use.
Ownership
For a Tailored customer, there is always a dedicated, individual account. For Modular or Explorer customers, this account level is labeled as such, under which a Cisco Customer account exists.
For a Tailored customer, connectivity can be grouped within Cisco at this level. For Modular or Explorer customers, this level shows the customer account as it is known and linked to the project.
SenML can be structured in different ways, and we do not guarantee the examples below will look the same as what you will receive on your Destination. To make sure you can handle the SenML optimally, take a look at our documentation about Understanding and Interpreting SenML Data.
› Syren II-L hex based decoder
interval
interval
Responses
200
The project
application/json
Project in KPN Things that serves as a container for devices, destinations, flows and metadata
idstring · uuidRead-onlyRequired
The entity ID
Example: 99086060-b099-416e-a321-53220f4edf99
clientIdstring · uuidRequired
ID of owning client
Example: b7b953c9-b137-4d28-8d29-d266c720bc78
createdAtstring · date-timeRead-onlyOptional
The timestamp when the project is created in the system.
The following SenML records can be present, amongst others:
name
type
unit
example
description
Detail level 1 (SV_CountersUser)
Detail level 2 (SV_Network)
Detail level 3 (SV_Position)
Retrieve downlinks filtered and sorted by specified search and sort criteria
get
Required scopes
This endpoint requires the following scopes:
Authorizations
AuthorizationstringRequired
Bearer authentication header of the form Bearer <token>.
Query parameters
cursorstring · cursorOptional
String that encodes all necessary information to retrieve a page.
limitintegerOptional
Limit the number of results (per page).
Default: 50
sortstringOptional
Sorting fields separated by comma. Default order is Ascending (ASC), minus(-) should be used in front of field name for Descending (DESC) order.
Example: createdAt,-name
qstring · min: 1Optional
Include only downlinks whose tagValue, networkId or message match the search term. The tagValue must match exactly. The networkId and message may match partially. Matching for every query parameter is done case-sensitively.
createdBeforestring · date-timeOptional
Include only downlinks created before the provided date and time. The date-time must be in ISO 8601 format.
createdSincestring · date-timeOptional
Include only downlinks created at or after the provided date and time. The date-time must be in ISO 8601 format.
modifiedBeforestring · date-timeOptional
Include only downlinks modified before the provided date and time. The date-time must be in ISO 8601 format.
modifiedSincestring · date-timeOptional
Include only downlinks modified at or after the provided date and time. The date-time must be in ISO 8601 format.
Responses
200
Page of filtered downlinks. Only downlinks that are accessible to the caller are returned.
application/json
Page of items
idstringRead-onlyOptional
Unique identifier for the downlink.
Example: 12345678-1234-1234-1234-123456789012
networkIdstringRequired
An identifier for a device that is on an activated network.
Example: urn:dev:DEVEUI:1234567890abcded:
externalReferencestringOptional
Optional external identifier that can be provided by API caller to reference the downlink with. Must be unique for the client that owns the device.
Example: someExternalReference123
statusstringRequired
Status of the downlink message. Known values include: PENDING, EXECUTING, SENT_TO_CARRIER, CANCELLED, RETRY, DELIVERED and FAILED
The timestamp when the downlink is created in the system.
Example: 2025-01-10T10:59:12.821Z
modifiedAtstring · date-timeRead-onlyOptional
The timestamp when the downlink is last modified in the system.
Example: 2025-01-11T09:27:26.272Z
createdAtstring · date-timeRequired
The creation timestamp of the downlink log
Example: 2025-01-11T09:27:26.272Z
eventstringOptional
Name of the event which corresponds to this log entry. Known values include: DOWNLINK_PART_SENT, DOWNLINK_PART_FAILED, DOWNLINK_PART_DELIVERED, DOWNLINK_ACCEPTED, DOWNLINK_REJECTED, DOWNLINK_STARTED, DOWNLINK_DELIVERED and DOWNLINK_FAILED
errorCodestringOptional
Error code indicating the reason for a failure, if applicable.
Example: CANCELLEDPattern: .*\S.*
nextstring · uriOptional
Pagination link pointing to the next page. Only provided when not at the last page.
prevstring · uriOptional
Pagination link pointing to the previous page. Only provided when not at the first page.
get
/downlinks
Create a new downlink
post
Required scopes
This endpoint requires the following scopes:
Authorizations
AuthorizationstringRequired
Bearer authentication header of the form Bearer <token>.
Body
A request to create a downlink to be sent to an IoT device.
externalReferencestringOptional
Optional external identifier that can be provided by API caller to reference the downlink with. Must be unique for the client that owns the device.
Example: someExternalReference123
i_number · int32Optional
bnstringOptional
btnumber · doubleOptional
bvnumber · doubleOptional
bsnumber · doubleOptional
bustringOptional
bverinteger · int32Optional
lstringOptional
nstringOptional
snumber · doubleOptional
tnumber · doubleOptional
ustringOptional
utnumber · doubleOptional
vnumber · doubleOptional
vbbooleanOptional
vsstringOptional
vdstringOptional
and
anyOptional
Instruction in SenML format to send to the device. The provided instruction must contain a bn that identifies the device. The SenML instruction will be transformed into a protocol specific downlink using the configured encoder.
The protocol type. For HttpMethod, this must be HTTP.
Possible values:
or
protocolDiscriminatorconst: LORARequired
The protocol type. For LoraMethod, this must be LORA.
Possible values:
fPortintegerOptional
LoRaWAN FPort used by the device for this downlink.
Example: 3
or
protocolDiscriminatorconst: MQTTRequired
The protocol type. For MqttMethod, this must be MQTT.
Possible values:
topicstringOptional
MQTT topic to which the message should be published.
Default: downlinkExample: downlink
contentTypestringOptional
MIME type of the message content.
Example: text/plain
or
protocolDiscriminatorconst: SMSRequired
The protocol type. For SmsMethod, this must be SMS.
Possible values:
retryLimitintegerOptional
The maximum number of retries that should be performed for the downlink.
Default: 0Example: 3
feedbackTimeoutall ofOptional
string · durationOptional
Duration that supports a subset of ISO 8601, where only days, hours, minutes, and seconds can be specified. Days are treated as exactly 24 hours, thus ignoring daylight savings effects.
The timestamp when the downlink is created in the system.
Example: 2025-01-10T10:59:12.821Z
modifiedAtstring · date-timeRead-onlyOptional
The timestamp when the downlink is last modified in the system.
Example: 2025-01-11T09:27:26.272Z
createdAtstring · date-timeRequired
The creation timestamp of the downlink log
Example: 2025-01-11T09:27:26.272Z
eventstringOptional
Name of the event which corresponds to this log entry. Known values include: DOWNLINK_PART_SENT, DOWNLINK_PART_FAILED, DOWNLINK_PART_DELIVERED, DOWNLINK_ACCEPTED, DOWNLINK_REJECTED, DOWNLINK_STARTED, DOWNLINK_DELIVERED and DOWNLINK_FAILED
errorCodestringOptional
Error code indicating the reason for a failure, if applicable.
Example: CANCELLEDPattern: .*\S.*
get
/downlinks/{downlinkId}
200
Downlink has been successfully fetched.
No content
Accepts and schedules full or partial cancellation of downlink for further downstream handling.
delete
Required scopes
This endpoint requires the following scopes:
Authorizations
AuthorizationstringRequired
Bearer authentication header of the form Bearer <token>.
Path parameters
downlinkIdstringRequired
Downlink identifier
Query parameters
forcedbooleanOptional
Whether to force the cancellation of the downlink or not.
Default: false
Responses
202
Downlink cancellation has been accepted and scheduled for further downstream processing.
409
Downlink status does not permit cancellation.
application/problem+json
delete
/downlinks/{downlinkId}
No content
get
Required scopes
This endpoint requires the following scopes:
Authorizations
AuthorizationstringRequired
Bearer authentication header of the form Bearer <token>.
Query parameters
cursorstring · cursorOptional
String that encodes all necessary information to retrieve a page.
limitintegerOptional
Limit the number of results (per page).
Default: 50
sortstringOptional
Sorting fields separated by comma. Default order is Ascending (ASC), minus(-) should be used in front of field name for Descending (DESC) order.
Example: createdAt,-name
deviceIdone ofOptional
A device identifier in one of several supported formats.
The timestamp when the downlink was created in the system.
Example: 2025-01-02T12:04:32.982Z
modifiedAtstring · date-timeRead-onlyOptional
The timestamp when the downlink was last modified in the system.
Example: 2025-01-02T12:04:32.982Z
feedbackTimeoutall ofRequired
string · durationOptional
Duration that supports a subset of ISO 8601, where only days, hours, minutes, and seconds can be specified. Days are treated as exactly 24 hours, thus ignoring daylight savings effects.
The duration after which feedback is expected for the downlink. Must be at least 10 minutes.
Example: PT25H
dryRunbooleanOptional
Indicates if this is a dry run.
Default: false
lastFailureReasonstringRead-onlyOptional
The failure reason of the HTTP downlink. Known values include: CANCELLED, TIMEOUT and EVICTED
get
/http/downlinks/{downlinkId}
delete
Required scopes
This endpoint requires the following scopes:
Authorizations
AuthorizationstringRequired
Bearer authentication header of the form Bearer <token>.
Path parameters
downlinkIdstring · uuidRequired
HTTP downlink identifier.
Query parameters
forcedbooleanOptional
Whether to force the cancellation of the HTTP downlink or not.
Default: false
Responses
202
HTTP downlink cancellation has been accepted and scheduled for further downstream processing.
409
HTTP downlink does not permit cancellation.
application/problem+json
Getting Started with the API
The Getting Started guide provides everything you need to begin using the KPN Things API.
All API requests are made to the following base URL:
The API currently has a single version. All changes are backward-compatible.
Requests use standard HTTP methods (GET, POST, PUT, DELETE), and both requests and responses are in JSON format.
Access to the KPN Things API is secured through GRIP, KPN’s identity and access management platform. API keys and tokens are managed in GRIP, independently of individual user accounts.
Modular user management
Configure users, roles and permissions
You and your team want secure and sustainable access to your IoT solution, with full insight and control. To achieve this, assigning the right roles and permissions is essential.
To achieve this, assinging the right roles and permissions is done in GRIP. This Identity and Access Management platform is developed by KPN, specifically designed for Business Users. It enables organizations to securely and efficiently manage access to their applications and services.
To assign roles, you must be an admin of the account. As an administrator, you can add or remove users and configuratie roles and permissions for your services.
SenML can be structured in different ways, and we do not guarantee the examples below will look the same as what you will receive on your Destination. To make sure you can handle the SenML optimally, take a look at our documentation about Understanding and Interpreting SenML Data.
batteryVoltage
200
Page of filtered downlinks. Only downlinks that are accessible to the caller are returned.
No content
Responses
200
Page of filtered HTTP downlinks. Only downlinks that are accessible to the caller are returned.
The timestamp when the downlink was created in the system.
Example: 2025-01-02T12:04:32.982Z
modifiedAtstring · date-timeRead-onlyOptional
The timestamp when the downlink was last modified in the system.
Example: 2025-01-02T12:04:32.982Z
feedbackTimeoutall ofRequired
string · durationOptional
Duration that supports a subset of ISO 8601, where only days, hours, minutes, and seconds can be specified. Days are treated as exactly 24 hours, thus ignoring daylight savings effects.
Retrieve HTTP downlinks filtered and sorted by specified search and sort criteria
Create a new HTTP downlink
Retrieve a specific HTTP downlink by its ID
Accepts and schedules full or partial cancellation of a HTTP downlink for further downstream handling.
Retrieve SMS downlinks filtered and sorted by specified search and sort criteria
get
Required scopes
This endpoint requires the following scopes:
Authorizations
AuthorizationstringRequired
Bearer authentication header of the form Bearer <token>.
Query parameters
cursorstring · cursorOptional
String that encodes all necessary information to retrieve a page.
limitintegerOptional
Limit the number of results (per page).
Default: 50
sortstringOptional
Sorting fields separated by comma. Default order is Ascending (ASC), minus(-) should be used in front of field name for Descending (DESC) order.
Example: createdAt,-name
deviceIdstring · uuidOptional
Include only downlinks for the device with the provided deviceId. The deviceId must match exactly.
createdBeforestring · date-timeOptional
Include only SMS downlinks created before the provided date and time. The date-time must be in ISO 8601 format.
createdSincestring · date-timeOptional
Include only SMS downlinks at or after the provided date and time. The date-time must be in ISO 8601 format.
modifiedBeforestring · date-timeOptional
Include only SMS downlinks modified before the provided date and time. The date-time must be in ISO 8601 format.
modifiedSincestring · date-timeOptional
Include only SMS downlinks modified at of after the provided date and time. The date-time must be in ISO 8601 format.
statusstringRead-onlyOptional
The status of the downlink. Known values include: PENDING, EXECUTING and DONE
Responses
200
Page of filtered SMS downlinks. Only downlinks that are accessible to the caller are returned.
application/json
Page of items
idstring · uuidRead-onlyOptional
Unique identifier for the downlink.
Example: 12345678-1234-1234-1234-123456789012
smsMessageIdinteger · int64Read-onlyOptional
Unique identifier for the message.
Example: 42
textstringRequired
The text message
Example: Hello, World!
iccIdstringRead-onlyOptional
The ICCID of the SIM card in the mobile device.
Example: 8901234567890123456
statusstringRead-onlyOptional
The status of the downlink. Known values include: PENDING, EXECUTING and DONE
deviceIdstringRequired
The device identifier which this downlink is targeting.
Example: 4fa05eed-4db6-4fe5-8cb1-744893286db1
createdAtstring · date-timeRead-onlyOptional
The timestamp when the downlink was created in the system.
Example: 2025-01-02T12:04:32.982Z
modifiedAtstring · date-timeRead-onlyOptional
The timestamp when the downlink was last modified in the system.
Example: 2025-01-02T12:04:32.982Z
retryLimitintegerOptional
The maximum number of retries that should be performed for the downlink.
Default: 0Example: 3
retryCountintegerRead-onlyOptional
The number of retries that have been performed for the downlink.
Example: 0
feedbackTimeoutall ofRequired
string · durationOptional
Duration that supports a subset of ISO 8601, where only days, hours, minutes, and seconds can be specified. Days are treated as exactly 24 hours, thus ignoring daylight savings effects.
The duration after which feedback is expected for the downlink. Must be at least 10 minutes.
Example: PT25H
dryRunbooleanOptional
Indicates if this is a dry run.
Default: false
lastFailureReasonstringRead-onlyOptional
The failure reason of the SMS downlink. Known values include: CANCELLED, FAILURE_TO_TRANSMIT_TO_DEVICE, FAILURE_TO_ENQUEUE_FOR_TRANSMISSION, FEEDBACK_TIMEOUT and EVICTED
nextstring · uriOptional
Pagination link pointing to the next page. Only provided when not at the last page.
prevstring · uriOptional
Pagination link pointing to the previous page. Only provided when not at the first page.
get
/sms/downlinks
Create a new SMS downlink
post
Required scopes
This endpoint requires the following scopes:
Authorizations
AuthorizationstringRequired
Bearer authentication header of the form Bearer <token>.
Body
A downlink that is sent to a mobile device.
idstring · uuidRead-onlyOptional
Unique identifier for the downlink.
Example: 12345678-1234-1234-1234-123456789012
smsMessageIdinteger · int64Read-onlyOptional
Unique identifier for the message.
Example: 42
textstringRequired
The text message
Example: Hello, World!
iccIdstringRead-onlyOptional
The ICCID of the SIM card in the mobile device.
Example: 8901234567890123456
statusstringRead-onlyOptional
The status of the downlink. Known values include: PENDING, EXECUTING and DONE
deviceIdstringRequired
The device identifier which this downlink is targeting.
Example: 4fa05eed-4db6-4fe5-8cb1-744893286db1
createdAtstring · date-timeRead-onlyOptional
The timestamp when the downlink was created in the system.
Example: 2025-01-02T12:04:32.982Z
modifiedAtstring · date-timeRead-onlyOptional
The timestamp when the downlink was last modified in the system.
Example: 2025-01-02T12:04:32.982Z
retryLimitintegerOptional
The maximum number of retries that should be performed for the downlink.
Default: 0Example: 3
retryCountintegerRead-onlyOptional
The number of retries that have been performed for the downlink.
Example: 0
feedbackTimeoutall ofRequired
string · durationOptional
Duration that supports a subset of ISO 8601, where only days, hours, minutes, and seconds can be specified. Days are treated as exactly 24 hours, thus ignoring daylight savings effects.
The duration after which feedback is expected for the downlink. Must be at least 10 minutes.
Example: PT25H
dryRunbooleanOptional
Indicates if this is a dry run.
Default: false
lastFailureReasonstringRead-onlyOptional
The failure reason of the SMS downlink. Known values include: CANCELLED, FAILURE_TO_TRANSMIT_TO_DEVICE, FAILURE_TO_ENQUEUE_FOR_TRANSMISSION, FEEDBACK_TIMEOUT and EVICTED
Responses
201
SMS downlink has been successfully created.
application/json
post
/sms/downlinks
201
SMS downlink has been successfully created.
No content
Retrieve an SMS downlink by ID
get
Required scopes
This endpoint requires the following scopes:
Authorizations
AuthorizationstringRequired
Bearer authentication header of the form Bearer <token>.
Path parameters
downlinkIdstring · uuidRequired
SMS downlink identifier.
Responses
200
The SMS downlink.
application/json
A downlink that is sent to a mobile device.
idstring · uuidRead-onlyOptional
Unique identifier for the downlink.
Example: 12345678-1234-1234-1234-123456789012
smsMessageIdinteger · int64Read-onlyOptional
Unique identifier for the message.
Example: 42
textstringRequired
The text message
Example: Hello, World!
iccIdstringRead-onlyOptional
The ICCID of the SIM card in the mobile device.
Example: 8901234567890123456
statusstringRead-onlyOptional
The status of the downlink. Known values include: PENDING, EXECUTING and DONE
deviceIdstringRequired
The device identifier which this downlink is targeting.
Example: 4fa05eed-4db6-4fe5-8cb1-744893286db1
createdAtstring · date-timeRead-onlyOptional
The timestamp when the downlink was created in the system.
Example: 2025-01-02T12:04:32.982Z
modifiedAtstring · date-timeRead-onlyOptional
The timestamp when the downlink was last modified in the system.
Example: 2025-01-02T12:04:32.982Z
retryLimitintegerOptional
The maximum number of retries that should be performed for the downlink.
Default: 0Example: 3
retryCountintegerRead-onlyOptional
The number of retries that have been performed for the downlink.
Example: 0
feedbackTimeoutall ofRequired
string · durationOptional
Duration that supports a subset of ISO 8601, where only days, hours, minutes, and seconds can be specified. Days are treated as exactly 24 hours, thus ignoring daylight savings effects.
The duration after which feedback is expected for the downlink. Must be at least 10 minutes.
Example: PT25H
dryRunbooleanOptional
Indicates if this is a dry run.
Default: false
lastFailureReasonstringRead-onlyOptional
The failure reason of the SMS downlink. Known values include: CANCELLED, FAILURE_TO_TRANSMIT_TO_DEVICE, FAILURE_TO_ENQUEUE_FOR_TRANSMISSION, FEEDBACK_TIMEOUT and EVICTED
get
/sms/downlinks/{downlinkId}
200
The SMS downlink.
No content
Accepts and schedules full or partial cancellation of a SMS downlink for further downstream handling.
delete
Required scopes
This endpoint requires the following scopes:
Authorizations
AuthorizationstringRequired
Bearer authentication header of the form Bearer <token>.
Path parameters
downlinkIdstring · uuidRequired
SMS downlink identifier.
Query parameters
forcedbooleanOptional
Whether to force the cancellation of the SMS downlink or not.
Default: false
Responses
202
SMS downlink cancellation has been accepted and scheduled for further downstream processing.
409
SMS downlink status does not permit cancellation.
application/problem+json
delete
/sms/downlinks/{downlinkId}
No content
GET /downlinks HTTP/1.1
Host: api.kpnthings.com
Authorization: Bearer YOUR_SECRET_TOKEN
Accept: */*
GET /http/downlinks/{downlinkId} HTTP/1.1
Host: api.kpnthings.com
Authorization: Bearer YOUR_SECRET_TOKEN
Accept: */*
get
Required scopes
This endpoint requires the following scopes:
Authorizations
AuthorizationstringRequired
Bearer authentication header of the form Bearer <token>.
Query parameters
cursorstring · cursorOptional
String that encodes all necessary information to retrieve a page.
limitintegerOptional
Limit the number of results (per page).
Default: 50
sortstringOptional
Sorting fields separated by comma. Default order is Ascending (ASC), minus(-) should be used in front of field name for Descending (DESC) order.
Example: createdAt,-name
deviceIdone ofOptional
A device identifier in one of several supported formats.
The timestamp when the downlink was created in the system.
Example: 2025-04-01T00:00:00.000Z
modifiedAtstring · date-timeRead-onlyOptional
The timestamp when the downlink was last modified in the system.
Example: 2025-05-01T00:00:00.000Z
feedbackTimeoutall ofRequired
string · durationOptional
Duration that supports a subset of ISO 8601, where only days, hours, minutes, and seconds can be specified. Days are treated as exactly 24 hours, thus ignoring daylight savings effects.
The duration after which feedback is expected for the downlink. Must be at least 10 minutes.
Example: PT25H
dryRunbooleanOptional
Indicates if this is a dry run.
Default: false
lastFailureReasonstringRead-onlyOptional
The failure reason of the LoRa downlink. Known values include: CANCELLED, FEEDBACK_TIMEOUT, NOT_ACKNOWLEDGED_BY_DEVICE, FAILED_TO_TRANSMIT_TO_DEVICE, FAILED_TO_ENQUEUE_FOR_TRANSMISSION and EVICTED
get
/lora/downlinks/{downlinkId}
delete
Required scopes
This endpoint requires the following scopes:
Authorizations
AuthorizationstringRequired
Bearer authentication header of the form Bearer <token>.
Path parameters
downlinkIdstring · uuidRequired
LoRa downlink identifier.
Query parameters
forcedbooleanOptional
Whether to force the cancellation of the LoRa downlink or not.
Default: false
Responses
202
LoRa downlink cancellation has been accepted and scheduled for further downstream processing.
409
LoRa downlink status does not permit cancellation.
application/problem+json
get
Required scopes
This endpoint requires the following scopes:
Authorizations
AuthorizationstringRequired
Bearer authentication header of the form Bearer <token>.
Query parameters
cursorstring · cursorOptional
String that encodes all necessary information to retrieve a page.
limitintegerOptional
Limit the number of results (per page).
Default: 50
sortstringOptional
Sorting fields separated by comma. Default order is Ascending (ASC), minus(-) should be used in front of field name for Descending (DESC) order.
Example: createdAt,-name
deviceIdone ofOptional
A device identifier in one of several supported formats.
The timestamp when the downlink was created in the system.
Example: 2025-01-01T11:22:33.456Z
modifiedAtstring · date-timeRead-onlyOptional
The timestamp when the downlink was last modified in the system.
Example: 2025-01-01T11:22:33.456Z
feedbackTimeoutall ofRequired
string · durationOptional
Duration that supports a subset of ISO 8601, where only days, hours, minutes, and seconds can be specified. Days are treated as exactly 24 hours, thus ignoring daylight savings effects.
The duration after which feedback is expected for the downlink. Must be at least 10 minutes.
Example: PT25H
dryRunbooleanOptional
Whether or not this is a 'test' downlink that should not be delivered. If true the system will prevent actual delivery of the downlink to the MQTT account and pretend instead that successful delivery has occurred. This mode may be used to test your configuration within KPN Things without requiring a fully functional MQTT device.
Default: false
lastFailureReasonstringRead-onlyOptional
The failure reason of the MQTT downlink. Known values include: CANCELLED, FEEDBACK_TIMEOUT, FAILED_TO_TRANSMIT_TO_DEVICE
get
/mqtt/downlinks/{downlinkId}
delete
Required scopes
This endpoint requires the following scopes:
Authorizations
AuthorizationstringRequired
Bearer authentication header of the form Bearer <token>.
Path parameters
downlinkIdstring · uuidRequired
MQTT downlink identifier.
Query parameters
forcedbooleanOptional
Whether to force the cancellation of the MQTT downlink or not.
Default: false
Responses
202
MQTT downlink cancellation has been accepted and scheduled for further downstream processing.
409
MQTT downlink status does not permit cancellation.
application/problem+json
Every request to the KPN Things API must be authenticated with a bearer token (an access token) obtained from GRIP using an API key.
An API Key is a standalone entity within a GRIP tenant (your customer environment).
API Keys are not user-bound; they are service credentials that can be used by applications or systems.
Best practice: create separate API keys for each system or integration that needs access.
To call the KPN Things API, you must exchange your API Key for a short-lived access token:
Tokens are valid for 1 hour.
Include the token in every API request via the Authorization header:
There are no refresh tokens. When a token expires, simply request a new one from GRIP.
More background on the authentication model used is available in the GRIP Knowledge Base under Machine Authentication:
In the overflow menu your GRIP Tenant ID is displayed right above your name.
To create an API key, you need administrator access to the GRIP portal.
If you have a KPN Developer account, you are automatically an administrator.
If you have a MijnKPN Zakelijk account, you may need to request access from your local administrator.
Log in to the GRIP Portal.
Open the Admin panel from the role dropdown.
In the left-hand menu, go to Identity → API Keys.
Click Add to create a new API Key.
Enter a Display name and Description for your API Key.
Click Add to create it.
On the API Key details page, open the Services and Roles tab.
Click Add a service.
Select KPN Things Portal from the list and click Add.
Assign the desired role and access level to the API Key.
Click Save to apply.
Go back to the General Information tab of your new API Key.
Copy the ID (Client ID) and Secret (Client Secret).
Store them securely — you will use them to request access tokens.
With your Tenant ID, Application ID, Client ID, and Client Secret, you can now request an access token from GRIP. Refer to the GRIP API Documentation for details, including OpenAPI (Swagger) specifications.
Example Request:
Example Response:
Use this token in the Authorization header for all subsequent API requests.
Error
Solution
Feature user does not exist anymore.
Check your API Key ID or Secret,
they may be incorrect.
Feature service does not exist anymore.
Add the KPN Things Portal service
to your API Key through the GRIP Portal.
As a reseller of KPN Things, you can use the KPN Things APIs to manage your customers’ environments on their behalf. To do this, you must specify the customer context for each API call by including the following header:
Here, {{customerID}} is the UUID that identifies the customer whose environment you want to manage.
When this header is provided, KPN Things validates its syntax and confirms that your account is authorized as a reseller for the specified customer.
If either validation fails, the API request will be rejected. Please note that only one KPN-Things-Security-Context header can be included per request; multiple values are not supported.
The API uses cursor-based pagination. This approach ensures consistent performance when navigating large datasets.
When requesting a list of resources, the response may contain next and prev links. These links contain an opaque cursor that identifies the next or previous page.
Use the next link to load the following page.
Use the prev link to load the previous page.
The API does not provide the total number of results or pages.
You can control the maximum number of results per page using the limit query parameter:
You can filter results by adding query parameters. The most common filters are:
Parameter
Description
createdBefore
Items created before this timestamp
createdSince
Items created at or after this timestamp
modifiedBefore
Items modified before this timestamp
Example:
Use the sort parameter to order results. Multiple attributes can be combined in a comma-separated list. Prefix an attribute with - to sort in descending order.
Examples:
sort=createdAt,id → sort by createdAt ascending, then id ascending
sort=-createdAt,id → sort by createdAt descending, then id ascending
Example Request:
The KPN Things API uses the Problem Details for HTTP APIs format (application/problem+json) to return error information. This provides a consistent structure for all error responses.
An error response includes standard fields defined by RFC 7807, as well as optional details when available.
Example Error Response:
Field
Description
title
A short, human-readable summary of the problem type.
status
The HTTP status code of the error response.
detail
A human-readable explanation specific to this occurrence of the error.
400 Bad Request — The request is invalid (e.g., malformed parameters, invalid values).
401 Unauthorized — The request is missing a valid access token.
403 Forbidden — The token is valid, but you do not have permission to perform this action.
404 Not Found — The requested resource does not exist.
409 Conflict — A conflicting operation is already in progress, or resource constraints prevent the request.
429 Too Many Requests — You have hit a rate limit.
500 Internal Server Error — An unexpected error occurred.
When consuming the API, clients should:
Check the HTTP status code to determine the general error category.
Inspect the title field for programmatic handling of known error types.
Display or log the detail field to help users or developers troubleshoot.
The information below explains how to manage users, including adding and removing users, and managing roles and permissions.
Once you have accessed the User Management section in GRIP, you can perform several actions to control access within your organization.
Review existing users, add and delete users
View the list of all users in your organization, including their roles and assigned services. Invite new team members by creating users accounts or deleting users who no longer need access to your services.
Edit or give permissions to an added or existing user
Modify user information, roles and permissions to ensure they have the correct level of access to your services.
In the User Management table, you can see all current users along with their assigned roles and permissions. This overview helps you quickly check who has access to which services.
Add, Remove or Modify Users
To add a new user, click Add User at the top of the page
To modify a user, click the three dots ⋮ and select Edit
To remove a user, click the three dots ⋮ and select Deactivate or Delete
Modify users
For a New User you click on the Add User at the top of the page and provide the general information.
1
Provide the general information
Fill in the general details of the new user
Select the Send email to set password option to send a password email immediately. This can also be done at a later time, for example after you’ve configured all roles and permissions.
Click the Add User button
After adding the user, the next screen opens where you can optionally enter additional information about the user. This information is not required for using your account, but it can be used for your own administration.
Add additional general details (optional)
Add even more information like job title or office location (optional)
Select the preferred language setting
1
Select Services and Roles
Navigate to the Services and Roles tab
If the user should be able to manage other users, enable the Admin role
Click Save Changes
Click + Assign services and roles button to add specific services
Select the appropriate services and roles based on the user’s responsibilities. The example below grants the user full access to the features within the KPN IoT solution.
The below list shows the available roles for services that are used within the KPN IOT solution and describes what levels of access each of the roles gives to the user in KPN Things portal.
The central identity solution behind every account
Provides the user with an Admin account to access and give assigned services.
Role
Description
Access
Admin
Full user management, including own account.
View and manage services and roles of other users; add, modify or remove users.
The foundation for your IoT applications
The starting point for your IoT service and manage the IoT solution.
We advise that every user has a Things Manager and Things Support role.
This role is needed to view contract and usage information that is used as input for the invoice. It also allows you to see which costs will be charged on the upcoming invoice.
Role
Description
Access
Finance - Read Only
Read-only access to invoices and contracts in the Things Portal.
View contract and usage information that is used as input for the invoice. It also allows you to see which costs will be charged on the upcoming invoice.
These roles are only needed if you manage your devices, decoders and scripts via KPN Things. If only connectivity features are used, these roles are not required.
Role
Description
Access
Things Creator - Admin
Full access to Things Creator tab.
Add modify or remove devices types, decoders and scripts.
Things Creator - Read Only
Read-only access to Things Creator tab.
View device types, decoders, and scripts.
We recommend granting the user at least KPN Things - Read Only access. This ensures insights into the IoT solution and enables options such as making exports of connectivity items available.
Role
Description
Access
Things Manager - Admin
Full access to Things Manager tab.
Add, modify, or remove devices, flows, destinations and manage connectivity.
Things Manager - Editor
Full access except for deleting to Things Manager tab.
Add, modify, or remove devices, flows, destinations and manage connectivity except the right to delete.
We advise that every user has access to this role in order to see important documents and access to links to contact information and ServiceNow be able to log tickets. Assigning this role also subscribes you to service emails.
Role
Description
Access
Things Support - User
Access to the Things Support tab.
View news, release notes, documents, service status, reports and contact info and recieve service emails.
Provides access to the Service Portal for reporting incidents and service request
The Self Service Portal allows users to register and track tickets for incidents, information requests, change requests, and complaints. We recommend granting access to all users and ensuring each user profile includes the correct phone number and language setting (found under the Location section in User Settings).
Role
Description
Access
ICT Manager
Access to Self Service Portal.
Register and track tickets for incidents, information requests, change requests and complaints.
Provides access to te KPN Webshop
Grants the user access to the KPN Webshop. If any of the webshop-related roles are assigned, the Shop tab will automatically become visible and accessible in the KPN Things Portal.
Role
Description
Access
Forecasting
Enables forecasting functionality.
Enables product forecasting for specific calendar periods, allowing KPN to align stock levels with expected demand
Quotation
Enables ordering and requesting quotations.
Enables to order products and request quotations for items that are not currently covered by an existing contract. Additionally, user can view the status and history of their orders.
Provide access to MijnKPN Zakelijk functions
This provides the user with access to the MijnKPN Zakelijk service portal. It gives access to the available services.
Role
Description
Access
Facturen (Invoices)
View invoices in PDF format.
Allows user to view all invoices in PDF format that are linked to the same KPN Reference Number (KRN), which is your company’s unique identifier within KPN.
Before you start
Access the User Management section
Via KPN Things Portal
Via MijnKPN Zakelijk
Via direct link
Managing Users in GRIP
What functionalities do you have
Why this matters
Managing users and permissions in GRIP ensures that only authorized individuals can access your applications and IoT services. This helps maintain security and compliance across your organization.
Review existing users, add and delete users
To give you the opportunity to reactivate an account without having to create it again, a deleted user will remain visible in the overview for 10 days before it is completely removed.
Edit or give permissions to an added or existing user
Assigning Services and Roles
Services and Roles explained
Make sure to select only one role per item
If you choose multiple roles - such as Thing Manager - Admin and Thing Manager - Read Only - the lowest role will override the highest.
In this example, you would only have Read Only access.
Finance
Learn more about the finance information on the page.
Things Creator
Things Manager
Things Support
To be able to log tickets in ServiceNow also the ICT Manager role must be granted in Self Service Portal.
The 'Things Support - User' role must be assigned to access the Self Service Portal via in the KPN Things Portal.
Please note that you must have at least the Quotation role assigned to be able to place orders.
SenML can be structured in different ways, and we do not guarantee the examples below will look the same as what you will receive on your Destination. To make sure you can handle the SenML optimally, take a look at our documentation about .
SODAQ R412M
This is an old development board which is no longer available for purchase and should not be used for new designs.
A nifty, industry standard IoT developer board that allows you to utilize LTE-M networks with integrated GPS, Accelerometer and Magnetometers, Grove Connectors, JST connectors and Arduino compatible open source software that allows for low-power applications.
This getting started targets the SODAQ SARA Arduino Form Factor (AFF) R412M device. Probably other AFF and SFF SODAQs with an R41xM module will work, but we did not test them (yet). If you share your experiences with one of these devices, we can update this manual!
This getting started will give you step by step instructions to get your KPN Things M2M developer kit connected to KPN Things!
1. Get everything you need
Before we start, you should check if have all necessary components:
KPN Things SIM card
SODAQ SARA AFF R412M Board
PCB Antenna
LiPo Battery
After registration there is another step in order to receive test SIM cards, since we don't know your home address yet to send them to! After registering and logging in for the first time, click on the link in the M2M is now available in KPN Things! notification box on the home page and follow the directions.
You will receive your test SIM cards in a couple of days. The SIM cards will be added to your Portal account already, ready to go!
This part of the manual is based on the .
With the Arduino IDE we will write our code and program it on the Device.
Download the and follow the installer.
Open your freshly installed Arduino IDE.
When your IDE is all started, execute the following steps to install the Sodaq board configuration files.
Click on File > Preferences
At the bottom you should see Additional Boards Manager URLs. This is where you need to paste the following URL:
After adding the URL, your preferences screen should look like this:
Close the preferences screen with OK
Click on Tools > Board:… > Boards Manager…
Search for SODAQ.
Step 1: Insert the KPN Things SIM card.
Step 2: Connect the antenna. Push the connector straight on the board.
Step 3: Connect the battery to the right terminal on the board, the one stating BATT.
Step 4: Connect the USB cable to the left USB port, the one next to the SIM card slot.
From the Tools menu, under Board, select the correct board type:
Also from the Tools menu, under Port, make sure the correct COM port is selected. If you have multiple options, select the one stating SODAQ SARA.
With this test sketch we are going to check whether your Device works.
Copy the passthrough example code from the following SODAQ documentation page:
Paste the passthrough example code in you Arduino IDE.
Uncomment the third line, since you have a u-blox R4xx module
From the Sketch menu, click Upload to send the software to your SODAQ.
If all went well it will say the following in the bottom of the Arduino IDE:
Meanwhile, from the Tools menu, open the Serial Monitor
In the Serial Monitor, select Both NL & CR and set the baud rate to 115200 baud (#1 in the screenshot below).
#2 in the screenshot above illustrates where you can enter commands to be sent to the u-blox module that sits on your Development board.
#3 shows where you will see the responses from the module.
Use the command AT+GSN to get the IMEI of your module.
You will be needing this value when registering your Device in the next step of this getting started.
Additionally, with the command ATI9 you can check your firmware version.
The latest firmware version for the R412 is M0.10.00,A.02.14(as of November 2020)
The gives some more available commands.
All available commands can be found in the of u-blox.
Open the . Go to the All Devices page and click on Add new Device.
Select the Own M2M device device type.
Enter a name for your SODAQ device.
Click Add Device to continue.
Now enter the M2M specific information of your Device.
IMEI of your Device. This value is printed on your u-blox module:
2. ICCID of your SIM card. This value is printed on your SIM card. Select the correct SIM card from the drop down.
If you have an Early access SIM, you choose the option "Add early access SIM" and enter the ICCID of the SIM manually in the newly appeared input field.
3. Shared secret - a kind of password for the future data coming from your Device. Here you should come up with a unique password containing at least:
One lower case character.
One upper case character.
One number.
One special character.
The shared secret should also be programmed into your Device in step 5.
4. Click Add Network Info to save the network information and then Finish to continue.
.
In this step we are going to flash the Device with a program to send data to KPN Things.
The ThingsML library will provide code for your Device to communicate with KPN Things. The SODAQ libraries will provide code to interface with the components on the development board.
From the Tools menu in your Arduino IDE click on Manage Libraries...
Now, in the Library Manager, wait for all libraries to load.
Then search and install the following libraries:
ThingsML
When the installations are finished, click Close.
This example will read the board temperature from the onboard thermometer and send it to KPN Things every 60 seconds.
From the File menu, click on Examples. Now find ThingsML, then select sodaq, and within that choose sara_aff_temperature.
Look for the following part in the example code and fill in the missing values:
Device URN should be completed with the IMEI of your Device.
Make sure you leave the trailing colon : in place in the DEVICE_URN variable!
Roughly: If you received your SIM card after June 2023, it's most likely an M2M Advantage.
Upload the sketch to your Device and open the Serial Monitor. The device will report some of the setup steps it will perform:
This means your Device is trying to connect to our LTE-M network. After some seconds the following lines will appear:
This means your Device has join our network and has sent its first uplink message to KPN Things!
Now your Device has connected to the network and is sending data, you should visit the in the Portal of the Device you created in step 4.
In the connectivity block, you should see that the last message time indicates that KPN Things just received a message from your Device!
You now successfully connected your M2M device to KPN Things! To further setup your data flow in KPN Things, you should can go to the next step:
Interested in expanding the example sketch to make the Device do exactly what you want? Use the following references to find more information on Things code and SODAQ code:
The ThingsML library contains another SODAQ example that reads out the GPS module and sends latitude and longitude to KPN Things.
The SODAQ Support pages contain several examples to read out the sensors you can find on the SODAQ boards: .
Additional documentation on the ThingsML library can be found in Github:
Destination Format Scripts
When your IoT devices send data to the platform, it is internally processed and standardized into the SenML (Sensor Measurement Lists) format. By default, when you set up a Destination (such as an HTTP webhook or an MQTT broker) to receive your uplink data, the platform forwards it in this native SenML format.
However, your external applications or third-party systems might require data in a specific structure. Destination Format Scripts allow you to write custom JavaScript code to transform the platform's standard SenML payload into any desired format before it is delivered to your destination.
How It Works
A Destination Format Script acts as a data transformer at the very end of the data processing pipeline.
Input: The script receives a valid SenML JSON array containing the device's latest measurements and metadata.
Processing: Your custom JavaScript logic parses, filters, or reorganizes this SenML data.
Output: The script returns the transformed payload (e.g., a custom JSON object, a string, or a binary buffer) tailored to your external system's specifications.
To ensure proper execution within the platform, your script must adhere to the following guidelines:
The script engine is fully compliant with modern ECMAScript standards (including ES6, ES7, and beyond). You can freely use modern syntax features such as arrow functions, template literals, optional chaining (?.), nullish coalescing (??), destructuring, const/let, and advanced collection types like Set.
The destination format script is executed in a sandbox. As a result you cannot make network requests (e.g., fetch) or import external Node.js/third-party modules.
Your script must expose a single main function execution block that takes a single string parameter (input). The function itself does not require a specific name and can be written as an anonymous arrow function.
The underlying input argument is a JSON string that, when parsed, reveals an object with the following structural layout:
JavaScript
To maintain platform stability and performance, the execution environment enforces the following limits:
Execution Time: Scripts must complete execution within 100 milliseconds.
Memory Limit: Scripts are allocated a maximum of 10 MB of memory.
No External Access: For security reasons, scripts run in an isolated sandbox. You cannot make network requests (e.g., fetch) or import external Node.js/third-party modules.
When you create a new Destination Format, the Script Editor pre-populates with a robust template. This template contains built-in SenML Utilities to help you handle RFC 8428 data normalization (expanding and merging base fields like bn, bt, etc.) before mapping it to your custom schema.
Before saving your script, verify its execution using the built-in Script Editor Test Tool:
Paste your JavaScript code into the editor workspace.
Use one of the pre-defined SenML Payload Data inputs in the Tester, or provide a sample JSON test string containing a mock metadata object and payload array into the Test Input field.
Click Run script with test payload.
Retrieve MQTT bindings, filtered by query parameters.
get
Retrieve all MQTT bindings that match the query parameters given.
Required scopes
This endpoint requires the following scopes:
Authorizations
AuthorizationstringRequired
Bearer authentication header of the form Bearer <token>.
Query parameters
cursorstring · cursorOptional
String that encodes all necessary information to retrieve a page.
limitintegerOptional
Limit the number of results (per page).
Default: 50
sortstringOptional
Sorting fields separated by comma. Default order is Ascending (ASC), minus(-) should be used in front of field name for Descending (DESC) order.
Example: createdAt,-name
clientIdstring · uuidOptional
Include only MQTT bindings for devices that are owned by the provided clientId. If clientId is omitted, bindings from all devices owned by the calling client are included.
deviceIdone ofOptional
A device identifier in one of several supported formats.
The username the device uses when authenticating with the MQTT connector. This value is set to the device URN by the system when the binding is created.
Example: urn:dev:IMEI:357292748642776:
passwordstring · min: 24Write-onlyOptional
The password the device uses when authenticating with the MQTT connector. Must be at least 24 characters, with at least one lower case letter, upper case letter, number and special character.
Example: G6sdt9{4R8QmORTPt%zW.*:yr@}vRLzc
nextstring · uriOptional
Pagination link pointing to the next page. Only provided when not at the last page.
prevstring · uriOptional
Pagination link pointing to the previous page. Only provided when not at the first page.
400
Request is missing required information or invalid
application/problem+json
get
/mqtt/bindings
Create a new MQTT binding.
post
Create a new MQTT binding.
Required scopes
This endpoint requires the following scopes:
Authorizations
AuthorizationstringRequired
Bearer authentication header of the form Bearer <token>.
Body
A binding of a device to the MQTT connector.
idstring · uuidRead-onlyOptional
The id of the binding.
Example: 224ecc46-291d-482b-993f-c8b508adb0da
deviceIdone ofRequired
The id of the device that is bound to the MQTT connector by the binding.
The username the device uses when authenticating with the MQTT connector. This value is set to the device URN by the system when the binding is created.
Example: urn:dev:IMEI:357292748642776:
passwordstring · min: 24Write-onlyOptional
The password the device uses when authenticating with the MQTT connector. Must be at least 24 characters, with at least one lower case letter, upper case letter, number and special character.
Example: G6sdt9{4R8QmORTPt%zW.*:yr@}vRLzc
Responses
201
The newly created MQTT binding'.
application/json
400
Request is missing required information or invalid
application/problem+json
post
/mqtt/bindings
No content
Retrieve a MQTT binding by ID.
get
Required scopes
This endpoint requires the following scopes:
Authorizations
AuthorizationstringRequired
Bearer authentication header of the form Bearer <token>.
Path parameters
bindingIdstring · uuidRequired
MQTT binding identifier.
Responses
200
The MQTT binding.
application/json
A binding of a device to the MQTT connector.
idstring · uuidRead-onlyOptional
The id of the binding.
Example: 224ecc46-291d-482b-993f-c8b508adb0da
deviceIdone ofRequired
The id of the device that is bound to the MQTT connector by the binding.
The username the device uses when authenticating with the MQTT connector. This value is set to the device URN by the system when the binding is created.
Example: urn:dev:IMEI:357292748642776:
passwordstring · min: 24Write-onlyOptional
The password the device uses when authenticating with the MQTT connector. Must be at least 24 characters, with at least one lower case letter, upper case letter, number and special character.
Example: G6sdt9{4R8QmORTPt%zW.*:yr@}vRLzc
400
Request is missing required information or invalid
application/problem+json
get
/mqtt/bindings/{bindingId}
No content
Update a MQTT binding.
put
Required scopes
This endpoint requires the following scopes:
Authorizations
AuthorizationstringRequired
Bearer authentication header of the form Bearer <token>.
Path parameters
bindingIdstring · uuidRequired
MQTT binding identifier.
Body
A binding of a device to the MQTT connector.
idstring · uuidRead-onlyOptional
The id of the binding.
Example: 224ecc46-291d-482b-993f-c8b508adb0da
deviceIdone ofRequired
The id of the device that is bound to the MQTT connector by the binding.
The username the device uses when authenticating with the MQTT connector. This value is set to the device URN by the system when the binding is created.
Example: urn:dev:IMEI:357292748642776:
passwordstring · min: 24Write-onlyOptional
The password the device uses when authenticating with the MQTT connector. Must be at least 24 characters, with at least one lower case letter, upper case letter, number and special character.
Example: G6sdt9{4R8QmORTPt%zW.*:yr@}vRLzc
Responses
200
The updated MQTT binding.
application/json
A binding of a device to the MQTT connector.
idstring · uuidRead-onlyOptional
The id of the binding.
Example: 224ecc46-291d-482b-993f-c8b508adb0da
deviceIdone ofRequired
The id of the device that is bound to the MQTT connector by the binding.
The username the device uses when authenticating with the MQTT connector. This value is set to the device URN by the system when the binding is created.
Example: urn:dev:IMEI:357292748642776:
passwordstring · min: 24Write-onlyOptional
The password the device uses when authenticating with the MQTT connector. Must be at least 24 characters, with at least one lower case letter, upper case letter, number and special character.
Example: G6sdt9{4R8QmORTPt%zW.*:yr@}vRLzc
400
Request is missing required information or invalid
application/problem+json
put
/mqtt/bindings/{bindingId}
No content
Delete a MQTT binding.
delete
Required scopes
This endpoint requires the following scopes:
Authorizations
AuthorizationstringRequired
Bearer authentication header of the form Bearer <token>.
Path parameters
bindingIdstring · uuidRequired
MQTT Binding identifier.
Responses
204
MQTT binding has been deleted successfully.
delete
/mqtt/bindings/{bindingId}
204
MQTT binding has been deleted successfully.
No content
get
Retrieve all device groups that match the query parameters given. If a search parameter is provided, device groups whose name or description (partially) match are returned.
Required scopes
This endpoint requires the following scopes:
Authorizations
AuthorizationstringRequired
Bearer authentication header of the form Bearer <token>.
Query parameters
cursorstring · cursorOptional
String that encodes all necessary information to retrieve a page.
limitintegerOptional
Limit the number of results (per page).
Default: 50
sortstringOptional
Sorting fields separated by comma. Default order is Ascending (ASC), minus(-) should be used in front of field name for Descending (DESC) order.
Example: createdAt,-name
qstringOptional
Include only device groups whose names or descriptions contain the search term. Matching is done case-insensitively.
clientIdstring · uuidOptional
Include only device groups owned by the client with the provided clientId. If clientId is omitted, all device groups are included that are accessible to the caller.
projectIdstring · uuidOptional
Include only device groups associated with the project with the provided projectId. If projectId is omitted, all device groups are included that are accessible to the caller.
createdBeforestring · date-timeOptional
Include only device groups created before the provided date and time. The date-time must be in ISO 8601 format.
createdSincestring · date-timeOptional
Include only device groups created at or after the provided date and time. The date-time must be in ISO 8601 format.
modifiedBeforestring · date-timeOptional
Include only device groups modified before the provided date and time. The date-time must be in ISO 8601 format.
modifiedSincestring · date-timeOptional
Include only device groups modified at or after the provided date and time. The date-time must be in ISO 8601 format.
post
Required scopes
This endpoint requires the following scopes:
Authorizations
AuthorizationstringRequired
Bearer authentication header of the form Bearer <token>.
Body
get
Retrieve a device group by its ID. The device group must be accessible to the caller.
Required scopes
This endpoint requires the following scopes:
Authorizations
AuthorizationstringRequired
Bearer authentication header of the form Bearer <token>.
Path parameters
deviceGroupIdstring · uuidRequired
The ID of the device group to retrieve.
Responses
200
The requested device group.
application/json
A group of devices.
idstring · uuidRead-onlyOptional
The unique identifier of the device group.
Example: 36e75427-4c6e-438c-89b5-0cbdb0d4068c
namestring · min: 1 · max: 255Required
The name of the device group.
Example: Parking sensors device group
descriptionstring · max: 255Optional
A description of the device group.
Example: This is a group of devices containing parking sensor devices.
projectIdstring · uuidRequired
The project identifier to which this device group belongs.
Example: 12345678-1234-1234-1234-123456789012
createdAtstring · date-timeRead-onlyOptional
The timestamp when the device group is created in the system.
View devices, flows, destinations and connectivity.
Read Only
Read only access of products and prices.
View product details and prices, order status and order history.
Voucher Manager
Manage discount vouchers.
Process discount vouchers.
If the user is a contact person for operational matters, it is advisable to provide a phone number and the correct language setting so that our service desk can reach you when needed.
The admin is responsible for assigning thecorrect permissions to the user. Please note that someone with admin rights can also grant themselves additional permissions.
Review the generated Output block to ensure the data structure matches your target destination parameters, or review the Console Output Logs if a runtime exception is thrown.
Script Requirements
1. JavaScript Environment
2. The Main Function Entry Point
3. Processing Constraints
Default Starter Template & Example
Template Script
Testing Your Script
{
metadata: {
device: {
name: "example-device",
urn: "urn:dev:deveui:0011223344556677"
},
ingestion: {
timestamp: 1683014400000
}
// Additional routing metadata properties
},
payload: [
// Array of raw SenML records from the device
]
}
input => {
/************************ SENML UTILS ************************/
const ORDERED_SENML_KEYS = ['bn', 'bt', 'bu', 'bv', 'bs', 'bver', 'n', 'u', 'v', 's', 't', 'ut', 'vb', 'vs', 'vd'];
const ORDERED_SENML_KEY_SET = new Set(ORDERED_SENML_KEYS);
const orderRecordAttributes = (record) => {
const ordered = {};
ORDERED_SENML_KEYS.forEach((key) => {
if (Object.prototype.hasOwnProperty.call(record, key)) {
ordered[key] = record[key];
}
});
Object.keys(record)
.filter((key) => !ORDERED_SENML_KEY_SET.has(key))
.sort()
.forEach((key) => {
ordered[key] = record[key];
});
return ordered;
};
/**
* Expands SenML records to include inherited base fields (RFC 8428).
* Base fields (bn, bt, bu, bv, bs) are inherited from prior records unless overridden,
* and the base fields are written onto every output record.
* Regular fields (n, t, u, v, s) are not overwritten and only come from the record itself.
* The `bver` field is validated for consistency and propagated to output records.
* @param {object[]} records - Array of SenML records
* @returns {object[]} Records with inherited base fields
* @throws {Error} If records is not an array, if a record has neither a name nor an inherited base name, or if `bver` values are inconsistent
*/
const expandBaseFields = (records) => {
if (!Array.isArray(records)) {
throw new Error('Expected an array of records');
}
let base = {
bn: undefined,
bt: undefined,
bu: undefined,
bv: undefined,
bs: undefined
};
let bver;
return records.map((record) => {
base = {
bn: record.bn ?? base.bn,
bt: record.bt ?? base.bt,
bu: record.bu ?? base.bu,
bv: record.bv ?? base.bv,
bs: record.bs ?? base.bs
};
if (record.bver !== undefined && bver !== undefined && bver !== record.bver) {
throw new Error(`Inconsistent bver values: ${bver} and ${record.bver}`);
}
if (record.bver !== undefined) {
bver = record.bver;
}
const expanded = { ...record };
// Validate that record has a name or base name
if (record.n === undefined && base.bn === undefined) {
throw new Error('Encountered a record without a name and no base name');
}
// Always include inherited base fields in output
if (base.bn !== undefined) {
expanded.bn = base.bn;
}
if (base.bt !== undefined) {
expanded.bt = base.bt;
}
if (base.bu !== undefined) {
expanded.bu = base.bu;
}
if (base.bv !== undefined) {
expanded.bv = base.bv;
}
if (base.bs !== undefined) {
expanded.bs = base.bs;
}
if (bver !== undefined) {
expanded.bver = bver;
}
return orderRecordAttributes(expanded);
});
};
/**
* Merges base fields into regular fields and removes specified base fields.
* Takes records with expanded base fields and selectively removes base fields based
* on the baseFields parameter. When removing base fields, applies their values to
* the corresponding regular fields (bn->n, bt->t, bu->u, bv->v, bs->s).
* @param {object[]} records - Array of expanded SenML records
* @param {string[]} baseFields - Base fields to remove (default: ['bn', 'bt', 'bu', 'bv', 'bs'])
* @returns {object[]} Records with specified base fields removed and values merged
* @throws {Error} If records is not an array or if baseFields is not an array
*/
const mergeBaseFields = (records, baseFields = ['bn', 'bt', 'bu', 'bv', 'bs']) => {
if (!Array.isArray(records)) {
throw new Error('Expected an array of records');
}
if (!Array.isArray(baseFields)) {
throw new Error('Expected baseFields to be an array');
}
const shouldRemove = (field) => baseFields.includes(field);
return records.map((record) => {
const merged = { ...record };
if (shouldRemove('bn')) {
// Apply base name to regular name before removing
if (record.n !== undefined && record.bn !== undefined) {
merged.n = `${record.bn}${record.n}`;
} else if (record.n === undefined && record.bn !== undefined) {
merged.n = record.bn;
}
delete merged.bn;
}
if (shouldRemove('bt')) {
// Apply base time to regular time before removing
if (record.t !== undefined && record.bt !== undefined) {
merged.t = record.t + record.bt;
} else if (record.t === undefined && record.bt !== undefined) {
merged.t = record.bt;
}
delete merged.bt;
}
if (shouldRemove('bu')) {
// Apply base unit to regular unit before removing
if (record.u === undefined && record.bu !== undefined) {
merged.u = record.bu;
}
delete merged.bu;
}
if (shouldRemove('bv')) {
// Apply base value to regular value before removing
if (record.v !== undefined && record.bv !== undefined) {
merged.v = record.v + record.bv;
}
delete merged.bv;
}
if (shouldRemove('bs')) {
// Apply base sum to regular sum before removing
if (record.s !== undefined && record.bs !== undefined) {
merged.s = record.s + record.bs;
}
delete merged.bs;
}
return orderRecordAttributes(merged);
});
};
/**
* Normalizes an array of SenML records by expanding and merging base fields (RFC 8428).
* Combines expandBaseFields and mergeBaseFields: first expands all base fields across
* records, then selectively merges and removes base fields based on the mergeBaseFields parameter.
* @param {{records: object[], baseFields?: string[]}} input - Config object
* @returns {object[]} Normalized records with base fields selectively applied and removed
* @throws {Error} If records is not an array, if a record has neither a name nor an inherited base name, or if `bver` values are inconsistent
*/
const normalizeSenmlRecords = ({ records, baseFieldsToMerge = ['bn', 'bt', 'bu', 'bv', 'bs'] }) => {
const expanded = expandBaseFields(records);
return mergeBaseFields(expanded, baseFieldsToMerge);
};
/************************ END OF SENML UTILS ************************/
/************************ YOUR SCRIPT ************************/
const { payload, metadata } = JSON.parse(input);
/**
* In this example the SenML is normalized in the following way:
* 1) all SenML records are expanded with the inherited SenML base name field (if present).
* 2) the SenML base fields for time, unit, value and sum are merged into the regular SenML Fields.
* 3) the attributes in each record is returned in canonical SenML key order
* * Note: if you want to merge the base name field into the regular name fields, you just add 'bn' to the
* baseFieldsToMerge array (or completely leave out the baseFieldsToMerge parameter, which defaults
* to merging all base fields).
* * The normalized SenML data can be used as the basis for your own transformation.
*/
const normalizedSenml = normalizeSenmlRecords({ records: payload, baseFieldsToMerge: ['bt', 'bu', 'bv', 'bs'] });
const output = {
device: {
name: metadata?.device?.name,
urn: metadata?.device?.urn
},
ingestion:{
timestamp: metadata?.ingestion?.timestamp,
},
measurements: normalizedSenml
};
return JSON.stringify(output);
/************************ END OF YOUR SCRIPT ************************/
}
Click on SODAQ SAMD Boards and an install button will appear.
Click Install to install the latest version of your selected board collection.
When the installation is done, click Close.
AT+CSQ
Check signal quality
No connection: +CSQ: 99,99
Good connection: value around 20
AT+GSN
Fetch IMEI of module
32 characters in total.
Sodaq_LSM303AGR
Sodaq_R4X
Sodaq_wdt
Device Key should be filled with the Shared secret of your Device.
APN should be filled with one the following value two values. Your SIM card is one of two types, which you can see in the Connectivity list in KPN Things.
2. Prepare your development environment (Arduino IDE)
Setup your Arduino IDE
Download the board configuration files for Sodaq boards
3. Prepare your Device
Assemble your Device
Make sure you connect your battery when using the board, else the module won't work correctly!
Configure your Arduino IDE
If none of your ports is labelled that way, disconnect your SODAQ, reopen the menu, check which COM port disappeared, reconnect the SODAQ and choose the previously identified COM port.
GET /mqtt/bindings HTTP/1.1
Host: api.kpnthings.com
Authorization: Bearer YOUR_SECRET_TOKEN
Accept: */*
get
Retrieve all HTTP bindings that match the query parameters given.
Required scopes
This endpoint requires the following scopes:
Authorizations
AuthorizationstringRequired
Bearer authentication header of the form Bearer <token>.
Query parameters
cursorstring · cursorOptional
String that encodes all necessary information to retrieve a page.
limitintegerOptional
Limit the number of results (per page).
Default: 50
sortstringOptional
Sorting fields separated by comma. Default order is Ascending (ASC), minus(-) should be used in front of field name for Descending (DESC) order.
Example: createdAt,-name
clientIdstring · uuidOptional
Include only HTTP bindings for devices that are owned by the provided clientId. If clientId is omitted, bindings from all devices owned by the calling client are included.
deviceIdone ofOptional
A device identifier in one of several supported formats.
The timestamp when the downlink was created in the system.
Example: 2025-04-01T00:00:00.000Z
modifiedAtstring · date-timeRead-onlyOptional
The timestamp when the downlink was last modified in the system.
Example: 2025-05-01T00:00:00.000Z
feedbackTimeoutall ofRequired
string · durationOptional
Duration that supports a subset of ISO 8601, where only days, hours, minutes, and seconds can be specified. Days are treated as exactly 24 hours, thus ignoring daylight savings effects.
The duration after which feedback is expected for the downlink. Must be at least 10 minutes.
Example: PT25H
dryRunbooleanOptional
Indicates if this is a dry run.
Default: false
lastFailureReasonstringRead-onlyOptional
The failure reason of the LoRa downlink. Known values include: CANCELLED, FEEDBACK_TIMEOUT, NOT_ACKNOWLEDGED_BY_DEVICE, FAILED_TO_TRANSMIT_TO_DEVICE, FAILED_TO_ENQUEUE_FOR_TRANSMISSION and EVICTED
nextstring · uriOptional
Pagination link pointing to the next page. Only provided when not at the last page.
prevstring · uriOptional
Pagination link pointing to the previous page. Only provided when not at the first page.
get
/lora/downlinks
200
Page of filtered LoRa downlinks. Only downlinks that are accessible to the caller are returned.
No content
A downlink that is sent to a LoRa IoT device.
idstring · uuidRead-onlyOptional
Unique identifier for the downlink.
Example: 12345678-1234-1234-1234-123456789012
payloadHexstringRequired
Hex-encoded payload
Pattern: ^[0-9a-fA-F]+$
fPortintegerRequired
LoRaWAN FPort used by the device for this downlink.
Example: 3
statusstringRead-onlyOptional
The status of the LoRa downlink. Known values include: PENDING, EXECUTING and DONE
retryLimitintegerOptional
The maximum number of retries that should be performed for the downlink.
Default: 0Example: 3
retryCountintegerRead-onlyOptional
The number of retries that have been performed for the downlink.
Example: 0
deviceIdone ofRequired
The device identifier which this downlink is targeting.
The timestamp when the downlink was created in the system.
Example: 2025-04-01T00:00:00.000Z
modifiedAtstring · date-timeRead-onlyOptional
The timestamp when the downlink was last modified in the system.
Example: 2025-05-01T00:00:00.000Z
feedbackTimeoutall ofRequired
string · durationOptional
Duration that supports a subset of ISO 8601, where only days, hours, minutes, and seconds can be specified. Days are treated as exactly 24 hours, thus ignoring daylight savings effects.
The duration after which feedback is expected for the downlink. Must be at least 10 minutes.
Example: PT25H
dryRunbooleanOptional
Indicates if this is a dry run.
Default: false
lastFailureReasonstringRead-onlyOptional
The failure reason of the LoRa downlink. Known values include: CANCELLED, FEEDBACK_TIMEOUT, NOT_ACKNOWLEDGED_BY_DEVICE, FAILED_TO_TRANSMIT_TO_DEVICE, FAILED_TO_ENQUEUE_FOR_TRANSMISSION and EVICTED
The timestamp when the downlink was created in the system.
Example: 2025-01-01T11:22:33.456Z
modifiedAtstring · date-timeRead-onlyOptional
The timestamp when the downlink was last modified in the system.
Example: 2025-01-01T11:22:33.456Z
feedbackTimeoutall ofRequired
string · durationOptional
Duration that supports a subset of ISO 8601, where only days, hours, minutes, and seconds can be specified. Days are treated as exactly 24 hours, thus ignoring daylight savings effects.
The duration after which feedback is expected for the downlink. Must be at least 10 minutes.
Example: PT25H
dryRunbooleanOptional
Whether or not this is a 'test' downlink that should not be delivered. If true the system will prevent actual delivery of the downlink to the MQTT account and pretend instead that successful delivery has occurred. This mode may be used to test your configuration within KPN Things without requiring a fully functional MQTT device.
Default: false
lastFailureReasonstringRead-onlyOptional
The failure reason of the MQTT downlink. Known values include: CANCELLED, FEEDBACK_TIMEOUT, FAILED_TO_TRANSMIT_TO_DEVICE
nextstring · uriOptional
Pagination link pointing to the next page. Only provided when not at the last page.
prevstring · uriOptional
Pagination link pointing to the previous page. Only provided when not at the first page.
get
/mqtt/downlinks
200
Page of filtered MQTT downlinks. Only downlinks that are accessible to the caller are returned.
The timestamp when the downlink was created in the system.
Example: 2025-01-01T11:22:33.456Z
modifiedAtstring · date-timeRead-onlyOptional
The timestamp when the downlink was last modified in the system.
Example: 2025-01-01T11:22:33.456Z
feedbackTimeoutall ofRequired
string · durationOptional
Duration that supports a subset of ISO 8601, where only days, hours, minutes, and seconds can be specified. Days are treated as exactly 24 hours, thus ignoring daylight savings effects.
The duration after which feedback is expected for the downlink. Must be at least 10 minutes.
Example: PT25H
dryRunbooleanOptional
Whether or not this is a 'test' downlink that should not be delivered. If true the system will prevent actual delivery of the downlink to the MQTT account and pretend instead that successful delivery has occurred. This mode may be used to test your configuration within KPN Things without requiring a fully functional MQTT device.
Default: false
lastFailureReasonstringRead-onlyOptional
The failure reason of the MQTT downlink. Known values include: CANCELLED, FEEDBACK_TIMEOUT, FAILED_TO_TRANSMIT_TO_DEVICE
Connect a LoRa device which has built in LoRa connectivity that came with the device. You will need to enter the DevEUI, AppEUI, and AppKey of this device during registration in KPN Things.
Add data to messages where location could be calculated.
Forward the raw LoRa payload and port number without decoding.
Expected SenML records
name
type
unit
Forward the raw LoRa payload and port number without decoding.
The following SenML records can be present, amongst others:
name
type
unit
example
description
Forward the raw LoRa payload and lora network metadata without decoding.
Expected SenML records
name
type
unit
Forward the raw LoRa payload and lora network metadata without decoding.
Fixes from '= Raw LoRa payload Extended':
LrrRSSI is changed to a number.
LrrSNR is changed to a number.
The following SenML records can be present, amongst others:
name
type
unit
example
description
Decoder for , a generic LoRa payload protocol by KPN.
Decoder for , a generic LoRa payload protocol by KPN.
The resulting SenML completely depends on the ThingsML input and can produce almost any type of SenML output. The decoded ThingsML provided below is just an illustration of what is possible.
Protocol: LoRa downlink
Description: Send raw LoRa payload to your device.
Connect a LoRa device for which you currently do not have LoRa connectivity credentials (DevEUI, AppEUI, and AppKey). These credentials will be provided during registration of the device in KPN Things.
Supported network type(s): KPNLORA
Device Specification ID: own-lora
GET /device-groups HTTP/1.1
Host: api.kpnthings.com
Authorization: Bearer YOUR_SECRET_TOKEN
Accept: */*
GET /lora/downlinks HTTP/1.1
Host: api.kpnthings.com
Authorization: Bearer YOUR_SECRET_TOKEN
Accept: */*
GET /mqtt/downlinks HTTP/1.1
Host: api.kpnthings.com
Authorization: Bearer YOUR_SECRET_TOKEN
Accept: */*
bc523b60-1b3f-5f33-b041-3afbe29d13e0
Forward the raw LoRa payload and port number without decoding.
= Raw LoRa payload Extended
b7557a3d-4222-43e5-8b19-98706b1302f7
Forward the raw LoRa payload and lora network metadata without decoding.
= Raw LoRa payload Extended (v2)
bc9628e5-2c18-5f4b-9baf-5023d8b4a37b
Forward the raw LoRa payload and lora network metadata without decoding.
› Decoded ThingsML for LoRa payload
0d7b7295-287e-4908-878d-00d667f6f923
Decoder for , a generic LoRa payload protocol by KPN.
› Decoded ThingsML for LoRa payload (v2)
5c03dd6b-42a6-5cf4-8790-8db27551431a
Decoder for , a generic LoRa payload protocol by KPN.
number
200
The LoRa port used to send this uplink
number
FCntDn
number
FCntUp
number
LrrESP
string
LrrRSSI
string
LrrSNR
string
SpFact
number
SubBand
string
payload
string
port
number
LrrESP
is changed to a
number
.
string
LC255
Lora channel of the transmission
DevLrrCnt
number
0
Amount of gateways that received the message
FCntDn
number
21725
The downlink framecounter
FCntUp
number
30117
The uplink framecounter
LrrRSSI
number
0
Received Signal Strength Indicator
LrrSNR
number
0
Signal to Noise Ratio
payload
string
"4D985C495AC4D8C9682CFD"
raw hex payload string
port
number
1
LoRa port used
SpFact
number
9
Spreading factor used
SubBand
string
"G0"
Lora band of the transmission
+ LoRa Geolocation data
af9e394d-6c1d-4d46-9a29-73ac77be64b7
Add LoRa Geolocation data to messages where location could be calculated.
= Raw LoRa payload
c17e2392-bb83-4e79-b854-ed72196857ee
Forward the raw LoRa payload and port number without decoding.
SenML can be structured in different ways, and we do not guarantee the examples below will look the same as what you will receive on your Destination. To make sure you can handle the SenML optimally, take a look at our documentation about Understanding and Interpreting SenML Data.
SenML can be structured in different ways, and we do not guarantee the examples below will look the same as what you will receive on your Destination. To make sure you can handle the SenML optimally, take a look at our documentation about Understanding and Interpreting SenML Data.
SenML can be structured in different ways, and we do not guarantee the examples below will look the same as what you will receive on your Destination. To make sure you can handle the SenML optimally, take a look at our documentation about Understanding and Interpreting SenML Data.
SenML can be structured in different ways, and we do not guarantee the examples below will look the same as what you will receive on your Destination. To make sure you can handle the SenML optimally, take a look at our documentation about Understanding and Interpreting SenML Data.
SenML can be structured in different ways, and we do not guarantee the examples below will look the same as what you will receive on your Destination. To make sure you can handle the SenML optimally, take a look at our documentation about .
SenML can be structured in different ways, and we do not guarantee the examples below will look the same as what you will receive on your Destination. To make sure you can handle the SenML optimally, take a look at our documentation about .
Add data to messages where location could be calculated.
= Raw LoRa payload
6da609d1-0ec4-4f07-89e6-2acad60b7cdf
Forward the raw LoRa payload and port number without decoding.
Encoders
encoderSpecificationUUID
Description
= Raw LoRa payload
30fdeedd-69e6-4ab5-8a90-2d58af7b3b2f
Send raw LoRa payload to your device.
Add LoRa Geolocation data to messages where location could be calculated.
Forward the raw LoRa payload and port number without decoding.
Expected SenML records
name
type
unit
payload
string
port
number
Forward the raw LoRa payload and port number without decoding.
The following SenML records can be present, amongst others:
name
type
unit
example
description
payload
string
"4D985C495AC4D8C9682CFD"
The LoRa hex payload
Forward the raw LoRa payload and lora network metadata without decoding.
Expected SenML records
name
type
unit
ADRbit
number
Channel
string
Forward the raw LoRa payload and lora network metadata without decoding.
Fixes from '= Raw LoRa payload Extended':
LrrRSSI is changed to a number.
LrrSNR is changed to a number.
LrrESP is changed to a number.
The following SenML records can be present, amongst others:
name
type
unit
example
description
ADRbit
number
0
Adaptive Data Rate indicator
Decoder for ThingsML for LoRa, a generic LoRa payload protocol by KPN.
Decoder for ThingsML for LoRa, a generic LoRa payload protocol by KPN.
The resulting SenML completely depends on the ThingsML input and can produce almost any type of SenML output. The decoded ThingsML provided below is just an illustration of what is possible.
Protocol: LoRa downlink
Description: Send raw LoRa payload to your device.
SenML can be structured in different ways, and we do not guarantee the examples below will look the same as what you will receive on your Destination. To make sure you can handle the SenML optimally, take a look at our documentation about .
= Raw LoRa payload Extended
Raw LoRa payload Extended (v2)
This decoder also decodes data.
Example SenML
SenML can be structured in different ways, and we do not guarantee the examples below will look the same as what you will receive on your Destination. To make sure you can handle the SenML optimally, take a look at our documentation about .
› Decoded ThingsML for LoRa payload
› Decoded ThingsML for LoRa payload (v2)
This decoder also decodes data.
Example SenML
SenML can be structured in different ways, and we do not guarantee the examples below will look the same as what you will receive on your Destination. To make sure you can handle the SenML optimally, take a look at our documentation about .
= Raw LoRa payload encoding
Responses
200
Page of filtered HTTP bindings. Only bindings that are accessible to the caller are returned.
application/json
Page of items
idstring · uuidRead-onlyOptional
The id of the binding.
Example: 60e75fd6-44d2-474a-9557-39fbe246321e
typeDiscriminatorconst: http-streamlineRequired
The type of binding; must be 'http-streamline' for HttpStreamlineBinding.
Example: http-streamlinePossible values:
deviceIdone ofRequired
The id of the device that is bound to the HTTP connector by the binding.
Retrieve HTTP bindings, filtered by query parameters.
Create a new HTTP binding.
Retrieve a HTTP binding by ID.
Update a HTTP binding.
Delete a HTTP binding.
Retrieve LoRa bindings, filtered by query parameters.
get
Retrieve all LoRa bindings that match the query parameters given.
Required scopes
This endpoint requires the following scopes:
Authorizations
AuthorizationstringRequired
Bearer authentication header of the form Bearer <token>.
Query parameters
cursorstring · cursorOptional
String that encodes all necessary information to retrieve a page.
limitintegerOptional
Limit the number of results (per page).
Default: 50
sortstringOptional
Sorting fields separated by comma. Default order is Ascending (ASC), minus(-) should be used in front of field name for Descending (DESC) order.
Example: createdAt,-name
clientIdstring · uuidOptional
Include only LoRa bindings for devices that are owned by the provided clientId. If clientId is omitted, bindings from all devices owned by the calling client are included.
deviceIdone ofOptional
A device identifier in one of several supported formats.
Retrieve devices, filtered by search term and / or client ID.
get
Retrieve all devices that match the query parameters given. If a search parameter is provided, devices whose name or description (partially) match are returned.
Required scopes
This endpoint requires the following scopes:
Authorizations
AuthorizationstringRequired
Bearer authentication header of the form Bearer <token>.
Query parameters
cursorstring · cursorOptional
String that encodes all necessary information to retrieve a page.
limitintegerOptional
Limit the number of results (per page).
Default: 50
sortstringOptional
Sorting fields separated by comma. Default order is Ascending (ASC), minus(-) should be used in front of field name for Descending (DESC) order.
Example: createdAt,-name
qstring · min: 1Optional
Include only devices whose name or description contain the search term. Matching is done case-insensitively.
clientIdstring · uuidOptional
Include only owned devices that match the provided clientId. If clientId is omitted, all owned devices are included.
barcodestringOptional
Include only devices owned by the client partially matching barcode.
deviceSpecificationIdstring · uuid[]Optional
Filter devices by their device specification.
Example: null
createdBeforestring · date-timeOptional
Include only devices created before the provided date and time. The date-time must be in ISO 8601 format.
createdSincestring · date-timeOptional
Include only devices created at or after the provided date and time. The date-time must be in ISO 8601 format.
modifiedBeforestring · date-timeOptional
Include only devices modified before the provided date and time. The date-time must be in ISO 8601 format.
modifiedSincestring · date-timeOptional
Include only devices modified at or after the provided date and time. The date-time must be in ISO 8601 format.
itemsstring · enumOptionalPossible values:
Responses
200
Page of filtered devices. Only devices that are accessible to the caller are returned.
application/json
Page of items
idstring · uuidRead-onlyOptional
The id of the device
Example: 36e75427-4c6e-438c-89b5-0cbdb0d4068c
createdAtstring · date-timeRead-onlyOptional
The timestamp when the device is created in the system.
The Device Extended Unique Identifier (DevEUI) that identifies the LoRa node
Example: EA8FA35E2CF3489F
urnstringRead-onlyRequired
The URN for this network adapter
Example: urn:dev:DEVEUI:EA8FA35E2CF3489F:
Responses
201
The newly created network adapter.
application/json
post
/devices/{deviceId}/network-adapters
Update a network adapter.
put
The CellularNetworkAdapter.imei, GenericNetworkAdapter.dvnUuid and LoraNetworkAdapter.devEui properties may not be updated. Attempting an update with a value identical to the existing network adapter is a no-op and results in a 200 OK response returning the existing network adapter. Update attempts with different values will result in a 400 Bad Request response.
Required scopes
This endpoint requires the following scopes:
Authorizations
AuthorizationstringRequired
Bearer authentication header of the form Bearer <token>.
Path parameters
deviceIdone ofRequired
A device identifier in one of several supported formats.
A Device represents a single physical device that can send data to the platform. You can find all your devices when clicking Devices in the menu.
Devices page
On the Device page, you have an overview of all your Devices.
Elements on the page are:
Total number of Devices you have and see on the current page.
Device list of all your Devices with some information:
The Device name.
The Device type.
The primary identifier of your Device.
Search element to search for your specific Devices. You can search by Name and Primary identifier.
Link to Add a new Device.
Bulk manipulation options. Select some or all Devices and choose the bulk action from the action bar at the bottom of the page.
Sorting options, by clicking on a specific table header the table will sorted by the selected value.
A lock 🔒 icon for KPN Things devices. For such devices fewer editing options are available. See for a comparison of what you can do with KPN Things devices and Supported devices.
The most important difference is that:
Device deactivation can be used temporarily and is necessary when you want stop data from devices being send to devices.
As an example: a customer has not paid his invoice and in response this customer receives no data.
Deletion is permanent. After the deletion, you can't onboard this device again. You can delete the device via the Bulk manipulation options. KPN Things devices can only be deleted by KPN. Contact thefor this.
In the table below you can read about the differences between deleting a Device and deactivating a Device.
This page offers you all detailed information about your Device and its connectivity.
The elements on this page are:
General
Connectivity information card for your Device, depending on your network type:
for devices with LoRa connectivity.
The Device information card contains general information about your Device:
The name of your Device.
The Device type.
The of your Device, which you may be able to update.
The Flows linked to your Device.
Clicking on the Device name or Device type will open the with more information about your Device.
The LoRa information card contains more LoRa specific information of your Device.
The DevEUI of your Device.
The .
The moment KPN Things last received data from your Device.
Clicking on the DevEUI or the Type = LoRa part of the card will open the with all LoRa specific information of your Device.
The M2M information card contains more M2M specific information of your Device.
The IMEI of your Device.
The ICCID of the SIM card linked to your Device.
The MSISDN of the subscription linked to the SIM card in your Device.
The with the possibility to change its value.
Clicking on the IMEI or the white part of the card will open the with all M2M specific information of your Device.
The Internet information card contains more Internet specific information of your Device.
The SenML base name
The .
The moment KPN Things last received data from your Device.
Clicking on the base name or the white part of the card will open the Internet tab with all Internet specific information of your Device.
LoRa data history will show you all data and mac traffic sent to and from your Device up to one month ago. Learn more about .
On this tab you can send data or instructions to your Device, and you can see the status of requested data/instructions. Data to LoRa devices is also called a downlink.
Depending on your device type, different ways of sending data/instructions to your Device will be available. These could be:
- for own LoRa devices and supported LoRa devices.
- for any Things M2M or Internet device.
- for KPN devices. Learn more about .
To see which methods are available for your device type, you can check the .
Some Device types allow you to send raw LoRa data to your Device. To do this, you need to enter two values in the form as shown below:
FPort - the LoRa application port you want to send the data on.
Payload - the data you want to send to your Device in hexadecimal characters.
Things M2M devices and Internet devices can communicate with SenML. So downlinks to these devices should also be SenML.
The input form in the Portal should be filled in with a valid SenML measurement list formatted as JSON. . The entered SenML measurement list does not have to contain base values, KPN Things will add those before sending the downlink to the Device.
For KPN Devices we provide a predefined list of human readable commands that you can send to the Device. Simply select the desired command to send by clicking on the radio button (if multiple commands are available), select the desired value for the command from the drop down, and click submit.
If downlink is not available for your Device, you will see the following:
If your Device is not yet linked to a Flow, doing this could enable Downlink for your device. A Flow is required to enable an encoder that is required for downlink communication. Learn more about .
Often data or an instruction sent to your Device is not received immediately. Often the Device is in sleep mode and will be able to receive the data when it wakes up again. So to monitor the status of the requested data/instructions to your Device, you can check the downlink status table on this tab.
There are five downlink statuses, illustrated in the diagram below and further explained in the table below.
This tab shows you detailed information about your Device configuration:
Network info - The information required to register the Device to the correct network.
Device type - What type of Device it is.
Description (optional) - More information about your Device.
You can read more about the information that you can find on this tab.
If your LoRa Device is not yet registered on the LoRa network, you can click Register Device on Network here. This will open a modal for you to enter the LoRa network information for this Device.
The M2M tab shows you detailed information about your M2M connectivity. You can read more about the you can find on this tab.
Additionally, you can perform some M2M specific actions:
2. Edit M2M Device Configuration - allows you to generate a new shared secret for your M2M device.
3. Switch SIM card - allows you to administratively switch the SIM card of your M2M device.
4. Unlink SIM card- allows you to administratively remove the SIM card from your M2M device.
If your M2M Device is not linked to a SIM card, you can click Link Connectivity here. This will open a new page to allow you to link your Device to a SIM card. The steps you take for this action are the same as for .
In the Flows tab you can see:
A list of all the Flows your Device is linked to and the Project this Flow is in.
You can click on a Flow to open it.
You can click on Unlink from this Flow to remove the Device from that Flow.
If there is a possible issue with one of the Flows your Device is in, a warning icon is shown on the Flow tab link and in the row of the concerning Flow. By clicking on the warning icon of a Flow, you will continue to the Flow detail page displaying more information about the warning.
After you click on Link to another Flow in the Flows tab, a modal will open.
In this modal you can:
Select the Project to which you want to add the Device, if you have more than 1 Project.
Select the Flow to which to link your Device.
Optionally create a new Flow to which to link your Device.
Each Device in KPN Things will have a processing status. This will tell you whether data from and to that Device will be processed by KPN Things.
Status
Description
To connect a Device to KPN Things it needs either to be registered to our LoRa or M2M network, or it needs to be an Internet-connected device running our SDKs or other KPN Things compatible software.
Separate pages will explain more about the supported network types:
Shop
Order your devices and simcards
The KPN Webshop for IoT products has been combined with the KPN Webshop for other business market products. When multiple products are purchased, they will be displayed in this single environment.
You can only start if you have a MijnKPN account with the correct permissions to access the KPN Webshop.
No account yet!
Then ask your administrator to create an account. If case you don't know who is the administrator for your organization is, please contact us.
You have receIved an account?
Let's get started!
There are two ways to log in to the KPN IoT Webshop. This can be done via the MijnKPN or directly from the KPN Things Portal.
Log in with MijnKPN
1
Open MijnKPN via
2
Click on the KPN Hardwareshop link in the menu-item Products
3
The KPN IoT Webshop is a separate module, click on Log in with Grip to log in with your Single Sign On account
4
You are now in the KPN Webshop where you can choose the desired product group
1
Open the KPN Things Portal via or click on the Shop tab in the
In the shop tab, the available product groups are shown based on the IoT solutions used
2
To go directly to the desired product group select
3
We show all products by default, but in most cases you will want to be able to order an item directly for which you have a pricing agreement. By using the filter, only those items will be displayed.
If you want to view the products with pricing agreement, click on.
Switch 'Show only products within my pricing agreement'
Do you know the name of the item? Then you can search directly via the button.
If you want to view the products per product group, click on.
The desired type of product
View the specifications for a product
If you have checked the desired items and would like to order them, click on.
The or buttons to select the desired quantity
Add to shopping cart
Once you have added an item, it can be ordered via Continue to order. You can also include multiple items in one order and choose Continue shopping. It is also possible to add a non-KPN IoT product such as a mobile phone or accessory to the Shopping Cart. Please note that this will be processed as a separate delivery. These items are shipped separately and are not charged via the KPN IoT invoice.
When ordering SIM cards, it is possible to immediately choose additional options to ensure that they are delivered with the desired settings in Cisco Control Center.
Of course it is possible to change this afterwards in the KPN Things Portal or Cisco Control Center.
If more than one Account ID is in use, it is possible to indicate which account you want, cick on.
1. Select the Account ID
If you want to immediately select the desired communication plan and rate plan, click on.
default rate plan no
fill in the desired comm plan name
fill in the desired rate plan name
If you have chosen to place the order, check the Shopping Cart for the desired quantities and products. If the order is correct, click Continue ordering.
Based on the company details the company address is available. This information cannot be changed. In the next step you can choose to deliver the order to this address. If you want to have the order delivered somewhere else, you can choose a different address.
Because you are the one who places the order, we will inform you about the status. You do not have to adjust the information. If someone else is our Contact Person for this order, then please adjust the information here.
Choose here to use the company address as the delivery address. Or enter a different address.
Use the company address as the delivery address
Select a previously entered different address
Manually enter a different address
Reference details can be added for your own use, please fill in the following information.
Add an internal Purchase Order
Enter a Reference text
If there is a desired delivery date, please indicate it here.
The payment method cannot be changed. By default, the costs are included on the upcoming invoice as one-off costs.
You're done! Your order is now being processed.
Click on View my order. You will then receive an overview of all the order information.
You will receive a confirmation with the order number by e-mail. This is your reference if you have any questions about the order. You can track the status of your order in the KPN IoT Webshop. Click on the Track and Trace link in the email to open your order to follow its status.
Do you have any questions about the status of your order?
Is any information incorrect or is the desired delivery date very important? Please stating your order number and your question. We will always provide personal support.
It may be indicated in the ordering process for items that daily prices apply. These items are subject to price fluctuations of the components used. We immediately request a quote from the supplier for the ordered products.
After you have placed an order, you will first see it in the quotation overview.
When we receive the current prices we will contact you to determine whether the order can be processed. The order may always be adjusted or cancelled at that time.
If you expect to place order in large numbers in the coming period, you can provide a forecast. Deviating from the expectations later is permitted. But informing our suppliers in advance helps in anticipating planning and purchasing.
Would you like to provide a forecast? Then click on forecast in the menu.
Now provide a forecast of quantities for the products you expect to order.
Filter when needed by entering part of the product name, such as Business Grade, or a product code like K019
Enter the quantities per product in the month in which you expect to place the orde
Press ENTER to save the value
If you have new information, please adjust the forecast.
1. Click Configure Forecast to adjust the previous forecast
In this way you help us to prepare upcoming orders and ensure that our suppliers can respond to them on time.
Only the items for which your price is included in the contract can be ordered directly. You may want to include these in a favorite list for quick access.
If you have checked the desired items and would like to order them, click on.
The search icon
Type a part of the product name
Click on Look to open the item
If you found the desired item and would like to order them, click on.
The heart shaped favorite icon
If you want to view your selected items, open Favorite from the menu.
To order or remove an item from your favorite list, click on.
The In cart button to order the item
The heart shaped favorite icon to remove the item from your list
You can find all orders in the menu under Orders.
Open the order to show the order details.
The search field search for the order number you recieved by Email
Click on the order number to open for the order details
The order details give an overview of the order including the track and trace information and attached files.
Click the link for Track & Trace information
Download attached files like the packing slip
Resend the order delivery Email including the Track & Trace link
KPN LocationTag II
Also known as Security Tag.
Supported network type(s): KPNLORA
Device Specification ID: kpn-locationtag-ii
For LoRa this is the
DevEUI
For M2M the IMEI
For internet the DvnUUID
The moment Things last received a message from the Device.
The Project the Device belongs to.
The number of Flows your Device is in. Hover over the number to get a popup with a list of Flow names.
No, you can easily Activate the Device again in the Portal in bulk and individually.
Yes, the Device is removed from all KPN systems. You can not use this the device again.
Does it influence billing?
No, remove from Flow to have it stop being counted (applicable to Modular customers, E2E customers are being billed by information in C8Y)
Yes, because it is also removed from the Flow.
Impact on battery if Device is still turned on
Connection between Device and Network is not changed, so the Device continues operating as normal.
Network registration of Device is removed. Depending on how the Device is programmed it may continue operating as normal, but it will probably change to a more energy consuming mode because the device will (uselessly) try to reconnect to the Network.
Can you check the operation afterwards?
Yes, because the Device object still exists, only has the attribute "STATUS" changed to "Deactivated". But once the Device is reactivated, you cannot see when it has been deactivated.
No, the Device is completely removed from all systems.
When KPN Things does not receive acknowledgement of the successful delivery of the downlink, or if KPN Things receives a timeout on sending the downlink, the downlink will get the final state Failed.
Delivered
When the delivery of the downlink is acknowledged by the device, the downlink will be set on final state Delivered.
Barcode (optional) - The serial number of other code that is visible on the outside of the Device.
Name - A descriptive name of the Device.
Also you can add your Device to another Flow.
⚫ Deactivated
Your Device or SIM card is registered to the network, but labeled as Inactive, meaning incoming connections will not be accepted.
🔴 Failed
The Device could not be registered to the network. Probably the Network info you entered to register your Device was incorrect or already in use.
⚫ Inventory
Your Device and its Network information is known in the system but not yet registered to the network. If you want you can activate the network registration on the .
Deactivate Device
Delete Device
Why use it?
Temporarily disable data from Device. (example: disable data for sub customers)
The device is end of life and should be tossed out.
Can customers do it themselves?
Yes, in bulk and for individual devices.
[{"n":"door","v":1}]
[{"n":"door","v":1},{"n":"mode","vs":"quiet"}]
Status
Description
Pending
When a downlink is requested on the Actuator API the command will get the status Pending. This means the downlink is accepted by Things and will be processed shortly. If there is another downlink of the device already in Executing, the downlink will stay in Pending until the other downlink reaches a final status. Downlinks will be processed by KPN Things in order of request date, so FIFO.
After the previous downlink has been finalized, it can take up to an hour or so for the next pending downlink to be taken into execution. We are working on it to shorten this period.
Cancelled
Pending downlinks can be cancelled. Since a pending downlink is not yet being processed by network systems, KPN Things can safely remove the downlink from its queue. Cancelled downlinks will not be processed any further and will get the final status Cancelled.
It is not possible to cancel a downlink that is in Executing, since we cannot guarantee the withdrawal of a downlink request that is already being executed by the network system.
Executing
When there is at least one downlink in the queue for a device, so with status Pending, it will be processed further by the system. It will then be de-normalized and sent to the device. During de-normalization, sending and waiting for feedback on delivery, the downlink is in Executing.
Only one downlink per device can be in Executing.
🟢 Active
Data coming from and going to your Device will be processed.
⚫ Deactivated
Data coming from your Device will not be processed or forwarded by KPN Things. Also downlinks will not be sent to your Device. Data history will still be available, since Things will still accept data from your Device.
The network connection is not denied.
⚫ Not yet linked
Your Device is not connected to a Flow, so data will not be processed in KPN Things.
Status
Description
⚪ Not yet linked to a network
Your Device is added to KPN Things, but Network information is still missing in able to register your Device to the network.
🔵 Pending create
Your Device is being registered to the network.
🟢 Active
Your Device or SIM card is registered to the network and should be able to join and send data.
Deactivate or delete Device
Device detail page
Device information card
LoRa information card (only for devices with LoRa connectivity)
M2M information card (only for devices with M2M connectivity)
Internet information card (only for devices with Internet connectivity)
"LoRa data" tab (only for devices with LoRa connectivity)
"Send instruction" tab
Currently you can only send data to your Device if your Device is linked to at least one Flow!
You are now in the KPN Webshop directly in the product group you selected in the KPN Things Portal
click on continue ordering
Save the entered address as a new address to select from the list later
Open MijnKPN
Open the KPN Hardwareshop
Log in with Grip
You are now in the webshop
Log in with KPN Things Portal
Open the shop tab
Select product group
Fewer items may be visible on your shop. More items will be only shown when an additional connectivity type is activated in the portal.
Search and select
Show ony products within pricing agreement
We show all available products by default, as there may be an item that is relevant for you. When you place an order for an item for which no pricing agreement is yet in place, we receive a request for quotation. We will then review the product together with you to see whether it fits within your portfolio.
From that moment on, the item can be ordered directly.
Search for an item
Add an item to the shopping cart
Multiple articles in a single order
Order simcards
Place an order
Check your order
Shipping details
Contact details
A phone number must not contain spaces.
So add the number as +5511912345678 and not +55 11 91234 5678.
Delivery adress
It is very important that the delivery address is complete. The information is necessary to prevent packages from getting lost or being held up by customs authorities because informatie is not clear.
Information needed:
name, phone and email information of the receiver
full adress including district of state information
additional information like docking station or gates on location
In case an adress is saved as a new adress our team is able to check if the information is complete and correct the information if nessacary before sending the order to logistics. When an order is placed using a one-time address, we are forced to reject the order and will contact you to ensure the order is placed correctly, in order to prevent the mentioned issues.
Reference details and confirmation
Requested delivery data and payment method
We do our best to meet the requested delivery date. If the date is not feasible, we will contact you.
Your order has been placed
Confirmation and order status
Track your order status
Current prices and forecasting
Current prices via quotation
Indicating order expectations
If there is no input field for a month in question, it is no longer possible to provide a forecast for it. In case an order is placed for that month, the products are shipped according to the standard delivery times that apply to the product.
Once you have entered a forecast value in a field, don't forget press ENTER to save it! If you want to change the value, simply enter a new number and press ENTER again to overwrite the previous one.
A reliable and up-to-date forecast helps us to deliver your order as quickly as possible.
SenML can be structured in different ways, and we do not guarantee the examples below will look the same as what you will receive on your Destination. To make sure you can handle the SenML optimally, take a look at our documentation about .
› Decoded payload for Medical Tracker application
› Decoded payload for Medical Tracker application (v2)
This decoder also decodes data.
Example SenML
SenML can be structured in different ways, and we do not guarantee the examples below will look the same as what you will receive on your Destination. To make sure you can handle the SenML optimally, take a look at our documentation about .
‹ Encoded device modes for Asset Recovery application
Tailored user management
Configure users, roles and permissions
You and your team want secure and sustainable access to your IoT solution, with full insight and control. To achieve this, assigning the right roles and permissions is essential.
To achieve this, assinging the right roles and permissions is done in GRIP. This Identity and Access Management platform is developed by KPN, specifically designed for Business Users. It enables organizations to securely and efficiently manage access to their applications and services.
To assign roles, you must be an admin of the account. As an administrator, you can add or remove users and configuratie roles and permissions for your services.
As a Tailored customer, connectivity can be managed either in the KPN Things Portal or in Cisco Control Center. User management is handled separately within the respective tool.
To manage users and roles, you need admin rights
Already an admin? Great! Let’s get started!
Not an admin yet? Ask your organization’s administrator to grant you admin rights
Not sure who that is? Contact us and we’ll help you out
The information below explains how to manage users, including adding and removing users, and managing roles and permissions.
Once you have accessed the User Management section in GRIP, you can perform several actions to control access within your organization.
Review existing users, add and delete users
View the list of all users in your organization, including their roles and assigned services. Invite new team members by creating users accounts or deleting users who no longer need access to your services.
Edit or give permissions to an added or existing user
Modify user information, roles and permissions to ensure they have the correct level of access to your services.
In the User Management table, you can see all current users along with their assigned roles and permissions. This overview helps you quickly check who has access to which services.
Add, Remove or Modify Users
To add a new user, click Add User at the top of the page
To modify a user, click the three dots ⋮ and select Edit
To remove a user, click the three dots ⋮ and select Deactivate or Delete
Modify users
For a New User you click on the Add User at the top of the page and provide the general information.
1
Provide the general information
Fill in the general details of the new user
Select the Send email to set password option to send a password email immediately. This can also be done at a later time, for example after you’ve configured all roles and permissions.
Click the Add User button
After adding the user, the next screen opens where you can optionally enter additional information about the user. This information is not required for using your account, but it can be used for your own administration.
Add additional general details (optional)
Add even more information like job title or office location (optional)
Select the preferred language setting
1
Select Services and Roles
Navigate to the Services and Roles tab
If the user should be able to manage other users, enable the Admin role
Click Save Changes
Click + Assign services and roles button to add specific services
Select the appropriate services and roles based on the user’s responsibilities. The example below grants the user full access to the features within the KPN IoT solution.
The below list shows the available roles for services that are used within the KPN IOT solution and describes what levels of access each of the roles gives to the user in KPN Things portal.
The central identity solution behind every account
Provides the user with an Admin account to access and give assigned services.
Role
Description
Access
Admin
Full user management, including own account.
View and manage services and roles of other users; add, modify or remove users.
The foundation for your IoT applications
The starting point for your IoT service and manage the IoT solution.
We advise that every user has a Things Manager and Things Support role.
These roles are only needed if you manage your devices, decoders and scripts via KPN Things. If only connectivity features are used, these roles are not required.
Role
Description
Access
Things Creator - Admin
Full access to Things Creator tab.
Add modify or remove devices types, decoders and scripts.
Things Creator - Read Only
Read-only access to Things Creator tab.
View device types, decoders, and scripts.
We recommend granting the user at least KPN Things - Read Only access. This ensures insights into the IoT solution and enables options such as making exports of connectivity items available.
Role
Description
Access
Things Manager - Admin
Full access to Things Manager tab.
Add, modify, or remove devices, flows, destinations and manage connectivity.
Things Manager - Editor
Full access except for deleting to Things Manager tab.
Add, modify, or remove devices, flows, destinations and manage connectivity except the right to delete.
We advise that every user has access to this role in order to see important documents and access to links to contact information and ServiceNow be able to log tickets. Assigning this role also subscribes you to service emails.
Role
Description
Access
Things Support - User
Access to the Things Support tab.
View news, release notes, documents, service status, reports and contact info and recieve service emails.
Provides access to the Service Portal for reporting incidents and service request
The Self Service Portal allows users to register and track tickets for incidents, information requests, change requests, and complaints. We recommend granting access to all users and ensuring each user profile includes the correct phone number and language setting (found under the Location section in User Settings).
Role
Description
Access
ICT Manager
Access to Self Service Portal.
Register and track tickets for incidents, information requests, change requests and complaints.
Provides access to te KPN Webshop
Grants the user access to the KPN Webshop. If any of the webshop-related roles are assigned, the Shop tab will automatically become visible and accessible in the KPN Things Portal.
Role
Description
Access
Forecasting
Enables forecasting functionality.
Enables product forecasting for specific calendar periods, allowing KPN to align stock levels with expected demand
Quotation
Enables ordering and requesting quotations.
Enables to order products and request quotations for items that are not currently covered by an existing contract. Additionally, user can view the status and history of their orders.
Provide access to MijnKPN Zakelijk functions
This provides the user with access to the MijnKPN Zakelijk service portal. It gives access to the available services.
The information below explains how to manage users, including adding and removing users, and managing roles and permissions.
Once you have accessed the User Management section in GRIP, you can perform several actions to control access within your organization.
Review existing users, add and delete users
View the list of all users in your organization, including their roles and assigned services. Invite new team members by creating users accounts or deleting users who no longer need access to your services.
Edit or give permissions to an added or existing user
Modify user information, roles and permissions to ensure they have the correct level of access to your services.
In the User Management table, you can see all current users along with their assigned roles and permissions. This overview helps you quickly check who has access to which services.
Add, Remove or Modify Users
To add a new user, click Add User at the top of the page
To modify a user, click the three dots ⋮ and select Edit
To remove a user, click the three dots ⋮ and select Deactivate or Delete
Modify users
For a New User you click on the Add User at the top of the page and provide the general information.
1
Provide the general information
Fill in the general details of the new user
Select the Send email to set password option to send a password email immediately. This can also be done at a later time, for example after you’ve configured all roles and permissions.
Click the Add User button
After adding the user, the next screen opens where you can optionally enter additional information about the user. This information is not required for using your account, but it can be used for your own administration.
Add additional general details (optional)
Add even more information like job title or office location (optional)
Select the preferred language setting
1
Select Services and Roles
Navigate to the Services and Roles tab
If the user should be able to manage other users, enable the Admin role
Click Save Changes
Click + Assign services and roles button to add specific services
Select the appropriate services and roles based on the user’s responsibilities. The example below grants the user full access to the features within the KPN IoT solution.
The below list shows the available roles for services that are used within the KPN IOT solution and describes what levels of access each of the roles gives to the user in KPN Things portal.
The central identity solution behind every account
Provides the user with an Admin account to access and give assigned services.
Role
Description
Access
Admin
Full user management, including own account.
View and manage services and roles of other users; add, modify or remove users.
The foundation for your IoT applications
The starting point for your IoT service and manage the IoT solution.
We advise that every user has a Things Manager and Things Support role.
This role is needed to view contract and usage information that is used as input for the invoice. It also allows you to see which costs will be charged on the upcoming invoice.
Role
Description
Access
Finance - Read Only
Read-only access to invoices and contracts in the Things Portal.
View contract and usage information that is used as input for the invoice. It also allows you to see which costs will be charged on the upcoming invoice.
These roles are only needed if you manage your devices, decoders and scripts via KPN Things. If only connectivity features are used, these roles are not required.
Role
Description
Access
Things Creator - Admin
Full access to Things Creator tab.
Add modify or remove devices types, decoders and scripts.
Things Creator - Read Only
Read-only access to Things Creator tab.
View device types, decoders, and scripts.
We recommend granting the user at least KPN Things - Read Only access. This ensures insights into the IoT solution and enables options such as making exports of connectivity items available.
Role
Description
Access
Things Manager - Admin
Full access to Things Manager tab.
Add, modify, or remove devices, flows, destinations and manage connectivity.
Things Manager - Editor
Full access except for deleting to Things Manager tab.
Add, modify, or remove devices, flows, destinations and manage connectivity except the right to delete.
We advise that every user has access to this role in order to see important documents and access to links to contact information and ServiceNow be able to log tickets. Assigning this role also subscribes you to service emails.
Role
Description
Access
Things Support - User
Access to the Things Support tab.
View news, release notes, documents, service status, reports and contact info and recieve service emails.
Provides access to the Service Portal for reporting incidents and service request
The Self Service Portal allows users to register and track tickets for incidents, information requests, change requests, and complaints. We recommend granting access to all users and ensuring each user profile includes the correct phone number and language setting (found under the Location section in User Settings).
Role
Description
Access
ICT Manager
Access to Self Service Portal.
Register and track tickets for incidents, information requests, change requests and complaints.
Provides access to te KPN Webshop
Grants the user access to the KPN Webshop. If any of the webshop-related roles are assigned, the Shop tab will automatically become visible and accessible in the KPN Things Portal.
Role
Description
Access
Forecasting
Enables forecasting functionality.
Enables product forecasting for specific calendar periods, allowing KPN to align stock levels with expected demand
Quotation
Enables ordering and requesting quotations.
Enables to order products and request quotations for items that are not currently covered by an existing contract. Additionally, user can view the status and history of their orders.
Provide access to MijnKPN Zakelijk functions
This provides the user with access to the MijnKPN Zakelijk service portal. It gives access to the vailable services.
Role
Description
Access
Facturen (Invoices)
View invoices in PDF format.
Allows user to view all invoices in PDF format that are linked to the same KPN Reference Number (KRN), which is your company’s unique identifier within KPN.
User management in Cisco Control Center is explained in detail in the Help section of the application.
Below is a quick guide so you can easily find this information.
1
Log in and click on Help at the top of the page
2
Type Managing Users in the search field
Click Managing Users
Or select Managing Users from the index under User Guide
3
Click the topic you want to learn more about
Can’t find the information or still have questions? Contact us and we’ll help you out
Before you start
Access the User Management section
Via KPN Things Portal
Via MijnKPN Zakelijk
Via direct link
Managing Users in GRIP
What functionalities do you have
Why this matters
Managing users and permissions in GRIP ensures that only authorized individuals can access your applications and IoT services. This helps maintain security and compliance across your organization.
Review existing users, add and delete users
To give you the opportunity to reactivate an account without having to create it again, a deleted user will remain visible in the overview for 10 days before it is completely removed.
Edit or give permissions to an added or existing user
Assigning Services and Roles
Services and Roles explained
Make sure to select only one role per item
If you choose multiple roles - such as Thing Manager - Admin and Thing Manager - Read Only - the lowest role will override the highest.
In this example, you would only have Read Only access.
Things Creator
Things Manager
Things Support
To be able to log tickets in ServiceNow also the ICT Manager role must be granted in Self Service Portal.
The 'Things Support - User' role must be assigned to access the Self Service Portal via in the KPN Things Portal.
Please note that you must have at least the Quotation role assigned to be able to place orders.
Access the User Management section
Via KPN Things Portal
Via MijnKPN Zakelijk
Via direct link
Managing Users in GRIP
What functionalities do you have
Why this matters
Managing users and permissions in GRIP ensures that only authorized individuals can access your applications and IoT services. This helps maintain security and compliance across your organization.
Review existing users, add and delete users
To give you the opportunity to reactivate an account without having to create it again, a deleted user will remain visible in the overview for 10 days before it is completely removed.
Edit or give permissions to an added or existing user
Assigning Services and Roles
Services and Roles explained
Make sure to select only one role per item
If you choose multiple roles - such as Thing Manager - Admin and Thing Manager - Read Only - the lowest role will override the highest.
In this example, you would only have Read Only access.
Finance
This feature is not yet available for Tailored customers. Invoices in PDF format are available via Facturen (Invoices) in the MijnKPN Zakelijk portal.
Learn more about the finance information on the page.
Things Creator
Things Manager
Things Support
To be able to log tickets in ServiceNow also the ICT Manager role must be granted in Self Service Portal.
The 'Things Support - User' role must be assigned to access the Self Service Portal via in the KPN Things Portal.
Please note that you must have at least the Quotation role assigned to be able to place orders.
Cisco Control Center User Management
› Decoded payload for Device Management
aec28f98-7e78-4eb9-a314-04f435219bc5
Decoder for Streamline LoRa short payloads, containing firmware version, mode, and battery status.
› Decoded payload for Device Management (v2)
c0d1ea0f-2470-5f88-897c-c1ec25f360d6
Decoder for Streamline LoRa short payloads, containing firmware version, mode, and battery status.
› Decoded payload for Medical Tracker application
9e8b2100-537d-46f8-ab21-4fad11d04bc9
Decoder for Streamline LoRa message type 0xD282 containing only temperature and movement bit.
› Decoded payload for Medical Tracker application (v2)
6a7a4ef4-e7a3-5eab-90ba-6901cf360d08
Decoder for Streamline LoRa message type 0xD282 containing only temperature and movement bit.
numeric
51.79
longitude
numeric
4.68
radius
m
319
locAccuracy
%
locPrecision
%
locTime
timestamp
1637165561
V
3.58
batteryLevelLow
boolean
false
indicates if the battery voltage has been below the threshold
timeOrigin
string
NETWORK
indicates the origin of the timestamp
firmwareVersion
string
firmware info, only sent after device boot
firmwareCRC
string
firmware info, only sent after device boot
settingsCRC
string
settings info, only sent after device boot
batteryVoltage
number
V
firmwareCRC
string
Firmware info, only sent after device boot
firmwareVersion
string
Firmware info, only sent after device boot
mode
string
"active"
Operation modus. Either "production", "active", "presales" or "missing")
View devices, flows, destinations and connectivity.
Read Only
Read only access of products and prices.
View product details and prices, order status and order history.
Voucher Manager
Manage discount vouchers.
Process discount vouchers.
Things Manager - Read Only
Read only access to Things Manager tab.
View devices, flows, destinations and connectivity.
Read Only
Read only access of products and prices.
View product details and prices, order status and order history.
Voucher Manager
Manage discount vouchers.
Process discount vouchers.
KPN IoT Services
User Management for KPN services in GRIP
Cisco Control Center
User Management for Cisco Control Center users
If the user is a contact person for operational matters, it is advisable to provide a phone number and the correct language setting so that our service desk can reach you when needed.
The admin is responsible for assigning thecorrect permissions to the user. Please note that someone with admin rights can also grant themselves additional permissions.
Digital Matter has a broad range of both wired and battery powered GPS trackers.
All types are supported by the same decoder. Therefore there's no specific page per device type. However not every message and field is decoded for each type and not every device is able to generate every field.
Currently KPN does not support adding your own Digital Matter devices.
Digital Matter devices have a flexible message layout. Depending on the device-type, the device configuration and state at a given time some SenML records may be present or not.
The message includes blocks of SenML records that are named with a prefix. In some cases, a block of SenML records is sent multiple times within a message. When this occurs, an index is included in the record name.
For example, in the case of a Wi-Fi scan result, the signal strength of each scanned Wi-Fi access point is sent, and the names of the records are made unique using an index (wifiscan:macs:<index>:signalStrength), with an index of 0 for the first Wi-Fi scan result. The corresponding MAC address can then be found in another SenML record with the same prefix (wifiscan:macs:<index>:mac).
SenML can be structured in different ways, and we do not guarantee the examples below will look the same as what you will receive on your Destination. To make sure you can handle the SenML optimally, take a look at our documentation about .
Devices may output different types of information depending on their type and configuration. Not all the details below may apply to every device.
Digital Matter devices can generate a large volume of data, which may result in the output being split across multiple messages at the destination. To handle this correctly, the receiving system may need a buffering mechanism to combine these messages into a single logical unit.
All messages contain fields that identify the device, indicate the timestamp and the message sequence number.
name
type
unit
example
description
Example:
name
type
unit
example
description
Example:
name
type
unit
example
description
Example:
name
type
unit
example
description
Example:
name
type
unit
example
description
Example:
Some Digital Matter devices are capable of scanning for nearby cell towers. This data can be combined with other information to approximate the current location of the device. When the device provides a cell tower scan report, the decoder will generate SenML records similar to the following:
name
type
unit
example
description
Example:
There are many types of Bluetooth tags (vendors of tags), and depending on the tag type, records may or may not be present in the device messages. For the following tag types, all reported records are decoded:
Apple iBeacon
Eddystone
EddystoneTLM
Generic Tag
This list may be extended in future versions of the decoder. For these tags, the following SenML records are forwarded:
name
type
unit
example
tag-types
description
Example:
For the other tag types, raw data is forwarded:
name
type
unit
example
description
Example:
name
type
unit
example
description
Example:
name
type
unit
example
description
Example:
For devices that report WiFi access points, KPN Things automatically determines the corresponding geographic location. The resulting location information is then added to the SenML record. If the device is configured to fall back to cell-tower data, KPN Things will also attempt to resolve this information to a location whenever possible. In some cases, the provided data cannot be translated into a reliable position. When this occurs, the location resolution process fails, which can be identified by checking the returned status code.
name
type
unit
example
description
Example:
For some fields, decoder logic has not yet been implemented but can be added in future versions. The data is forwarded as an undecoded hex string, allowing for customer-side decoding. This applies to the following fields:
driverOperatorID
sdi12DeviceIdentification
sdi12Measurement
int32AnalogueData
name
type
unit
example
description
Example output for an undecoded field (specific devices only):
Devices supporting multiple localization methods (e.g., GPS and WiFi) might report both. To determine which is more recent, compare the gps:timestamp with the ts of the WiFi data. Since devices always send their last known GPS location, the gps:timestamp reflects when the GPS fix was obtained, while the message ts shows when it was sent.
If both GPS and WiFi data have recent timestamps, use the radius field to compare their accuracy.
Sometimes it's not possible to resolve the WiFi access points to a reliable location. We make this transparent through the extLocationResolveStatusCode.
When multiple devices scan for Bluetooth tags, they may report the same tag. If it's important to establish a relationship between a specific device and a tag, implement logic to determine which device should be associated with which tag.
number
count
Contains the messages record number that is incremented for a group of records within the message
number
1724758046
Seconds since 1/1/1970
gps:latitude
number
lat
51.9071025
gps:longitude
number
lon
4.4891488
gps:altitude
number
m
54
gps:speed
number
m/s
1
gps:speed:accuracyEstimate
number
m/s
0.013
gps:heading
number
rad
1.5707963267948966
gps:accuracy:positionDilutionOfPrecision
number
/
0.5
gps:accuracy:radius
number
m
65
gps:fix:valid
boolean
true
gps:fix:threeDimensional
boolean
true
gps:fix:reused
boolean
false
string
01010001...
Bitstring of 32 bits
digitalData:outputs
string
01010001...
Bitstring of 16 bits
digitalData:flags:tripStatus
boolean
true
digitalData:flags:internalBatteryGood
boolean
true
digitalData:flags:externalPowerGood
boolean
true
digitalData:flags:connectedToGsm
boolean
true
digitalData:flags:shuntingPowerFromBattery
boolean
true
digitalData:flags:externalPowerEnabled
boolean
true
digitalData:flags:magnetAbsent
boolean
true
digitalData:flags:recoveryModeActive
boolean
true
digitalData:flags:deviceSpecificBits
string
01010001
Bistring containing 8 device specific bits
number
V
3.3
analogueData:externalBatteryVoltage
number
V
12
analogueData:internalTemperature
number
Cel
25
analogueData:gsmSignalStrength
number
dBW
40
analogueData:loadedBatteryVoltage
number
V
11.5
analogueData:remainingBatteryPercentage
number
V
85
analogueData:<analogueNumber>
number
1234
Unknown analogue data reported by the device
string
001122334455
The mac address of the Wifi Access Point
wifiscan:macs:<index>:signalStrength
number
dBW
-80
The measured signal strength
wifiscan:macs:<index>:channel
string
1
The Wifi channel
string
123456789
Cell ID
celltowerscan:<index>:locationAreaCode
string
1234
Location Area Code
celltowerscan:<index>:mobileCountryCode
string
204
Mobile Country Code (MCC)
celltowerscan:<index>:mobileNetworkCode
string
69
Mobile Network Code (MNC)
Teltonika Eye Beacon / Sensor (reported as Teltonika Eye Beacon)
Digital Matter beacon format (reported as Guppy)
tag:<index>:tagLogReason
string
Tag Found
Indicates a reason for reporting this tags data
tag:<index>:type
string
Eddystone
Type bluetooth tag
tag:<index>:type:id
string
Generic Tag
Type Id for Generic Tag
tag:<index>:data
string
Generic Tag
Undecoded data bytes, if any
tag:<index>:rssi
number
dBW
-45
All
tag:<index>:mac
string
665544332211
All
tag:<index>:txPower
number
dBW
54
iBeacon, Eddystone, Teltonika Eye Beacon, Guppy
tag:<index>:uuid
string
iBeacon
tag:<index>:id:major
string
iBeacon
tag:<index>:id:minor
string
iBeacon
tag:<index>:namespaceId
string
001122334455667899
Eddystone,Teltonika Eye Beacon
tag:<index>:instanceId
string
889977665544
Eddystone,Teltonika Eye Beacon
tag:<index>:batteryVoltage
number
V
EddystoneTLM,Teltonika Eye Beacon, Guppy
tag:<index>:temperature
number
Cel
EddystoneTLM,Teltonika Eye Beacon, Guppy
In case of Teltonika only reported by the Teltonika Eye Sensor variant
tag:<index>:advertisementFrameCount
number
count
EddystoneTLM
tag:<index>:timeSinceLastBoot
number
s
EddystoneTLM
tag:<index>:humidity
number
%RH
Teltonika Eye Beacon
Only reported by the Teltonika Eye Sensor variant
tag:<index>:magneticFieldDetected
boolean
Teltonika Eye Beacon
Only reported by the Teltonika Eye Sensor variant
tag:<index>:movementDetected
boolean
Teltonika Eye Beacon
Only reported by the Teltonika Eye Sensor variant
tag:<index>:movementCounter
number
count
Teltonika Eye Beacon
Only reported by the Teltonika Eye Sensor variant
tag:<index>:devicePitch
number
rad
Teltonika Eye Beacon
Only reported by the Teltonika Eye Sensor variant
tag:<index>:deviceRoll
number
rad
Teltonika Eye Beacon
Only reported by the Teltonika Eye Sensor variant
tag:<index>:batteryLow
boolean
Teltonika Eye Beacon
tag:<index>:serial
string
112233
Guppy
tag:<index>:gps:time
number
Not always reported by the device
tag:<index>:gps:latitude
number
lat
Not always reported by the device
tag:<index>:gps:longitude
number
lon
Not always reported by the device
tag:<index>:gps:accuracy:radius
number
m
Not always reported by the device
string
Ingics iBS04 Tag
Type bluetooth tag
tag:<index>:data
string
Undecoded data bytes, if any
string
01020304
Undecoded data bytes, if any. Else: 'No data'
string
CAT-M1 cell towers
detailedCellTowerScan:cellId
string
10517016
detailedCellTowerScan:locationAreaCode
string
3190
detailedCellTowerScan:mobileCountryCode
string
204
detailedCellTowerScan:mobileNetworkCode
string
8
detailedCellTowerScan:timingAdvanceTs
number
count
123
detailedCellTowerScan:<index>:downlinkEARFCN
string
1575
detailedCellTowerScan:<index>:physicalCellID
string
513
detailedCellTowerScan:<index>:rsrp
number
dBW
153
Received Signal Reference Power
detailedCellTowerScan:<index>:rsrq
number
dBW
-39
Received Signal Reference Quality
detailedCellTowerScan:<index>:timingDifference
number
ms
54
number
lat
Latitude as resolved
longitude
number
lon
Longitude as resolved
radius
number
m
Expected accuracy of resolved location
locOrigin
string
WIFI
WIFI if only based on wlan information
CELLTOWER if no wlan information is present and the location could be resolved based on celltower
WIFI+CELLTOWER if a combination is used
blobNotification
device3rdPartyAsyncMessage
projectCode
tripTypeCode
consoleData
rfTagData
rfTagLost
deviceTripTypeAndData
garminFmiStopResponse
accidentData
accelerometerTraceHeader
accelerometerTraceSamples
v5RFMessage
handHeldRadioGpsData
highGEvent
tripDistanceTripDuration
deviceOdometerRunHours
imageData
sdi12Measurement2
swarmGpsData
multiCellTowerScan
accelerometerSampleData
fieldId:<fieldId> (unrecognized field)
boolean
false
Flag to indicate the data has been decoded or not
<fieldName>:data
string
01020304
Undecoded data bytes
Digital Matter
25179211-a3b6-567f-ad9a-f9a83ac0a17e
Decoder for Digital Matter devices.
Digital Matter Debugging
48b93005-1719-599d-8f43-c56471c8c644
Decoder for Digital Matter devices with extra debug information
timeOrigin
string
Can be 'DEVICE' if the timestamp in this record is originated by the device or 'NETWORK'
gps:logReason
string
Start of trip
Indicates a reason for reporting this data
digitalData:logReason
string
Start of trip
Indicates a reason for reporting this data
analogueData:logReason
string
Start of trip
Indicates a reason for reporting this data
wifiscan:logReason
string
Start of trip
Indicates a reason for reporting this data
celltowerscan:logReason
string
Start of trip
Indicates a reason for reporting this data
tag:logReason
string
Start of trip
tag:logReason
string
Start of trip
Indicates a reason for reporting this data
GNSSLocationScan:logReason
string
Start of trip
Indicates a reason for reporting this data
detailedCellTowerScan:logReason
string
Start of trip
Indicates a reason for reporting this data
extLocationResolveStatusCode
string
200
Status code of the location resolving service.
-1 - Resolving service unavailable or insufficient input data
200 - OK
400/404 - Could not resolve location based on the input measurements
401/403/405/413/414/415/429 - Failed to resolve location, internal error
500/503 - Failed to resolve location, internal error
SenML can be structured in different ways, and we do not guarantee the examples below will look the same as what you will receive on your Destination. To make sure you can handle the SenML optimally, take a look at our documentation about Understanding and Interpreting SenML Data.
SenML can be structured in different ways, and we do not guarantee the examples below will look the same as what you will receive on your Destination. To make sure you can handle the SenML optimally, take a look at our documentation about Understanding and Interpreting SenML Data.
SenML can be structured in different ways, and we do not guarantee the examples below will look the same as what you will receive on your Destination. To make sure you can handle the SenML optimally, take a look at our documentation about Understanding and Interpreting SenML Data.
SenML can be structured in different ways, and we do not guarantee the examples below will look the same as what you will receive on your Destination. To make sure you can handle the SenML optimally, take a look at our documentation about Understanding and Interpreting SenML Data.
SenML can be structured in different ways, and we do not guarantee the examples below will look the same as what you will receive on your Destination. To make sure you can handle the SenML optimally, take a look at our documentation about Understanding and Interpreting SenML Data.